Weider Pro 9655 English Manual - Page 8
OCD OO
 |
View all Weider Pro 9655 manuals
Add to My Manuals
Save this manual to your list of manuals |
Page 8 highlights
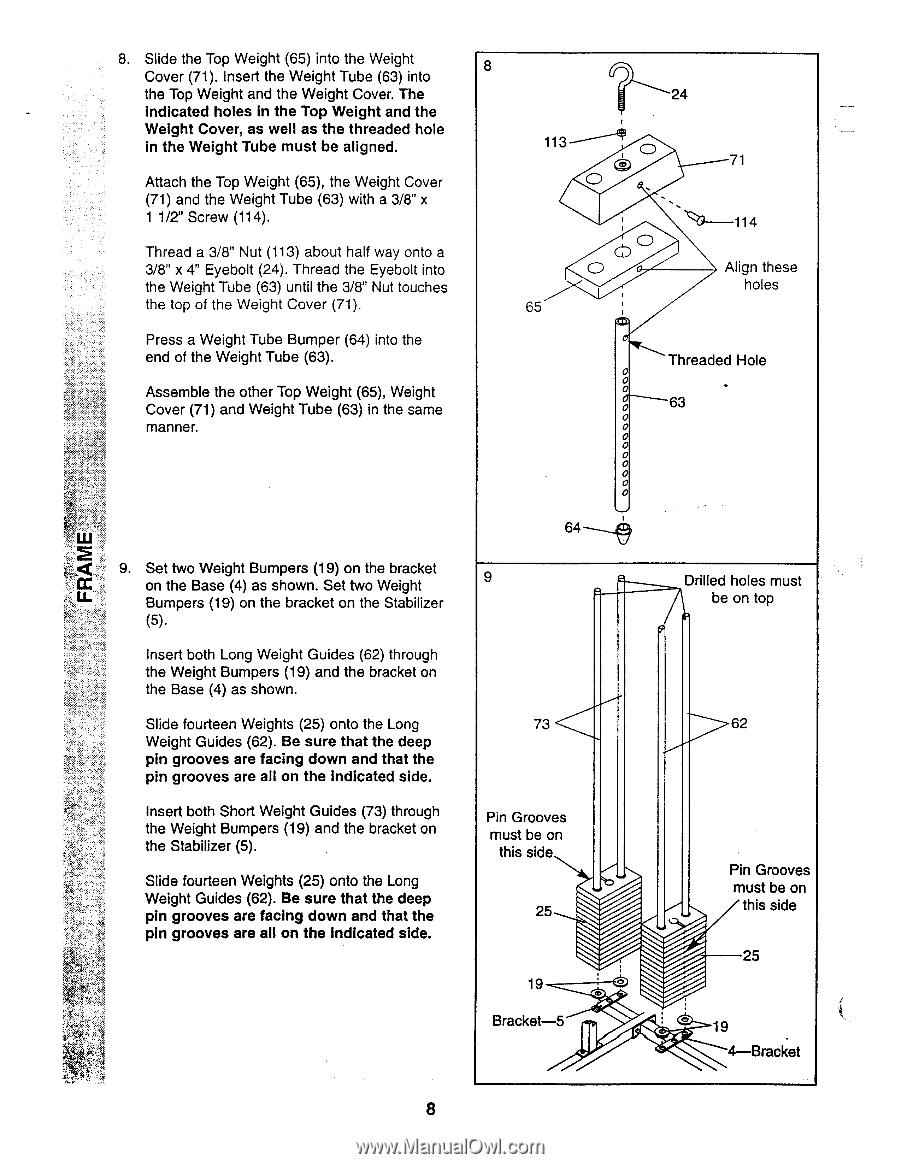
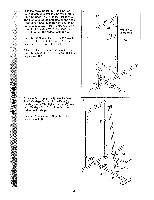
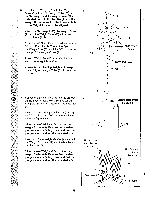
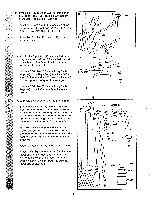
8. Slide the Top Weight (65) into the Weight 8 Cover (71). Insert the Weight Tube (63) into the Top Weight and the Weight Cover. The 24 indicated holes in the Top Weight and the Weight Cover, as well as the threaded hole in the Weight Tube must be aligned. O 71 Attach the Top Weight (65), the Weight Cover 0 (71) and the Weight Tube (63) with a 3/8" x 1 1/2" Screw (114). 114 Thread a 3/8" Nut (113) about half way onto a 3/8" x 4" Eyebolt (24). Thread the Eyebolt into the Weight Tube (63) until the 3/8" Nut touches O 0 Align these holes the top of the Weight Cover (71). 65 Press a Weight Tube Bumper (64) into the end of the Weight Tube (63). Assemble the other Top Weight (65), Weight Cover (71) and Weight Tube (63) in the same manner. Threaded Hole • 63 Set two Weight Bumpers (19) on the bracket on the Base (4) as shown. Set two Weight Bumpers (19) on the bracket on the Stabilizer (5). Insert both Long Weight Guides (62) through the Weight Bumpers (19) and the bracket on the Base (4) as shown. Slide fourteen Weights (25) onto the Long Weight Guides (62). Be sure that the deep pin grooves are facing down and that the pin grooves are all on the indicated side. Insert both Short Weight Guides (73) through the Weight Bumpers (19) and the bracket on the Stabilizer (5). Slide fourteen Weights (25) onto the Long Weight Guides (62). Be sure that the deep pin grooves are facing down and that the pin grooves are all on the indicated side. 9 73 Pin Grooves must be on this side 25 19 CD Bracket-5 8 Drilled holes must be on top 62 Pin Grooves must be on this side 25 O 19 4-Bracket
-
 1
1 -
2
-
 3
3 -
 4
4 -
 5
5 -
 6
6 -
 7
7 -
 8
8 -
 9
9 -
 10
10 -
 11
11 -
 12
12 -
 13
13 -
14
-
15
-
16
-
17
-
18
-
19
-
20
-
21
-
22
-
23
-
24
-
25
-
26
-
27
-
28
-
29
-
30
-
31
-
32
-
33
-
34
-
35
-
36
-
37
-
38
-
39
-
40
 |
 |