Western Digital WD20000H2Q-00 User Manual - Page 11
Setting Up - driver
 |
View all Western Digital WD20000H2Q-00 manuals
Add to My Manuals
Save this manual to your list of manuals |
Page 11 highlights
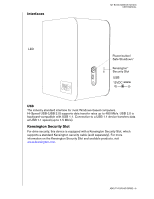
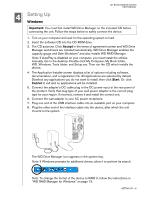
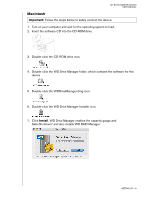
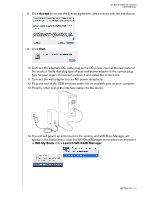
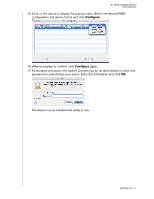
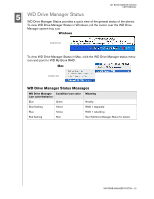
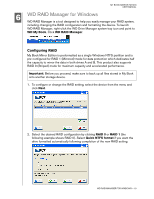
MY BOOK MIRROR EDITION USER MANUAL 4 Setting Up Windows Important: You must first install WD Drive Manager on the included CD before connecting the unit. Follow the steps below to safely connect the device. 1. Turn on your computer and wait for the operating system to load. 2. Insert the software CD into the CD-ROM drive. 3. The CD autoruns. Click Accept in the terms of agreement screen and WD Drive Manager and drivers are installed automatically. WD Drive Manager enables the capacity gauge and Safe Shutdown™ and also installs WD RAID Manager. Note: If AutoPlay is disabled on your computer, you must install the utilities manually. Go to the desktop. Double-click My Computer, My Book folder, WD_Windows_Tools folder, and Setup.exe. Then run the CD which installs the drivers. 4. The Application Installer screen displays a list of options including software, documentation, and a registration link. All applications are selected by default. Deselect any applications you do not want to install, then click Start. Or, click Cancel to exit and no applications will be installed. 5. Connect the adapter's DC cable plug to the DC power input at the rear panel of the product. Verify that plug type of your wall power adapter is the correct plug type for your region. If incorrect, remove it and install the correct one. 6. Connect the wall adapter to your AC power receptacle. 7. Plug one end of the USB interface cable into an available port on your computer. 8. Plug the other end of the interface cable into the device, after which the unit mounts to the system. The WD Drive Manager icon appears in the system tray. Note: If Windows prompts for additional drivers, allow it to perform its search. Note: To change the format of the device to RAID 0, follow the instructions in "WD RAID Manager for Windows" on page 13. SETTING UP - 8
-
 1
1 -
2
-
3
-
4
-
5
-
 6
6 -
 7
7 -
 8
8 -
 9
9 -
 10
10 -
 11
11 -
 12
12 -
 13
13 -
 14
14 -
 15
15 -
 16
16 -
17
-
18
-
19
-
20
-
21
-
22
-
23
-
24
-
25
-
26
-
27
-
28
-
29
-
30
-
31
 |
 |
