Whirlpool WDT730PAHV Installation Guide - Page 18
Final Installation Check
 |
View all Whirlpool WDT730PAHV manuals
Add to My Manuals
Save this manual to your list of manuals |
Page 18 highlights
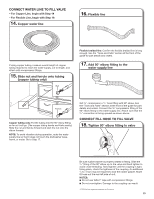
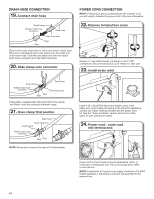
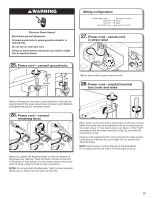
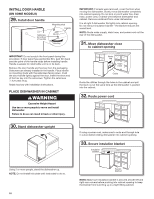
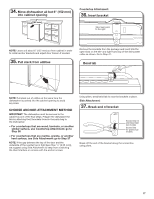
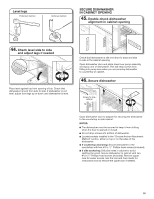
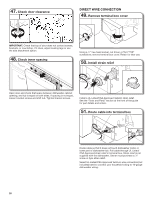
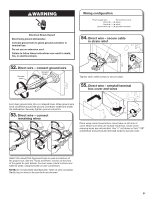
38. Install bracket Bend tabs 41. Door falls open - increase spring tension Push bracket into slot on the side of dishwasher and bend tab in toward the side of the dishwasher so that it keeps the bracket in place. Repeat this step for the other side of the dishwasher. NOTE: Install wood shims to the inside of the cabinets if the gap between the sides of the cabinet and the sides of the dishwasher are greater than 1/2" (13 mm) on each side. NOTE: Do not attach the dishwasher. This will be done later. FINAL INSTALLATION CHECK 39. Open and close door If the door falls open, increase the spring tension by moving the spring end toward the back of the dishwasher. NOTE: Springs should be in the same notches on left and right sides. 42. Align front of dishwasher with front of cabinet doors 40. Closes too quickly - decrease spring tension Align front of dishwasher door panel with front of cabinet doors. You may need to adjust alignment to be even with your cabinets. 43. Check for plumb and adjust legs if needed If the door closes too quickly, decrease the spring tension by moving the spring end toward the front of the dishwasher. NOTE: Springs should be in the same notches on left and right sides. Check that leveling legs are firmly against the floor. Close and latch the door and place level against the front panel. Check that dishwasher is centered from front to back in the opening. If needed, adjust leveling leg until dishwasher is plumb. Repeat for other side of dishwasher. Helpful Tip: Push up on front of dishwasher to raise dishwasher off the ground to adjust front legs. With some installations, it may be easier to adjust the front leg using a 3/16" hex head socket or adjustable wrench. If the gap between the top of the door and the underside of the counter top is tight (less than 1/4" [6 mm]), we suggest side anchoring to keep from scratching the User Interface or console. 18
-
 1
1 -
2
-
3
-
4
-
5
-
6
-
7
-
8
-
9
-
10
-
11
-
12
-
 13
13 -
 14
14 -
 15
15 -
 16
16 -
 17
17 -
 18
18 -
 19
19 -
 20
20 -
 21
21 -
 22
22 -
 23
23 -
24
-
25
-
26
-
27
-
28
-
29
-
30
-
31
-
32
-
33
-
34
-
35
-
36
-
37
-
38
-
39
-
40
-
41
-
42
-
43
-
44
-
45
-
46
-
47
-
48
-
49
-
50
-
51
-
52
-
53
-
54
-
55
-
56
-
57
-
58
-
59
-
60
-
61
-
62
-
63
-
64
-
65
-
66
-
67
-
68
-
69
-
70
-
71
-
72
-
73
-
74
-
75
-
76
 |
 |
