Whirlpool WDT730PAHV Installation Guide - Page 20
DIRECT WIRE CONNECTION, Remove terminal box cover, Install strain relief, Route cable into terminal
 |
View all Whirlpool WDT730PAHV manuals
Add to My Manuals
Save this manual to your list of manuals |
Page 20 highlights
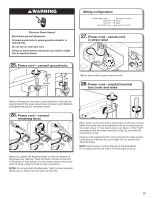
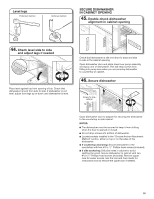
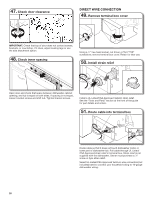
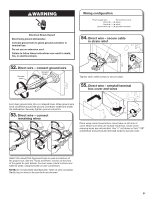
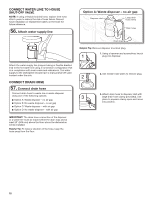
47. Check door clearance DIRECT WIRE CONNECTION 49. Remove terminal box cover IMPORTANT: Check that top of door does not contact screws, brackets, or countertop. If it does, adjust leveling legs or use the side attachment option. 48. Check inner spacing Using a 1/4" hex-head socket, nut driver, or Torx® T20® screwdriver, remove terminal box cover. Retain for later use. 50. Install strain relief Open door and check that space between dishwasher cabinet opening, and tub is equal on both sides. If spacing is not equal, loosen bracket screws and shift tub. Tighten bracket screws. Install a UL Listed/CSA Approved metallic strain relief. See the "Tools and Parts" section at the front of the guide for part details and orders. 51. Route cable into terminal box Route cable so that it does not touch dishwasher motor or lower part of dishwasher tub. Pull cable through UL Listed/ CSA Approved strain relief in terminal box. Strain relief is not supplied with the dishwasher. Owner must purchase a 7/8" screw-in type strain relief. Select UL Listed/CSA Approved twist-on wire connectors (not included) rated to connect your household wiring to 16-gauge dishwasher wiring. 20
-
 1
1 -
2
-
3
-
4
-
5
-
6
-
7
-
8
-
9
-
10
-
11
-
12
-
13
-
14
-
 15
15 -
 16
16 -
 17
17 -
 18
18 -
 19
19 -
 20
20 -
 21
21 -
 22
22 -
 23
23 -
 24
24 -
 25
25 -
26
-
27
-
28
-
29
-
30
-
31
-
32
-
33
-
34
-
35
-
36
-
37
-
38
-
39
-
40
-
41
-
42
-
43
-
44
-
45
-
46
-
47
-
48
-
49
-
50
-
51
-
52
-
53
-
54
-
55
-
56
-
57
-
58
-
59
-
60
-
61
-
62
-
63
-
64
-
65
-
66
-
67
-
68
-
69
-
70
-
71
-
72
-
73
-
74
-
75
-
76
 |
 |
