Whirlpool WGD9500T Use and Care Manual
Whirlpool WGD9500T Manual
 |
View all Whirlpool WGD9500T manuals
Add to My Manuals
Save this manual to your list of manuals |
Whirlpool WGD9500T manual content summary:
- Whirlpool WGD9500T | Use and Care Manual - Page 1
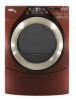
GASDRYER In the U.S.A., for questions about features, operation/perlormance, parts, accessories or service call: 1-800-253-1301 In Canada, for assistance, installation and service call: 1-800-807-6777 or visit our website at... www.whirlpool,com or www,whirlpooLca P SECHEUSEA GAZ ELECTRONIQUE Pour - Whirlpool WGD9500T | Use and Care Manual - Page 2
21 Cleaning the Dryer Interior 22 Removing Accumulated Lint 22 Water Inlet Hoses 22 Vacation, Storage and Moving Care 22 Changing the Drum Light 22 TROUBLESHOOTING 23 ASSISTANCE OR SERVICE 25 WARRANTY 26 TABLEDES MATIERES S¢CURITE DE LA S¢CHEUSE 27 INSTRUCTIONS D'INSTALLATION 28 Outillage - Whirlpool WGD9500T | Use and Care Manual - Page 3
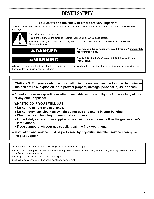
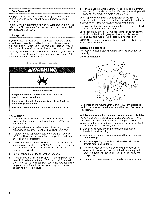
in this manual and on your appliance. Always read instructions are not followed. WARNING: For your safety, the information in this manual instructions. • If you cannot reach your gas supplier, call the fire department. - Installation and service must be performed by a qualified installer, service - Whirlpool WGD9500T | Use and Care Manual - Page 4
to the weather. [] Do not tamper with controls. [] Do not repair or replace any part of the dryer or attempt any servicing unless specifically recommended in this Use and Care Guide or in published user-repair instructions that you understand and have the skills to carry out. [] Do not use fabric - Whirlpool WGD9500T | Use and Care Manual - Page 5
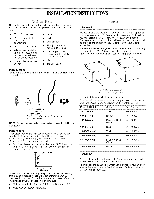
(39.4 cm} Black WHP1500SB Stack Kit Are you planning to stack your DUET ® washer and dryer? To do so, you will need to purchase a Stack Kit. To order, call the dealer from whom you purchased your dryer or refer to the "Assistance or Service" section of this manual. Ask for Part Number 8541503. - Whirlpool WGD9500T | Use and Care Manual - Page 6
Reversal Kit. To order, call the dealer from whom you purchased your dryer or refer to the "Assistance or Service" section of this manual. Ask for Part Number 8579666. Backguard If you are installing your DUET ° washer and dryer and wish to avoid having loose items fall behind your machines, you - Whirlpool WGD9500T | Use and Care Manual - Page 7
bottom venting, 2" (5.1 cm) spacing is allowed. Recessed or closet installation - Dryer on pedestal olo 1"-_t1_--27,,i*11_-1" 1..1I_- 31v_-"_15""1 (2.5 cm) ( spacing for recessed or closet installation, with stacked washer and dryer The dimensions shown are for the recommended spacing. 48 in? - Whirlpool WGD9500T | Use and Care Manual - Page 8
Kit Part Number 346764. See "Tools and Parts" section dryer be provided. GROUNDING INSTRUCTIONS • For a grounded, cord-connected dryer: This dryer Service" section of this manual. LP gas conversion: Conversion must be made by a qualified technician. No attempt shall be made to convert the appliance - Whirlpool WGD9500T | Use and Care Manual - Page 9
kinking. • Use only pipe-joint compound. Do not use TEFLON _t tape. • This dryer must be connected to the gas supply line with a listed flexible gas connector that complies with the standard for connectors for gas appliances, ANSI Z21.24 or CSA 6.10. Burner input requirements Elevations above 10,000 - Whirlpool WGD9500T | Use and Care Manual - Page 10
by calling Whirlpool Parts and Accessories. For more information, see the "Assistance or Service" section of this manual. Rigid metal • Flexible metal vent must be fully extended and supported when the dryer is in its final location. • Remove excess [] Housecleaning problems and health problems. 10 - Whirlpool WGD9500T | Use and Care Manual - Page 11
diamond dust) Contact your local dealer. Failure to follow these instructions can result in death, fire, electrical shock, or serious Service" section of this manual. • Over-the-Top Installation: Part Number 4396028 • Periscope Installation (For use with dryer vent to wall vent mismatch): Part - Whirlpool WGD9500T | Use and Care Manual - Page 12
Leave enough room to connect the exhaust vent or gas line. For mobile home use Gas dryers must be securely fastened to the floor at the time of installation. 1. Install exhaust . For more information, please reference the service numbers in the "Assistance or Service" section of this manual. 12 - Whirlpool WGD9500T | Use and Care Manual - Page 13
line. 4. Once the exhaust vent connection is made, remove the corner posts and cardboard. The dryer must be connected to the cold water faucet using the new inlet hoses. Do not use old hoses. 1. Turn cold water faucet off and remove washer inlet hose. 2. Remove old rubber washer from inlet hose and - Whirlpool WGD9500T | Use and Care Manual - Page 14
any dust. 12. If you live in a hard water area, use of a water softener is recommended to control the buildup of scale through the water system in the dryer. Over time, the buildup of lime scale may clog different parts of the water system which will reduce product performance. Excessive scale - Whirlpool WGD9500T | Use and Care Manual - Page 15
even after washing). Failure to follow these instructions can result in death, explosion, or fire. This manual covers several different models. Your dryer may not have all of the cycles and features described. The following is a guide to starting your dryer. Please refer to specific sections of this - Whirlpool WGD9500T | Use and Care Manual - Page 16
CYCLE SIGNAL button to set end of cycle signal volume to desired level. • Press and hold START button until dryer starts (about 1 second). NOTE: Dryness Level is not adjustable for Manual or Steam Cycles. Pressing the Dryness Level button will cause the triple beep indicating that this option is not - Whirlpool WGD9500T | Use and Care Manual - Page 17
dispensing water during the Quick Refresh and Enhanced Touch Up cycles. Wet The Wet light will turn on when a wet item has been detected in the dryer. The Wet light will remain on until: • The damp dry point is reached in an Automatic Cycle. • The dryer enters the cool down period in a Manual Cycle - Whirlpool WGD9500T | Use and Care Manual - Page 18
such as jackets, comforters and pillows, Rearrange the load halfway through the dryer cycle. This will aid in the drying process. Normal Use this cycle or loads that need a short drying time, Manual Preset Cycle Settings Manual Cycles Load Type Temperature TIMED DRY Heavyweight items, bulky - Whirlpool WGD9500T | Use and Care Manual - Page 19
drum after several minutes of tumbling with heat. The STEAM status light will come on while the water is sprayed into the drum. The dryer will continue to tumble at Medium heat followed by a brief cooldown. The Steam cycles include Quick Refresh and Enhanced Touch Up. The heat setting and - Whirlpool WGD9500T | Use and Care Manual - Page 20
, sweaters). To obtain a drying rack for your model, follow the instructions on the insert included in your dryer drum. To use the drying rack Do not remove the lint screen. 1. Open dryer door. A. Front edge 2. Place drying rack inside dryer drum, positioning the back wire on the ledge of the inner - Whirlpool WGD9500T | Use and Care Manual - Page 21
. 3. Wet a nylon brush with hot water and liquid detergent. Scrub lint screen with the brush to remove residue buildup. Every load cleaning The lint screen is located in the door opening of the dryer. The control panel has an indicator light to remind you to clean the lint screen before or after - Whirlpool WGD9500T | Use and Care Manual - Page 22
line. 7. Make sure leveling legs are secure in dryer base. 8. Use masking tape to secure dryer door. Reinstalling the dryer Follow the "Installation Instructions" to locate, level and connect the dryer. The dryer light automatically turns on inside the dryer drum when you open the door. To change - Whirlpool WGD9500T | Use and Care Manual - Page 23
TROUBLESHOOTING First try the solutions suggested here and possibly avoid the cost of a service call... Dryer will not run Has a household fuse blown, or has a circuit breaker tripped? Replace the fuse or reset the circuit breaker. If the problem See the Installation Instructions. Are fabric softener - Whirlpool WGD9500T | Use and Care Manual - Page 24
dryer requires a minimum of 1" (2,5 cm) of airspace, and, for most installations, the rear of the dryer requires 5" (12.7 cm), See the Installation Instructions tumble the load with water and heat to help smooth out wrinkles from a load left in the dryer. • Was the dryer overloaded? Dry smaller loads - Whirlpool WGD9500T | Use and Care Manual - Page 25
calling for assistance or service, please check "Troubleshooting." It may save you the cost of a service call. If you still need help, follow the instructions below. When calling, please know the purchase date and the complete model and serial number of your appliance. This information will help - Whirlpool WGD9500T | Use and Care Manual - Page 26
installation of your major appliance, to instruct you how to use your major appliance, to replace or repair house fuses or to correct house wiring or plumbing. 2. Service calls to repair or replace appliance light bulbs, air filters or water filters. Those consumable parts are excluded from warranty - Whirlpool WGD9500T | Use and Care Manual - Page 27
instructions. Risque possible de deces ou de blessure grave si vous ne euivez pas lee instructions produire en cas de non-respect des instructions. AVERTISSEMENT : Pour votre s_curit_, les renseignements de gaz d'un t_l_phone voisin. Suivre ses instructions. • .A d_faut de joindre votre fournisseur - Whirlpool WGD9500T | Use and Care Manual - Page 28
iorsque la secheuse est utiiisee pres d'eux. • Avant d'enlever ia secheuse du service ou ia jeter, enlever la porte du compartiment de sechage. • Ne pas d'une recommandation specifique darts le guide d'utlilisation et d'entretien, ou publiee dans les instructions de reparation par I'utilisateur que - Whirlpool WGD9500T | Use and Care Manual - Page 29
chez qui vous avez achete votre secheuse ou se rderer a la section "Assistance ou service" de ce manuel. Demander le numero de piece 8579666. Dosseret Si vous installez votre laveuse et votre secheuse DUET c_et souhaitez eviter de voir des objets tomber a I'arriere de vos machines, vous pouvez - Whirlpool WGD9500T | Use and Care Manual - Page 30
la secheuse au moins 46 cm (18 po) au-dessus du plancher pour une installation dans un garage. Le non=respect de ces instructions peut causer un deces, une explosion ou un incendie. Ddgagements de s_paration a respecter L'emplacement dolt _tre assez grand pour permettre d'ouvrir completement la - Whirlpool WGD9500T | Use and Care Manual - Page 31
maison mobile. L'installation dolt _tre conforme a la Manufactured Home Construction and Safety Standard, Title 24 CFR, Part 3280 (anciennement Federal Standard for Mobile Home Construction and Safety, Title 24, HUD Part 280) ou la norme canadienne sur les maisons prefabriquees CAN/CSA-Z240 MH. 31 - Whirlpool WGD9500T | Use and Care Manual - Page 32
un adaptateur. Ne pas utiliser un c_ble de ralionge. Le non-respect de ces instructions peut causer un deces, un incendie ou un choc electrique. L'appareil dolt _tre ou composer les num@os indiques dans la section "Assistance ou service" de ce manuel. Conversion au gaz de p_trole liqu_fi_ : - Whirlpool WGD9500T | Use and Care Manual - Page 33
pae utiliser un conduit d'_vacuation en plastique. Ne pas utilieer un conduit d'evacuation en feuille de metal. Le non-respect de ces instructions peut causer un decee ou un incendie. AVERTISSEMENT : Pour reduire le risque d'incendie, cette secheuse dolt CVACUER L'AIR ,_,L'EXTCRIEUR. IMPORTANT - Whirlpool WGD9500T | Use and Care Manual - Page 34
du marchand ou en telephonant au service Pieces et accessoires de Whirlpool. Pour plus de renseignements, voir la section "Assistance ou service" de ce manuel. Conduit m_tallique par I'humidite aux boiseries, meubles, peinture, papier-peint, tapis, etc. [] Problemes de nettoyage dans la maison et - Whirlpool WGD9500T | Use and Care Manual - Page 35
poudre de diamant) Contacter votre marchand local. Le non-respect de ces instructions peut causer un d_ces, un incendie, un choc _lectrique ou une ou le degagement est reduit. Veuillez consulter la section "Assistance ou service" de ce manuel pour passer une commande. • Installation au-dessus - Whirlpool WGD9500T | Use and Care Manual - Page 36
Dispositions sp_ciales pour les installations dans une maison mobile Le syst_me d'evacuation dolt _tre solidement fixe a une section non combustible de la structure de la maison mobile et ne dolt passe terminer en-dessous de la maison mobile. Faire en sorte que le syst_me d'evacuation se termine I' - Whirlpool WGD9500T | Use and Care Manual - Page 37
de personnes pour deplacer et installer la secheuse. Le non-respect de cette instruction peut causer une blessure au dos ou d'autre blessure. 1. Pour proteger , voir les numeros de telephone mentionnes la section "Assistance ou service" dans ce manuel. A. Robinet ferm_ B. Robinet ouvert 4. Verifier - Whirlpool WGD9500T | Use and Care Manual - Page 38
A I'aide d'une bride de serrage de 4" (10,2 cm), relier le conduit d'evacuation & la bouche d'evacuation de la secheuse. Si on utilise un systeme d'evacuation existant, s'assurer qu'il est propre. Le conduit d'evacuation de la secheuse doit _tre fixe sur la bouche d'evacuation de la secheuse et dans - Whirlpool WGD9500T | Use and Care Manual - Page 39
enlever la brocbe de liaison a la terre. Ne pae utiliser un adaptateuro Ne pae utiliser un c_ble de rallonge. Le non=respect de cee instructions peut causer un decee, un incendie ou un cboc _lectrique. 8. Brancher sur une prise a 3 alveoles reliee a la terre. Mettre I'appareil sous tension. 9. Oter - Whirlpool WGD9500T | Use and Care Manual - Page 40
mousse, caoutchouc eu plastique doivent _tre seches sur une corde h linge eu par le programme de sechage a I'air. Le non=respect de ces instructions peut causer un deces ou un incendie. Ce manuel couvre plusieurs modeles diff@ents. Votre secheuse peut ne pas comporter I'ensemble des programmes et - Whirlpool WGD9500T | Use and Care Manual - Page 41
Le reglage de degre de sechage par defaut est Normal Iorsqu'on selectionne un programme de sechage automatique. On peut selectionner un degre de sechage different en fonction de la charge en appuyant sur DRYNESS LEVEL (degre de sechage) et en choisissant More (plus), Normal (normal) ou Less (moins). - Whirlpool WGD9500T | Use and Care Manual - Page 42
• Si desire, ajouter une feuille d'assouplissant de tissu. Suivre les instructions figurant sur I'emballage. • Sortir la charge de la secheuse aussit6t des programmes automatiques ou manuels (a la section "Programmes") pour un guide de sechage de charges diverses. • La temperature de sechage et le - Whirlpool WGD9500T | Use and Care Manual - Page 43
a la temperature recommandee. Un capteur detecte I'humidite de la charge et regle automatiquement la duree pour un sechage optimal. Heavy Duty (service intense) Utiliser ce programme pour le sechage & temperature elevee des charges mixtes Iourdes, des serviettes en coton ou des jeans. Bulky Items - Whirlpool WGD9500T | Use and Care Manual - Page 44
Pr_r_glages des programmes Programmes automatiques Type de charge automatiques Temperature Dur_e* (minutes) HEAVY DUTY (service intense) Articles Iourds, serviettes, jeans High (elev6e) 50 BULKY ITEMS (articles volumineux) Vestes, couettes, oreillers NORMAL Velours c6tel& v_tements de travail, - Whirlpool WGD9500T | Use and Care Manual - Page 45
Drum Light (lampe du tambour) Selectionner Drum Light (lampe du tambour) pour allumer la lampe a I'interieur du tambour de la secheuse. Pendant un programme, si la fonction Drum Light est selectionn6e, la lampe du tambour s'allume et reste allumee jusqu'a ce qu'on appuie nouveau sur la touche DRUM - Whirlpool WGD9500T | Use and Care Manual - Page 46
que I'on ferait normalement secher sur une corde a linge (les chandails par exemple). Pour obtenir une grille de s_chage pour votre modele, suivre les instructions de la brochure incluse dans le tambour de la secheuse. Utilisation de la grille de s_chage Ne pas retirer le filtre a charpie. 1. Ouvrir - Whirlpool WGD9500T | Use and Care Manual - Page 47
. Placer la eecheuse au moine 46 cm (18 po) au-dessue du plancher pour une installation dans un garage. Le non-respect de ces instructions peut causer un decee, une explosion ou un incendie. 4. Rincer le filtre a I'eau chaude. 5. Bien secher le filtre a charpie avec une serviette propre. Replacer - Whirlpool WGD9500T | Use and Care Manual - Page 48
la secheuse. 8. Utiliser du ruban adhesif de masquage pour fixer la porte de la secheuse. R_installation de la s_cheuse Suivre les "Instructions d'installation" pour choisir I'emplacement, regler I'aplomb de la secheuse et la raccorder. t La lumiere de la secheuse s'allume automatiquement - Whirlpool WGD9500T | Use and Care Manual - Page 49
service... La s_cheuse ne fonctionne pas Un fusible est-il grill_ ou un disjoncteur s'est-il declenche? Remplacer le fusible ou reenclencher le disjoncteur. probleme peut vibrer si elle n'est pas correctement installee. Voir "Instructions d'installation". Les v_tements sont-ils emm_l_s ou en boule? - Whirlpool WGD9500T | Use and Care Manual - Page 50
'elle culbute librement. Risque du poids excessif Utiliser deux ou plus de personnes pour d_placer et installer la secheuse. Le non-respect de cette instruction peut causer une blessure au dos ou d'autre blessure. • Le programme automatique se termine-t-il trop t6t? La charge n'est peut-_tre pas en - Whirlpool WGD9500T | Use and Care Manual - Page 51
la compagnie de service designee par Whirlpool dans votre region, vous pouvez consulter les Pages jaunes. Pour plus d'assistance Si vous avez besoin de plus d'assistance, vous pouvez nous ecrire en soumettant toute question ou probleme a : Whirlpool Brand Home Appliances Customer experience Center - Whirlpool WGD9500T | Use and Care Manual - Page 52
installe dans un endroit inaccessible ou n'est pas installe conformement aux instructions d'installation fournies. 11. Le coot des pieces de rechange et Whirlpool autorise pour determiner si une autre garantie s'applique. Si vous avez besoin de service, voir d'abord la section "Depannage" du Guide
-
 1
1 -
 2
2 -
 3
3 -
 4
4 -
 5
5 -
 6
6 -
 7
7 -
8
-
9
-
10
-
11
-
12
-
13
-
14
-
15
-
16
-
17
-
18
-
19
-
20
-
21
-
22
-
23
-
24
-
25
-
26
-
27
-
28
-
29
-
30
-
31
-
32
-
33
-
34
-
35
-
36
-
37
-
38
-
39
-
40
-
41
-
42
-
43
-
44
-
45
-
46
-
47
-
48
-
49
-
50
-
51
-
52
 |
 |
ELECTRONIC
GASDRYER
In the U.S.A., for questions
about features,
operation/perlormance,
parts, accessories
or service call: 1-800-253-1301
In Canada,
for assistance,
installation and service call: 1-800-807-6777
or visit our website at... www.whirlpool,com
or www,whirlpooLca
P
SECHEUSEAGAZ
ELECTRONIQUE
Pour assistance,
installation
ou service
composez
le :
1-800-807-6777
ou visitez
notre site web &._www,whirlpool.ca
Table
of Contents/Table
des
matieres
........................
2
W10122320A