Xerox 3210 User Guide - Page 126
Using the Unified Driver Configurator, Printers Configuration
 |
UPC - 095205754322
View all Xerox 3210 manuals
Add to My Manuals
Save this manual to your list of manuals |
Page 126 highlights
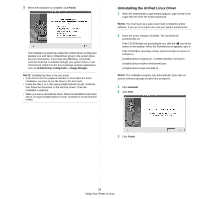
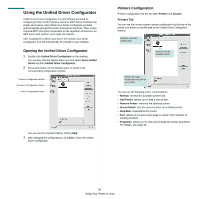
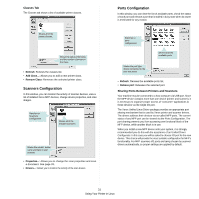
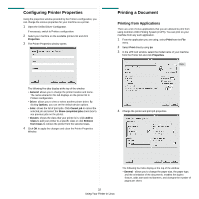
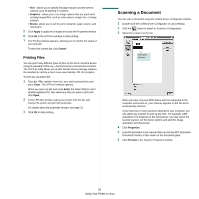
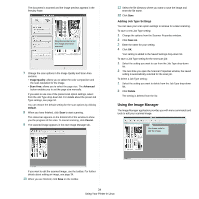
Using the Unified Driver Configurator Unified Linux Driver Configurator is a tool primarily intended for configuring Printer or MFP devices. Since an MFP device combines the printer and scanner, the Unified Linux Driver Configurator provides options logically grouped for printer and scanner functions. There is also a special MFP port option responsible for the regulation of access to an MFP printer and scanner via a single I/O channel. After installing the Unified Linux driver, the Unified Linux Driver Configurator icon will automatically be created on your desktop. Opening the Unified Driver Configurator 1 Double-click Unified Driver Configurator on the desktop. You can also click the Startup Menu icon and select Xerox Unified Driver and then Unified Driver Configurator. 2 Press each button on the Modules pane to switch to the corresponding configuration window. Printers Configuration button Scanners Configuration button Ports Configuration button You can use the onscreen help by clicking Help. 3 After changing the configurations, click Exit to close the Unified Driver Configurator. Printers Configuration Printers configuration has the two tabs: Printers and Classes. Printers Tab You can see the current system's printer configuration by clicking on the printer icon button on the left side of the Unified Driver Configurator window. Switches to Printer configuration. Shows all of the installed printer. Shows the status, model name and URI of your printer. You can use the following printer control buttons: • Refresh: renews the available printers list. • Add Printer: allows you to add a new printer. • Remove Printer: removes the selected printer. • Set as Default: sets the current printer as a default printer. • Stop/Start: stops/starts the printer. • Test: allows you to print a test page to check if the machine is working properly. • Properties: allows you to view and change the printer properties. For details, see page 32. 30 Using Your Printer in Linux
-
 1
1 -
2
-
3
-
4
-
5
-
6
-
7
-
8
-
9
-
10
-
11
-
12
-
13
-
14
-
15
-
16
-
17
-
18
-
19
-
20
-
21
-
22
-
23
-
24
-
25
-
26
-
27
-
28
-
29
-
30
-
31
-
32
-
33
-
34
-
35
-
36
-
37
-
38
-
39
-
40
-
41
-
42
-
43
-
44
-
45
-
46
-
47
-
48
-
49
-
50
-
51
-
52
-
53
-
54
-
55
-
56
-
57
-
58
-
59
-
60
-
61
-
62
-
63
-
64
-
65
-
66
-
67
-
68
-
69
-
70
-
71
-
72
-
73
-
74
-
75
-
76
-
77
-
78
-
79
-
80
-
81
-
82
-
83
-
84
-
85
-
86
-
87
-
88
-
89
-
90
-
91
-
92
-
93
-
94
-
95
-
96
-
97
-
98
-
99
-
100
-
101
-
102
-
103
-
104
-
105
-
106
-
107
-
108
-
109
-
110
-
111
-
112
-
113
-
114
-
115
-
116
-
117
-
118
-
119
-
120
-
 121
121 -
 122
122 -
 123
123 -
 124
124 -
 125
125 -
 126
126 -
 127
127 -
 128
128 -
 129
129 -
 130
130 -
 131
131 -
132
-
133
-
134
-
135
-
136
-
137
-
138
-
139
-
140
 |
 |
