Xerox 3210 User Guide - Page 66
Replacing the print cartridge
 |
UPC - 095205754322
View all Xerox 3210 manuals
Add to My Manuals
Save this manual to your list of manuals |
Page 66 highlights
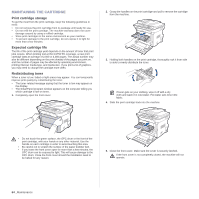
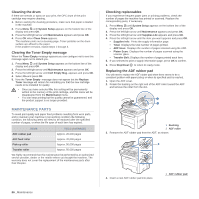
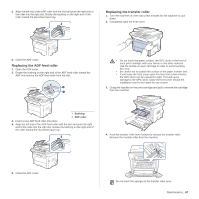
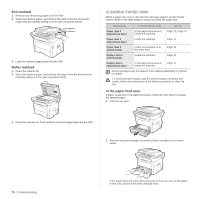
REPLACING THE PRINT CARTRIDGE When the print cartridge is completely empty, you must replace the print cartridge. • The status LED and the toner-related message on the display indicates that the print cartridge should be replaced. • Incoming faxes are saved in memory. At this stage, the print cartridge needs to be replaced. Check the type of print cartridge for your machine. (See "Ordering supplies and accessories" on page 83.) 1. Turn the machine off, then wait a few minutes for the machine to cool. 2. Completely open the front cover. 4. Take a new print cartridge out of its package. • Don't use sharp objects, such as a knife or scissors, to open the print cartridge package. You could damage the surface of the print cartridge. • To prevent damage, do not expose the print cartridge to light for more than a few minutes. Cover it with a piece of paper to protect it if necessary. 5. Holding both handles on the print cartridge, thoroughly rock it from side to side to evenly distribute the toner. • Do not touch the green surface, the OPC drum or the front of each print cartridge, with your hands or any other material. Use the handle on each cartridge in order to avoid touching this area. • Be careful not to scratch the surface of the paper transfer belt. • If you leave the front cover open for more than a few minutes, the OPC drum can be exposed to light. This will cause damage to the OPC drum. Close the front cover should the installation need to be halted for any reason. 3. Grasp the handles on the print cartridge and pull to remove the cartridge from the machine. 6. Place the print cartridge on a flat surface, as shown, and remove the paper covering the print cartridge by removing the tape. If toner gets on your clothing, wipe it off with a dry cloth and wash it in cold water. Hot water sets toner into fabric. 7. Grasp the handles on the print cartridge. Insert the cartridge until it clicks into place. 8. Close the front cover. Make sure the cover is securely latched, and then turn the machine on. If the front cover is not completely closed, the machine will not operate. Maintenance_ 65
-
 1
1 -
2
-
3
-
4
-
5
-
6
-
7
-
8
-
9
-
10
-
11
-
12
-
13
-
14
-
15
-
16
-
17
-
18
-
19
-
20
-
21
-
22
-
23
-
24
-
25
-
26
-
27
-
28
-
29
-
30
-
31
-
32
-
33
-
34
-
35
-
36
-
37
-
38
-
39
-
40
-
41
-
42
-
43
-
44
-
45
-
46
-
47
-
48
-
49
-
50
-
51
-
52
-
53
-
54
-
55
-
56
-
57
-
58
-
59
-
60
-
 61
61 -
 62
62 -
 63
63 -
 64
64 -
 65
65 -
 66
66 -
 67
67 -
 68
68 -
 69
69 -
 70
70 -
 71
71 -
72
-
73
-
74
-
75
-
76
-
77
-
78
-
79
-
80
-
81
-
82
-
83
-
84
-
85
-
86
-
87
-
88
-
89
-
90
-
91
-
92
-
93
-
94
-
95
-
96
-
97
-
98
-
99
-
100
-
101
-
102
-
103
-
104
-
105
-
106
-
107
-
108
-
109
-
110
-
111
-
112
-
113
-
114
-
115
-
116
-
117
-
118
-
119
-
120
-
121
-
122
-
123
-
124
-
125
-
126
-
127
-
128
-
129
-
130
-
131
-
132
-
133
-
134
-
135
-
136
-
137
-
138
-
139
-
140
 |
 |
