Xerox 3210 User Guide - Page 68
Replacing the ADF feed roller, Bushing, ADF roller
 |
UPC - 095205754322
View all Xerox 3210 manuals
Add to My Manuals
Save this manual to your list of manuals |
Page 68 highlights
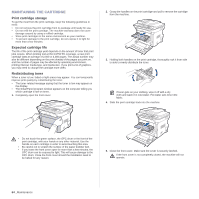
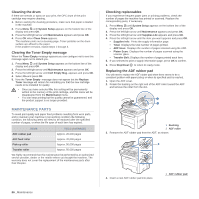
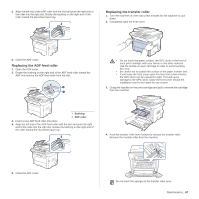
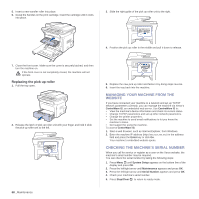
5. Align the left end of the ADF roller with the slot and push the right end of the roller into the right slot. Rotate the bushing on the right end of the roller toward the document input tray. Replacing the transfer roller 1. Turn the machine off, then wait a few minutes for the machine to cool down. 2. Completely open the front cover. 6. Close the ADF cover. Replacing the ADF feed roller 1. Open the ADF cover. 2. Rotate the bushing on the right end of the ADF feed roller toward the ADF and remove the ADF feed roller from the slot. • Do not touch the green surface, the OPC drum or the front of each print cartridge, with your hands or any other material. Use the handle on each cartridge in order to avoid touching this area. • Be careful not to scratch the surface of the paper transfer belt. • If you leave the front cover open for more than a few minutes, the OPC drum can be exposed to light. This will cause damage to the OPC drum. Close the front cover should the installation need to be halted for any reason. 3. Grasp the handles on the print cartridge and pull to remove the cartridge from the machine. 1 Bushing 2 ADF roller 3. Insert a new ADF feed roller into place. 4. Align the left end of the ADF feed roller with the slot and push the right end of the roller into the right slot. Rotate the bushing on the right end of the roller toward the document input tray. 4. Push the transfer roller lever forward to release the transfer roller. Remove the transfer roller from the machine. 5. Close the ADF cover. Do not touch the sponge on the transfer roller area. Maintenance_ 67
-
 1
1 -
2
-
3
-
4
-
5
-
6
-
7
-
8
-
9
-
10
-
11
-
12
-
13
-
14
-
15
-
16
-
17
-
18
-
19
-
20
-
21
-
22
-
23
-
24
-
25
-
26
-
27
-
28
-
29
-
30
-
31
-
32
-
33
-
34
-
35
-
36
-
37
-
38
-
39
-
40
-
41
-
42
-
43
-
44
-
45
-
46
-
47
-
48
-
49
-
50
-
51
-
52
-
53
-
54
-
55
-
56
-
57
-
58
-
59
-
60
-
61
-
62
-
 63
63 -
 64
64 -
 65
65 -
 66
66 -
 67
67 -
 68
68 -
 69
69 -
 70
70 -
 71
71 -
 72
72 -
 73
73 -
74
-
75
-
76
-
77
-
78
-
79
-
80
-
81
-
82
-
83
-
84
-
85
-
86
-
87
-
88
-
89
-
90
-
91
-
92
-
93
-
94
-
95
-
96
-
97
-
98
-
99
-
100
-
101
-
102
-
103
-
104
-
105
-
106
-
107
-
108
-
109
-
110
-
111
-
112
-
113
-
114
-
115
-
116
-
117
-
118
-
119
-
120
-
121
-
122
-
123
-
124
-
125
-
126
-
127
-
128
-
129
-
130
-
131
-
132
-
133
-
134
-
135
-
136
-
137
-
138
-
139
-
140
 |
 |
