Yamaha AW2816 Owner's Manual - Page 150
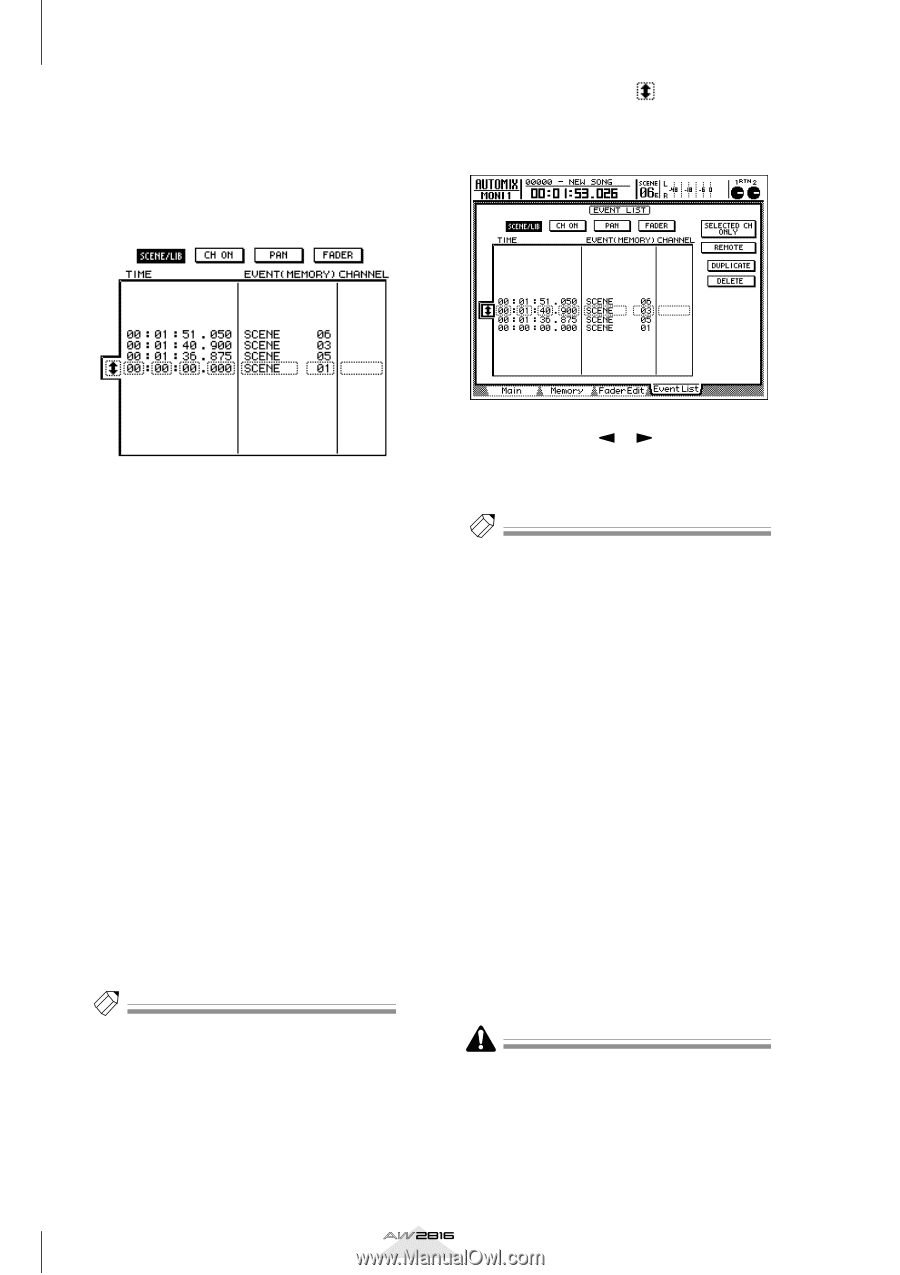
EVENT, SCENE xx, EQ.Lib xxx, DY.Lib xxx, EF.Lib xxx, CH.Lib xxx, CHANNEL
 |
View all Yamaha AW2816 manuals
Add to My Manuals
Save this manual to your list of manuals |
Page 150 highlights
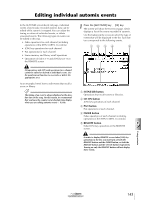
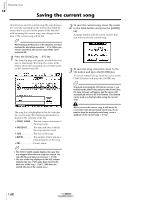
Chapter Using automix 9 2 Move the cursor to the SCENE/LIB button, and press the [ENTER] key. The SCENE/LIB button will turn on, and scene/ library recall operations recorded in the automix will be displayed in the list. The row enclosed by a dotted line in the list is the currently selected event. 3 Move the cursor to the symbol at the left of the list, and turn the [DATA/JOG] dial to select the event that you want to edit. The columns of the list show the following information when the SCENE/LIB button is on. • TIME The time at which the event is executed is displayed as "hours: minutes: seconds: milliseconds." • EVENT This indicates the type and value of the event. The type of events that can be selected in this column will depend on which button above the list is turned on. If the SCENE/LIB button is on, the following events will be displayed. • SCENE xx ..... Recall scene memory number xx • EQ.Lib xxx.... Recall an EQ library • DY.Lib xxx .... Recall dynamics library number xxx • EF.Lib xxx ..... Recall effect library number xxx • CH.Lib xxx ... Recall channel library number xxx • CHANNEL This indicates the channel to which the data will be recalled (input channel 1-8, monitor channel 1-16, stereo output channel, return channels 1/ 2). This column will be blank if a scene memory is selected in the EVENT column. Tip! For details on the displayed content for each event, refer to page 344. 4 Use the CURSOR [ ]/[ ] keys to move the cursor to the item that you want to edit, and turn the [DATA/JOG] dial to edit the value. Tip! • If you edit the value in the TIME column (event timing), the cursor may jump over events in the list and move to another location. This is because events are re-ordered by time, and is not a malfunction. • The timing of an event can be adjusted in fine steps of 25 ms. 5 To add a new event, move the cursor to the DUPLICATE button in the upper right of the screen, and press the [ENTER] key. The event currently selected for editing will be duplicated at the same timing. Edit the time, event type, and value as necessary. 6 To delete an unwanted event, move the cursor to the DELETE button in the upper right of the screen, and press the [ENTER] key. The event currently selected for editing will be deleted. 7 If you want to view only the events of a specific channel, move the cursor to the SELECTED CH ONLY button and press the [ENTER] key. Then use the [SEL] keys to select the channel whose events you want to view. If the REMOTE button is on, the SELECTED CH ONLY button and the SCENE/LIB and PAN buttons will have no effect. Also, if the SELECTED CH ONLY button is on, the REMOTE button will have no effect. 144 Operation section
-
 1
1 -
2
-
3
-
4
-
5
-
6
-
7
-
8
-
9
-
10
-
11
-
12
-
13
-
14
-
15
-
16
-
17
-
18
-
19
-
20
-
21
-
22
-
23
-
24
-
25
-
26
-
27
-
28
-
29
-
30
-
31
-
32
-
33
-
34
-
35
-
36
-
37
-
38
-
39
-
40
-
41
-
42
-
43
-
44
-
45
-
46
-
47
-
48
-
49
-
50
-
51
-
52
-
53
-
54
-
55
-
56
-
57
-
58
-
59
-
60
-
61
-
62
-
63
-
64
-
65
-
66
-
67
-
68
-
69
-
70
-
71
-
72
-
73
-
74
-
75
-
76
-
77
-
78
-
79
-
80
-
81
-
82
-
83
-
84
-
85
-
86
-
87
-
88
-
89
-
90
-
91
-
92
-
93
-
94
-
95
-
96
-
97
-
98
-
99
-
100
-
101
-
102
-
103
-
104
-
105
-
106
-
107
-
108
-
109
-
110
-
111
-
112
-
113
-
114
-
115
-
116
-
117
-
118
-
119
-
120
-
121
-
122
-
123
-
124
-
125
-
126
-
127
-
128
-
129
-
130
-
131
-
132
-
133
-
134
-
135
-
136
-
137
-
138
-
139
-
140
-
141
-
142
-
143
-
144
-
 145
145 -
 146
146 -
 147
147 -
 148
148 -
 149
149 -
 150
150 -
 151
151 -
 152
152 -
 153
153 -
 154
154 -
 155
155 -
156
-
157
-
158
-
159
-
160
-
161
-
162
-
163
-
164
-
165
-
166
-
167
-
168
-
169
-
170
-
171
-
172
-
173
-
174
-
175
-
176
-
177
-
178
-
179
-
180
-
181
-
182
-
183
-
184
-
185
-
186
-
187
-
188
-
189
-
190
-
191
-
192
-
193
-
194
-
195
-
196
-
197
-
198
-
199
-
200
-
201
-
202
-
203
-
204
-
205
-
206
-
207
-
208
-
209
-
210
-
211
-
212
-
213
-
214
-
215
-
216
-
217
-
218
-
219
-
220
-
221
-
222
-
223
-
224
-
225
-
226
-
227
-
228
-
229
-
230
-
231
-
232
-
233
-
234
-
235
-
236
-
237
-
238
-
239
-
240
-
241
-
242
-
243
-
244
-
245
-
246
-
247
-
248
-
249
-
250
-
251
-
252
-
253
-
254
-
255
-
256
-
257
-
258
-
259
-
260
-
261
-
262
-
263
-
264
-
265
-
266
-
267
-
268
-
269
-
270
-
271
-
272
-
273
-
274
-
275
-
276
-
277
-
278
-
279
-
280
-
281
-
282
-
283
-
284
-
285
-
286
-
287
-
288
-
289
-
290
-
291
-
292
-
293
-
294
-
295
-
296
-
297
-
298
-
299
-
300
-
301
-
302
-
303
-
304
-
305
-
306
-
307
-
308
-
309
-
310
-
311
-
312
-
313
-
314
-
315
-
316
-
317
-
318
-
319
-
320
-
321
-
322
-
323
-
324
-
325
-
326
-
327
-
328
-
329
-
330
-
331
-
332
-
333
-
334
-
335
-
336
-
337
-
338
-
339
-
340
-
341
-
342
-
343
-
344
-
345
-
346
-
347
-
348
-
349
-
350
-
351
-
352
-
353
-
354
-
355
-
356
-
357
-
358
-
359
-
360
-
361
-
362
-
363
-
364
-
365
-
366
-
367
-
368
-
369
-
370
-
371
-
372
-
373
-
374
-
375
-
376
-
377
-
378
-
379
-
380
-
381
-
382
-
383
-
384
-
385
-
386
-
387
-
388
-
389
-
390
-
391
-
392
-
393
-
394
-
395
-
396
-
397
-
398
-
399
-
400
-
401
-
402
-
403
-
404
-
405
-
406
-
407
-
408
-
409
-
410
-
411
-
412
-
413
-
414
-
415
-
416
-
417
-
418
-
419
-
420
 |
 |