Yamaha DG60-112 Owner's Manual - Page 6
The Panel Controls, Front Panel - amplifier
 |
View all Yamaha DG60-112 manuals
Add to My Manuals
Save this manual to your list of manuals |
Page 6 highlights
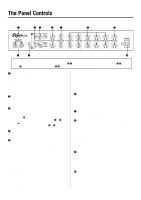
The Panel Controls s Front Panel q rt y u i o w e !0 The DG60-112 is a high-quality guitar amp with 2 independent channels. You can switch between channel A (the upper row of knobs t-o) settings and channel B (the lower row of knobs t-o) with the switch e or with a foot-switch. Control knobs t-o for both channels A and B operate in the same manner. q Input Jack (INPUT HIGH, LOW) The amplifier's input jack. The guitar is connected to the amplifier here. Guitars with a high output should be connected to the LOW jack while guitars with a low output should be connected to the HIGH jack. If you want a clean tone we recommend connecting the guitar to the LOW jack. * Always switch the power off before connecting the guitar. w Peak Indicator This indicator is used to match the input level. The indicator lights when the peak level is exceeded. e Channel Select Switch Use to switch between Channels A and B. Press the switch to select the channel you want to use. When Channel A ( ) is selected, the amplifier will produce tone according to the settings specified by the upper row of knobs t - o. When Channel B( ) is selected, the amplifier will produce tone according to the settings specified by the lower row of knobs t - o. r Channel Indicator The indicator lamp corresponding to the currently selected channel lights. t Amp Select Switch Use to select one of the 8 internal preset guitar amp types. With any of the amp types, basically 2 is brighter than 1. Depending upon the control settings, as shown in "Setting Examples" on the page 8, the tone character that is possible is wider than what the amp type's name implies. • LEAD1, LEAD2 Lead offers a tone with heavy distortion. Substantial mids provide a fat tone with excellent sustain. • DRIVE1, DRIVE2 Drive offers a thick overdrive tone with excellent sustain similar to when the volume is fully raised on a tube amplifier. Using the tone control knobs to adjust the balance of their respective frequencies creates a wider variety of tone. • CRUNCH1, CRUNCH2 Crunch offers expressive picking articulation and nuance. Raise the 6 GAIN level creates a tone similar to that natural overdrive when the volume is raised on a tube amplifier. This crisp tone is excellent for playing riffs and rhythm parts. • CLEAN1, CLEAN2 A clean sound without distortion. Use an effect such as reverb or chorus to create a spacious sound. y Gain Volume (GAIN) Use to control the amount of distortion. Rotate the knob to the right to increase the amount of distortion. * If the GAIN is set to "0", sound will not be produced even of the MASTER Volume is turned up. u Master Volume (MASTER) Use to control the overall volume of the GAIN and tone control settings. i Tone Controls (TREBLE, HIGH MID, LOW MID, BASS, PRESENCE) Use to control the levels of their respective frequencies. Rotate the knob to the right to increase the level of tone. TREBLE Controls the level of the high frequencies. HIGH MID Controls the level of the upper mid frequencies. LOW MID Controls the level of the lower mid frequencies. BASS Controls the level of the low frequencies. PRESENCE Controls the level of the frequencies higher than TREBLE. o Reverb Volume (REVERB) Use to control the amount of reverb (Spring Reverb). Rotate the knob to the right to increase the amount of reverb. If the knob is set to "0", no reverb will be produced. Reverb can also be switched ON/OFF with a foot switch connected to the FOOT SW REVERB jack located on the rear panel. !0 Power Switch (POWER) The main unit's power switch. Press the switch to turn the amp ON/OFF. * To protect the speakers make sure the MASTER Volume is set to "0"before you switch the power ON/OFF.
-
 1
1 -
 2
2 -
 3
3 -
 4
4 -
 5
5 -
 6
6 -
 7
7 -
 8
8 -
 9
9 -
 10
10 -
 11
11 -
 12
12 -
13
-
14
-
15
-
16
-
17
-
18
-
19
-
20
-
21
-
22
-
23
-
24
-
25
-
26
-
27
-
28
-
29
-
30
-
31
-
32
-
33
-
34
-
35
-
36
-
37
-
38
-
39
-
40
 |
 |
