Yamaha MT2X Owner's Manual
Yamaha MT2X Manual
 |
View all Yamaha MT2X manuals
Add to My Manuals
Save this manual to your list of manuals |
Yamaha MT2X manual content summary:
- Yamaha MT2X | Owner's Manual - Page 1
YAMAHA® AUTHORIZED PRODUCT MANUAL Multitrack Cassette Recorder - Yamaha MT2X | Owner's Manual - Page 2
YAMAHA Multitrack Cassette Recorder Operating Manual - Yamaha MT2X | Owner's Manual - Page 3
Yamaha MT2X Multitrack Cassette Recorder. The Yamaha MT2X Multitrack Cassette Recorder is a complete multitrack recording package which elegantly integrates a high-performance six-channel mixer and dual-speed 4-track cassette recorder. It is fully compatible with advanced MIDI tape synchronization - Yamaha MT2X | Owner's Manual - Page 4
back tapes recorded without dbx. *dbx and the dbx mark are trademarks of dbx in- corporated. *The dbx system has been manufactured under license of dbx Incorporated. CHECK YOUR AC POWER SUPPLY Make sure that your local AC mains voltage matches the voltage specified on the bottom panel of the MT2X - Yamaha MT2X | Owner's Manual - Page 5
tape side For left channel track on the A side (direction) determining which two tracks will be used. These recorders do not allow separate selection of tracks for recording and playback. Multitrack recorders, however, allow you to record or MT2X MULTITRACK CASSETTE RECORDER playback tracks - Yamaha MT2X | Owner's Manual - Page 6
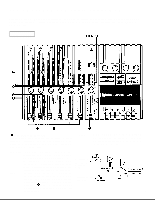
mixer, recorder, meter/ monitor, and connector sections. Familiarize yourself with them in order to take full advantage of the MT2X's versatile functions. MIXER playback material which has already been recorded on this channel. Channels 1-4 correspond to tracks 1-4 on the tape. MIC/LINE: Only input - Yamaha MT2X | Owner's Manual - Page 7
. Adjust the output level of the microphone or instrument as outlined in its instruction booklet. Low output source, such as a microphone High output source, such as high frequency response when the track is re-recorded. This technique is known as "pre-emphasis," and is commonly used in professional - Yamaha MT2X | Owner's Manual - Page 8
also useful in ping-ponging (see "Pingponging" on page 25). AUX CONTROLS The MT2X is equipped with an AUX SEND jack and two (left and right) AUX RETURN 5 signal Channel 6 signal Amplified monitor speakers Performers or sound mixers can control the level balance of the four channels (instruments) - Yamaha MT2X | Owner's Manual - Page 9
of the AUX RTN control and the sound mixed through the stereo mix buss. The output level of the ST OUT jack (the recording level at mixdown) and the recording level during ping-ponging are also adjusted with this control. Set the control input faders at "7" for best results. AUX MASTER SEND - Yamaha MT2X | Owner's Manual - Page 10
the left stereo signal. REC INDICATORS Each track on the MT2X has its own REC indicator LED. When the RECORD SELECT switches are used to set one or more of the tracks to the REC standby mode (that is, the selected tracks are ready to record but the cassette transport is not yet running in the REC - Yamaha MT2X | Owner's Manual - Page 11
track) the pitch of the previously recorded material can be altered to match the new material if necessary. This feature can also be used to obtain certain special effects during recording. TAPE SPEED SWITCH This switch selects either LO (4.8 cm/s) or HI (9.5 cm/sec) cassette tape speed. The - Yamaha MT2X | Owner's Manual - Page 12
Set the switch in this position to display the level of each track. Starting from the far left, each meter corresponds to tracks 1--4. During playback, the playback level is displayed; during recording, the recording level is displayed. Setting the switch to this position during overdubbing enables - Yamaha MT2X | Owner's Manual - Page 13
operations, the mixed signal of all the instruments can be monitored. MONITOR Position: This position is for monitoring the signal of each track. You can freely monitor while mixing the sound of each track during recording or playback. Using the MONITOR LEVEL Controls set the desired level for each - Yamaha MT2X | Owner's Manual - Page 14
to the MONITOR position, these level controls are used for each track to achieve a level balance for easy monitoring. Use these controls of the headphones (See page 10). CONNECTOR SECTION FRONT PANEL INPUT JACKS The MT2X mixer has six channels and therefore six INPUT jacks. INPUT 1 and 2 can be - Yamaha MT2X | Owner's Manual - Page 15
to these jacks must be set to match the output level of the MT2X. These jacks can be conveniently used in the following ways: l Another 4-track recorder can be connected for direct dubbing of all four channels. l An external mixer can be connected for mixdown. ST OUT JACKS The mixed signals of each - Yamaha MT2X | Owner's Manual - Page 16
a pair of Yamaha KS10 powered speakers. AMP MT2X + SPX90 + monitor system + mic + guitar + DX100 + RX17 I I RX17 DX21 n MIDI TAPE SYNC SYSTEM MT2X + YMC2 + QX21 to playback of the MT2X tape. Other material can now be recorded on tracks 1 through 3 of the MT2X - vocals, acoustic instruments - Yamaha MT2X | Owner's Manual - Page 17
off the tab with a screwdriver or similar implement. RECORDING OVER A TAPE WITH THE TABS BROKEN OUT: Cover the hole with l Playing tapes recorded on other cassette recorders When playing Normal-position tapes, or tapes encoded with Dolby B noise reduction the MT2X, the following steps are advised - Yamaha MT2X | Owner's Manual - Page 18
distortion may become a problem. dbx SYSTEM Keep the dbx switch "ON" to expand dynamic range and to reduce inherent tape noise. SELECT THE BEST TAPE SPEED The MT2X gives you a choice of two tape speeds. The low speed gives you about double the record/playback time of the high-speed mode - at the - Yamaha MT2X | Owner's Manual - Page 19
we'll use an RX-series Digital Rhythm programmer to record a high-quality drum track. The "L" and "R" stereo outputs from the rhythm programmer are fed to input channels 1 and 2 of the MT2X, and these are mixed down onto track 1 of the tape. The Yamaha SPX90 Multi-effect processor is an ideal way to - Yamaha MT2X | Owner's Manual - Page 20
RTN jacks (output). 2. Getting ready Lift open the cassette door and insert a chrome position (CrO2) tape. Bias: HIGH, Eq: 70µs. Return all the tape speed the 9.5 cm/sec. is recommended. Set the RECORD SELECT switch 1 to the "L" posi- tion. This is to record the Left stereo signal onto track - Yamaha MT2X | Owner's Manual - Page 21
and 2 up to "7". Set the GAIN controls to the LINE position, start the rhythm programmer and adjust its output level so the "+3" segment on the track-1 level meter lights only briefly on the signal peaks. Pull the input faders back down to "0". - The proper input levels for channels 1 and 2 are now - Yamaha MT2X | Owner's Manual - Page 22
tracks during overdubbing later on. When the music sequence is over, press the STOP switch to stop the recording. Then, press the REW switch, and the tape will rewind to a point just before the beginning "999" on the tape counter and stop. - Drum Recording Completed - Track 1 Track 2 Track 3 Track - Yamaha MT2X | Owner's Manual - Page 23
problems, press the REW switch and reset all the knobs and controls to their normal positions. Now it's time to record the bass. If the recording is not to your satisfaction, you can rerecord the whole track. Or you can use the "punchin/punch-out" technique to record over a certain spot on the tape - Yamaha MT2X | Owner's Manual - Page 24
musician to play many different instrumental parts on a single recording. If you're multitalented, multitrack overdubbing can clone you into your own group. Now, we're going to record a bass guitar on track 2 in synchronization with the drum part already recorded on track 1. There are two ways to - Yamaha MT2X | Owner's Manual - Page 25
for the rest of the steps.) Set the same tape speed as before. (This also goes for the rest of the steps.) Set the RECORD SELECT position to "2". the REC indicator will flash to show that the bass guitar connected to input jack 2 will be recorded on track 2. Press the pause switch to start the - Yamaha MT2X | Owner's Manual - Page 26
through headphones, the bass player should play along in sync with the drum track. When the musical segment is over, stop and rewind the tape. - Bass Guitar Recording completed - Track 1 Track 2 Track 3 Track 4 8. Post recording check Just press the play switch to check to see that the - Yamaha MT2X | Owner's Manual - Page 27
to provide a line-level signal to the MT2X. PING-PONG < PING-PONG RECORDING > After the rhythm section has been recorded on tracks 1 - 3, only track 4 remains as an empty, spare track. Since there are three more parts to be recorded, more tracks will be needed. The ping-pong technique (sometimes - Yamaha MT2X | Owner's Manual - Page 28
everything sounds right. Rewind the tape, and reset to the REC PAUSE mode. 4. Recording Push the PAUSE switch to start recording. When ping-pong recording is finished, rewind the tape. - Ping-pong Recording Completed - Track 1 Track 2 Track 3 Track 4 5. Post recording check Just press the PLAY - Yamaha MT2X | Owner's Manual - Page 29
lead solo into an empty section of the vocal track. However, this sort of operation requires a blank section of tape on a track. NOTE: The RECORD SELECT switches of the MT2X can be operated by the optional FS-1 Foot Switch. The RECORD SELECT switch for the track to be redone must be set, and then it - Yamaha MT2X | Owner's Manual - Page 30
- Signal Path during Punch-in/Punch-out Operation - 28 - Yamaha MT2X | Owner's Manual - Page 31
Set the PHONES SELECT switch to "MIX". (If it's not set to this position, you won't be able to monitor the new recording sound and the playback sound of tracks 1-4 during punch-in/punch-out operation.) Turn the MONITOR LEVEL control to about . "7". Turn the PHONES volume to about "7". Set the METER - Yamaha MT2X | Owner's Manual - Page 32
. When using the FS-1, press on the foot switch again. In both cases, the REC indicator will begin flashing. Rewind the tape. - Punch-in/Punch-out Completed - 7. Post recording check Press the PLAY switch to make sure the passage was redone correctly. Return all controls and switches to their normal - Yamaha MT2X | Owner's Manual - Page 33
"trackdown" or "remix", mixdown is when all the four recorded tracks are mixed to achieve a certain sound balance in level, effects, and stereo positioning, and then recorded onto one side of a cassette tape in mono or stereo. This tape is the final "master". In this next step, the instruments - Yamaha MT2X | Owner's Manual - Page 34
the level meters of the stereo tape deck, set its proper recording level. Rewind the tape. 4. Recording Press the PLAY switch of the MT2X at the same time you start recording with the stereo tape deck. After the recording is finished, play back the mixed down tape. How does it sound? You can - Yamaha MT2X | Owner's Manual - Page 35
MT2X recorder section permits multitrack recording on four tracks, the mixer section offers a total of six input channels. The following are a few hints on using the extra two channels for more effective, more versatile recording. * Once three of the four available recorder tracks have been recorded - Yamaha MT2X | Owner's Manual - Page 36
MIDI synchronizing signal from the RX17 to FSK signal, which is recorded on track 4 of the MT2X. In order to operate the RX17 by the FSK signal recorded on track 4, connect everything like this: Start the tape, mixdown the sound from tracks 1-3 and the RX17's drum sounds input through the AUX Left - Yamaha MT2X | Owner's Manual - Page 37
the optional YMC2 or through the SYNC IN jack and recorded onto track 4. However, if the level is not above the prescribed level, the SYNC may not operate during playback. If this happens repeatedly, adjust the level adjustment volume at the bottom of the MT2X. (Since the unit is already set at the - Yamaha MT2X | Owner's Manual - Page 38
BLOCK DIAGRAM NOTE: When the REC button is engaged, the panel switches can be used to individually order recording on only those channels with RECORD SELECT not switched "OFF". 36 - Yamaha MT2X | Owner's Manual - Page 39
GENERAL SPECIFICATIONS TRANSPORT Tape type Heads Tape speeds Pitch control Wow & flutter fast wind Motor CONNECTORS channel ferrite erase 4.8 cm/sec, 9.5 cm/sec ±10% Less than 0.05% WRMS Approx 100 sec, for C-60 tape DC servo 10 k-ohms - 10 to - 50 dB (fader nominal) + 10 dB (trim min.) - 56 dB - Yamaha MT2X | Owner's Manual - Page 40
INTRODUCTION TO THE ACCESSORIES DIGITAL MULTI-EFFECT PROCESSOR - SPX90 GRAPHIC EQUALIZER - GQ1031B 2-CHANNEL COMPRESSOR/LIMITER - GC2020B MIDI CONVERTER - YMC2 POWER AMPLIFIER - P2075 KEYBOARD SPEAKER - KS10 SPEAKER SYSTEM - S10X FOOT SWITCH - FS-1 38 - Yamaha MT2X | Owner's Manual - Page 41
YAMAHA SINCE 1887 NIPPON GAKKI CO., LTD. HAMAMATSU, JAPAN VD70420 SERVICE The MT2X is supported by Yamaha's worldwide network of factory trained and qualified dealer service personnel. In the event of a problem, contact your nearest Yamaha dealer. Printed in Japan - Yamaha MT2X | Owner's Manual - Page 42
YAMAHA® Yamaha Corporation of America 6600 Orangethorpe Avenue, P.O. Box 6600, Buena Park, CA 90622-6600 11/17/98 98109
-
 1
1 -
 2
2 -
 3
3 -
 4
4 -
 5
5 -
 6
6 -
 7
7 -
8
-
9
-
10
-
11
-
12
-
13
-
14
-
15
-
16
-
17
-
18
-
19
-
20
-
21
-
22
-
23
-
24
-
25
-
26
-
27
-
28
-
29
-
30
-
31
-
32
-
33
-
34
-
35
-
36
-
37
-
38
-
39
-
40
-
41
-
42
 |
 |
®
YAMAHA
AUTHORIZED
PRODUCT MANUAL
Multitrack Cassette Recorder