Yamaha MT2X Owner's Manual - Page 11
Ff Switch Fast Forward - multitrack cassette recorder
 |
View all Yamaha MT2X manuals
Add to My Manuals
Save this manual to your list of manuals |
Page 11 highlights
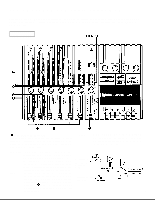
REC SWITCH When this switch is pressed, the PLAY switch also moves, and the unit goes into the recording mode. However, if the RECORD SELECT switches for all tracks 1-4 are switched OFF, nothing will be recorded. NOTE: When the REC switch is pressed down, noise occurs which is recorded on the tape. In order to prevent this, we recommended the use of the PAUSE switch . Press the PAUSE switch first, then press the REC switch. To start recording, press the PAUSE switch again to shift out of the REC pause mode and into the recording mode. PLAY SWITCH Press this switch for playback. However, if the input selector switch of a track is not in the TAPE position, the sound will not be heard on the stereo buss. REW SWITCH (REWIND) Use this switch to rewind the tape. Pressing it when the MT2X is in the PLAY mode enables you to hear the sound of the tape while it rewinds. This feature is useful for finding the beginning of a song or other recorded material. FF SWITCH (FAST FORWARD) Use this switch to quickly advance the tape forward. Pressing it when the MT2X is in the PLAY mode enables you to hear the sound of the tape while it is moved forward. This feature is useful for cueing up the start of a subsequent song or other recorded material on the tape. STOP SWITCH Press this to stop tape. PAUSE SWITCH Press this switch to momentarily stop playback or recording in progress. Press it again to restart. dbx SWITCH Ordinary cassette tapes don't have sufficient dynamic range (the level difference between the softest sounds and the loudest peaks) to adequately record highly dynamic music. If the dbx switch is put "ON" during recording, highly dynamic music signals can be adequately handled, while the hiss noise inherent to cassette tapes is kept down below the range of human hearing. If the dbx switch is kept "ON" during recording, it must also be kept "ON" during playback. PITCH CONTROL During recording or playback, this control can be used to vary the tape running speed from +10% to -10%. The pitch of voices or musical instruments also varies in proportion to tape speed. Under normal conditions, the control should be in the center position. When overdubbing (playing back a recorded passage while recording new material on a different track) the pitch of the previously recorded material can be altered to match the new material if necessary. This feature can also be used to obtain certain special effects during recording. TAPE SPEED SWITCH This switch selects either LO (4.8 cm/s) or HI (9.5 cm/sec) cassette tape speed. The low-speed setting corresponds to standard cassette tape speed, offering maximum recording time. The HI setting causes the tape to run at twice the standard tape speed, reducing available recording time but significantly improving sound quality. TAPE COUNTER This displays the amount of tape run. RESET SWITCH Press this switch to reset the tape counter to "000". Pressing this switch at the start of recording, or at the beginning of a song, makes it easy to cue up the selection from the start. ZERO STOP SWITCH If this switch is set "ON" during rewinding, the tape will stop when the tape counter reaches "999". During multitrack recording, this feature is convenient for repeated playback or recording operations after rewind. 9
-
 1
1 -
2
-
3
-
4
-
5
-
 6
6 -
 7
7 -
 8
8 -
 9
9 -
 10
10 -
 11
11 -
 12
12 -
 13
13 -
 14
14 -
 15
15 -
 16
16 -
17
-
18
-
19
-
20
-
21
-
22
-
23
-
24
-
25
-
26
-
27
-
28
-
29
-
30
-
31
-
32
-
33
-
34
-
35
-
36
-
37
-
38
-
39
-
40
-
41
-
42
 |
 |
