Yamaha PSR-E433 Owner's Manual - Page 29
Recording to a Specified Track, User 1 - case
 |
View all Yamaha PSR-E433 manuals
Add to My Manuals
Save this manual to your list of manuals |
Page 29 highlights
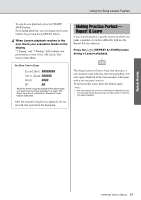
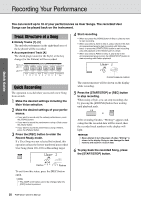
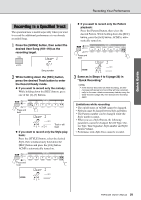
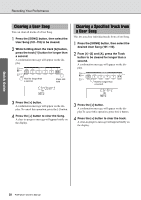
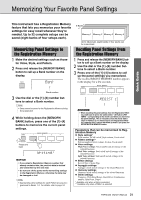
Quick Guide Recording Your Performance Recording to a Specified Track The operation here is useful especially when you want to record the additional performances to an already recorded Song. 1 Press the [SONG] button, then select the desired User Song (101-110) as the recording target. User 1 101 Song number 2 While holding down the [REC] button, press the desired Track button to enter the Record Ready mode. If you want to record only the melody: While holding down the [REC] button, press one of the [1]-[5] buttons. If you want to record only the Pattern playback: Press the [Pattern] button, then select the desired Pattern. While holding down the [REC] button, press the [6/A] button. ACMP is automatically turned on. Press and hold User 1 rEC 001 3 Same as in Steps 4 to 6 (page 28) in "Quick Recording." NOTE • If the memory becomes full while recording, an alert message will appear and recording will stop automatically. In this case, delete unnecessary data by using the Clear functions (page 30), then execute the recording again. Press and hold User 1 rEC 001 Track 1 will flash If you want to record only the Style playback: Press the [STYLE] button, select the desired Style, then simultaneously hold down the [REC] button and press the [6/A] button. ACMP is automatically turned on. Limitations while recording • The on/off status of ACMP cannot be changed. • Playback cannot be changed between Style and Pattern. • The Pattern number can be changed while the Style number cannot. • When you use a Style/Pattern, the following parameters cannot be changed: Reverb Type, Chorus Type, Time Signature, Style number and Style/ Pattern Volume. • Performance with a Split Voice cannot be recorded. Press and hold User 1 rEC 001 PSR-E433 Owner's Manual 29
-
 1
1 -
2
-
3
-
4
-
5
-
6
-
7
-
8
-
9
-
10
-
11
-
12
-
13
-
14
-
15
-
16
-
17
-
18
-
19
-
20
-
21
-
22
-
23
-
 24
24 -
 25
25 -
 26
26 -
 27
27 -
 28
28 -
 29
29 -
 30
30 -
 31
31 -
 32
32 -
 33
33 -
 34
34 -
35
-
36
-
37
-
38
-
39
-
40
-
41
-
42
-
43
-
44
-
45
-
46
-
47
-
48
-
49
-
50
-
51
-
52
-
53
-
54
-
55
-
56
-
57
-
58
-
59
-
60
-
61
-
62
-
63
-
64
-
65
-
66
-
67
-
68
 |
 |
