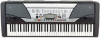
Yamaha PSR-GX76 Owner's Manual
Yamaha PSR-GX76 Manual
 |
View all Yamaha PSR-GX76 manuals
Add to My Manuals
Save this manual to your list of manuals |
Yamaha PSR-GX76 manual content summary:
- Yamaha PSR-GX76 | Owner's Manual - Page 1
- Yamaha PSR-GX76 | Owner's Manual - Page 2
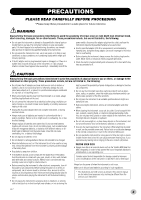
only with the components supplied or; a cart, rack, or stand that is recommended by Yamaha. If a cart, etc., is used, please observe all safety markings and instructions that accompany the accessory product. SPECIFICATIONS SUBJECT TO CHANGE: The information contained in this manual is believed to be - Yamaha PSR-GX76 | Owner's Manual - Page 3
fied Yamaha service personnel. • Do not expose the instrument to rain, use it near water or in damp or wet conditions, or place containers on it containing liquids which might spill into any openings. • If the AC adaptor cord or plug becomes frayed or damaged, or if there is a sudden loss of sound - Yamaha PSR-GX76 | Owner's Manual - Page 4
of the Yamaha PSR-GX76 PortaTone! You now own a portable keyboard that combines advanced functions, great sound and exceptional ease-of-use in a highly compact package. Its outstanding features also make it a remarkably expressive and versatile instrument. Read this Owner's Manual carefully while - Yamaha PSR-GX76 | Owner's Manual - Page 5
Is MIDI 67 • Connecting to a Personal Computer 69 • Controlling PSR-GX76 Playback from an External Device - External Clock 70 • Using Bulk Dump Send to Save Data 71 • Using Initial Setup Send with a Sequencer...... 73 • Local Control 74 Troubleshooting 75 Data Backup & Initialization 76 Voice - Yamaha PSR-GX76 | Owner's Manual - Page 6
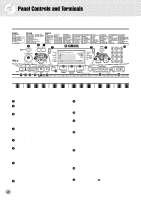
Controls and Terminals s Front Panel q er u t wy 000 GrandPno @0 @1 @2 !9 !3 !4 !5 !6 !7 !8 u i !2 !0 o !1 @3 @4 q Power switch ([STANDBY/ON]) w [MASTER VOLUME] dial This determines the overall volume of the PSR-GX76 of the PSR-GX76, including effects, transpose, tuning, and MIDI. (See - Yamaha PSR-GX76 | Owner's Manual - Page 7
tracks of a User song. (See control over sustain, just like the damper pedal on a piano. (See page 9.) @8 PHONES/OUTPUT jack This is for connection to a set of stereo headphones or to an external amplifier/speaker system. (See page 9.) @9 DC IN 10-12V jack This is for connection to a PA-3B AC power - Yamaha PSR-GX76 | Owner's Manual - Page 8
other adaptors may result in irreparable damage to both the adaptor and the PSRGX76. • Unplug the AC Power Adaptor when not using the PSR-GX76, or during electrical storms. • Never mix old and new batteries or different types of batteries (e.g., alkaline and manganese). • To prevent possible damage - Yamaha PSR-GX76 | Owner's Manual - Page 9
footswitch while turning the power on. Doing this changes the recognized polarity of the footswitch, resulting in reversed footswitch operation. s Using the MIDI Terminals The PSR-GX76 also features MIDI terminals, allowing you to interface the PSRGX76 with other MIDI instruments and devices. (For - Yamaha PSR-GX76 | Owner's Manual - Page 10
the Piano Simply by pressing the [Piano] button, you can automatically reset the entire PSR-GX76 for piano play. z Press the [Piano] button. 000 GrandPno Playing along with the Metronome z Press the [METRONOME] button. x Play the keyboard. Want to find out more? See page 20. Want to find out more - Yamaha PSR-GX76 | Owner's Manual - Page 11
The PSR-GX76 has a huge total of 256 dynamic and realistic instrument voices. Let's try a few of them out now... q Press the [VOICE] button. w Select a voice. 000 GrandPno 002 BritePno e Play the keyboard. Want to find out more? See page 23. Playing with the DJ Feature The exciting new DJ - Yamaha PSR-GX76 | Owner's Manual - Page 12
Quick Guide Step 2 Songs 000 GrandPno zx xq xcr z w Playing the Songs The PSR-GX76 is packed with a total of 105 songs, including five User songs to which you can record your own performances, plus 100 songs that not only showcase the high-quality sound of the PSR-GX76 but can also be used - Yamaha PSR-GX76 | Owner's Manual - Page 13
song (101 - 105) for recording. e Start recording by playing a melody on the key- board. The PSR-GX76 starts recording as soon as you play the first note on the keyboard. 102 User 2 w Simultaneously hold down the [RECORD] button and press the desired track number button ([1] - [5]). r To stop - Yamaha PSR-GX76 | Owner's Manual - Page 14
powerful yet easy-to-use Auto Accompaniment features give you professional instrumental backing for your performances. Simply play chords with your left hand - and the PSR-GX76 automatically produces appropriate bass, chord and rhythm backing. Use your right hand to play melodies, and you'll sound - Yamaha PSR-GX76 | Owner's Manual - Page 15
Keys for entering the chord type (C3 - B4) the chord root (C5 - B5) c Specify the chord type of the chord (in this case, M7). Learning how to play a specific chord Example: G M7 Root note Chord type z Press the [Dict.] button. v Play the notes of the chord as indicated in the keyboard - Yamaha PSR-GX76 | Owner's Manual - Page 16
Guide timing of the notes. Lesson 2 - Waiting In this lesson step, the PSR-GX76 waits for you to play the correct notes before continuing playback of the song. and master both hands. z Select one of the Lesson songs. For instructions on selecting songs, see page 50. c Start the Lesson. x Select - Yamaha PSR-GX76 | Owner's Manual - Page 17
notes. In Lesson 1, the particular note you play on the keyboard is unimportant. The PSR-GX76 checks your timing and how rhythmically "tight" your playing is. the rhythm. Lr4 BothHand • The PSR-GX76 also has a convenient Tap Tempo function that allows you to "tap" a new tempo in real time. (See - Yamaha PSR-GX76 | Owner's Manual - Page 18
r Keyboard t Measure o Song track indicators u Chord y Beat marks q Indicators These indicate the operating condition of the PSRGX76 as the PSR-GX76. The currently selected setting is indicated by a dark bar that appears next to its name (printed on the panel). e Notation / r Keyboard These two - Yamaha PSR-GX76 | Owner's Manual - Page 19
and type. It also indicates chords played in the ACMP section of the keyboard when the Style mode and auto accompaniment are on. i Song/Voice/Style (See page 56.) Music Stand Insert the bottom edge of the included music stand into the slot located at the top rear of the PSR-GX76 control panel. 19 - Yamaha PSR-GX76 | Owner's Manual - Page 20
for playing with the special Pianist styles (#086 - #100). When auto accompaniment is turned on, these provide piano-only accompaniment in a variety of music styles. Using the Metronome 1 Call up the Tempo setting. Press the [TEMPO/TAP] button. Current Tempo value 068 TEMPO 2 Change the value - Yamaha PSR-GX76 | Owner's Manual - Page 21
all low clicks) Indicates current beat number 2 TIME SIG Adjusting the Metronome Volume You can adjust the volume of the Metronome sound independently of the other PSR-GX76 sounds. The volume range is 000 - 127. 1 Call up the Metronome Volume setting. Press the right Overall button until "MTR VOL - Yamaha PSR-GX76 | Owner's Manual - Page 22
step is called up. The DJ voice is divided into "blocks" (as shown below). Each block has a different sound. Block #1 Block #2 Block #3 Block #4 For Lesson 1, any note on the keyboard can be played. For the other Lesson steps, play the appropriate octave block. Once the song starts playing, play - Yamaha PSR-GX76 | Owner's Manual - Page 23
See page 29.) There's also a Touch Sensitivity control (page 28), which determines how the voices respond to your playing technique. The PSR-GX76 also includes special Drum Kit voices - #119 - #128 - that let you play various drum and percussion sounds from the keyboard. (Refer to the Drum Kit Voice - Yamaha PSR-GX76 | Owner's Manual - Page 24
. • Each voice is automatically called up with the most suitable octave range setting. Thus, playing middle C with one voice may sound higher or lower than another voice at the same key. 3 Play the selected voice. Since either the Style or Song mode is active in the background (as indicated by the - Yamaha PSR-GX76 | Owner's Manual - Page 25
in mind that the PSR-GX76 has two separate sets of voices: 128 Panel voices and 128 GM (General MIDI) Voices. The GM Voices can also be used for optimum playback of GM-compatible song data. This means that any GM song data (played from a sequencer or other MIDI device) will sound just as the - Yamaha PSR-GX76 | Owner's Manual - Page 26
Playing Voices Transpose and Tuning You can also adjust the tuning and change the transposition (key) of the entire PSR-GX76 sound with the Transpose and Tuning functions. s Transpose Transpose determines the key of both the main voice and the bass/chord accompaniment of the selected style. It - Yamaha PSR-GX76 | Owner's Manual - Page 27
both [+]/[-] buttons simultaneously (when Tuning is selected). Pitch Bend Range The GX76 has a [PITCH BEND] wheel that lets you change the pitch of BEND] wheel affects the voices played in the right-hand section of the keyboard. (It has no effect on the auto accompaniment.) 1 Select the Pitch - Yamaha PSR-GX76 | Owner's Manual - Page 28
control over the voices, letting you determine how loud or soft the sound is by your playing strength. Turn the Touch function on or off as desired by pressing the [TOUCH] button. Touch Sensitivity lets you set how the PSR-GX76 how lightly or strongly you play the keys. This lets you play over a - Yamaha PSR-GX76 | Owner's Manual - Page 29
sound of the voices. The PSR-GX76 has three separate effect systems - Reverb, DSP, and Harmony - and each has many different effect types to choose from. Reverb The Reverb effect reproduces the natural ambient "wash" of sound are available when controlling the PSR-GX76 from a MIDI device. (For - Yamaha PSR-GX76 | Owner's Manual - Page 30
useful and dynamic effects for enhancing and changing the sound of the voices. Included among these miscellaneous effects are Each voice of the PSR-GX76 has its own independent DSP setting. • Fifty-one additional DSP Types are available when controlling the PSR-GX76 from a MIDI device. (For details - Yamaha PSR-GX76 | Owner's Manual - Page 31
Block, Country, and Octave), chords must be played in the Accompaniment section of the keyboard. • The speed of the Trill, Tremolo, and Echo effects depends on the Tempo setting (page 33). • Each voice of the PSR-GX76 has its own independent Harmony setting. 3 Set the Harmony Type, if desired. Use - Yamaha PSR-GX76 | Owner's Manual - Page 32
. Equalizer effect that boosts both high and low frequencies, as is typical in most disco music. Equalizer effect that cuts both high and low frequencies, to simulate the sound heard through a telephone receiver. Equalizer with three separate frequency bands. Equalizer with two separate frequency - Yamaha PSR-GX76 | Owner's Manual - Page 33
one-, two- or threenote harmonies to the single-note melody played in the right hand. These types only sound when chords are played in the auto accompaniment section of the keyboard. Types 6 - 26 are rhythm-based effects and add embellishments or delayed repeats in time with the auto accompaniment - Yamaha PSR-GX76 | Owner's Manual - Page 34
, letting you control the accompaniment by the chords you play. Auto accompaniment effectively splits the keyboard into two sections: The upper is used for playing a melody line, and the lower (set by default to keys F#2 and lower) is for the auto accompaniment function. The PSR-GX76 also features - Yamaha PSR-GX76 | Owner's Manual - Page 35
enables and cancels the Sync Start function. (See page 36.) This controls the Intro and Ending sections. (See pages 36, 38.) Pressing this Pressing this button switches between the Main A and Main B sections, automatically adding a fill-in pattern before changing the section. (See page 40.) - Yamaha PSR-GX76 | Owner's Manual - Page 36
by tapping the [TEMPO/TAP] button twice at the desired tempo. s Using Sync Start The PSR-GX76 also has a Sync Start function that allows you to start the rhythm/accompaniment by simply pressing a key on the keyboard. To use Sync Start, first press the [SYNC START] button (the beat marks all flash - Yamaha PSR-GX76 | Owner's Manual - Page 37
/ENDING] button. Indicates Intro standby. INTRO≥A 3) Press the [SYNC START] button to enable Sync Start, and start the Intro section and accompaniment by playing any key on the keyboard. (When auto accompaniment is on, play a key or chord in the auto accompaniment section of the - Yamaha PSR-GX76 | Owner's Manual - Page 38
Stop on (page 39), you can control breaks in the rhythm and accompaniment simply by releasing your fingers from the keys. As long as you play and hold a chord or key in the auto accompaniment section of the keyboard. • Chords played in the auto accompaniment section of the keyboard are also detected - Yamaha PSR-GX76 | Owner's Manual - Page 39
Stop This convenient feature lets you stop (or pause) the auto accompaniment by releasing your fingers from the auto accompaniment section of the keyboard. Playing the chord again restarts the auto accompaniment. This is ideal for putting dynamic breaks in your performance - for example, stopping the - Yamaha PSR-GX76 | Owner's Manual - Page 40
You can also use the convenient Tap Tempo function to change the tempo by "tapping" a new one in real time. (See page 36.) Also, the tempo of a style returns to the fill-in pattern is playing. Fill A≥B • Rhythm sounds and fill-in sections are not available when one of the Pianist styles (#086 - #100) - Yamaha PSR-GX76 | Owner's Manual - Page 41
and the Main A or B section begins here. Adjusting the Accompaniment Volume The playback volume of the accompaniment can be adjusted. This volume control affects only the accompaniment volume. The volume range is 000 - 127. 1 Select the Accompaniment Volume function. Press the right Overall button - Yamaha PSR-GX76 | Owner's Manual - Page 42
You can change the chords of the accompaniment by playing keys in the auto accompaniment section of the keyboard using either the "Single Finger" or "Fingered" method. notes of the chord. Whichever method you use, the PSR-GX76 "understands" what chord you indicate and then automatically generates - Yamaha PSR-GX76 | Owner's Manual - Page 43
C7(13) C7(#9) C7b5 C7aug C7sus4 C1+2+5 C7(13) C7(#9) C7b5 C7aug C7sus4 C • Notes in parentheses can be omitted. • Playing two same root keys in the adjacent octaves produces accompaniment based only on the root. • A perfect fifth (1 + 5) produces accompaniment based only on the root and fifth which - Yamaha PSR-GX76 | Owner's Manual - Page 44
Split voices. Auto accompaniment section 1 Select the Split Point control. Press and hold the [ACMP ON/OFF] button until "S_POINT"appears in the display. Current Split Point value 054 S-POINT The current Split Point is also shown in the keyboard section of the display. 2 Change the value. Use the - Yamaha PSR-GX76 | Owner's Manual - Page 45
the root G. 3 Specify the type of the chord (major, minor, seventh, etc.). Press the key on the keyboard that corresponds to the desired chord type (as printed on the panel). Pressing this key selects the major seventh chord type (M7). The display shows the name of the chord, and the individual - Yamaha PSR-GX76 | Owner's Manual - Page 46
three notes and are the most basic and common chords in most music. In this triad, the lowest note is the "root." The root is the most important note in the chord, because it anchors the sound harmonically by determining its "key" and forms the basis for how we hear the other notes - Yamaha PSR-GX76 | Owner's Manual - Page 47
Beautiful sounding harmonies can be built in this manner. The use of intervals and chords is one of the most important elements in music. A The chord type should be indicated to the right as well. Examples for the key of C are shown below. Major chord C Minor chord Cm Augmented chord Caug - Yamaha PSR-GX76 | Owner's Manual - Page 48
style-related settings: Accompaniment On/Off and Split Point Recording a Registration Memory Preset 1 Make all desired settings for the PSR-GX76. Virtually all of the PSR-GX76's settings can be saved to a Registration Memory button. 2 Select the desired bank. Press the [BANK] button, then press - Yamaha PSR-GX76 | Owner's Manual - Page 49
Registration Memory Recalling a Registration Memory Preset 1 Select the appropriate Registration Memory bank. 1 BANK 2 Press the desired Registration Memory preset button ([1] or [2]). 1 REGIST1 49 - Yamaha PSR-GX76 | Owner's Manual - Page 50
Selecting and Playing Songs The PSR-GX76 features a total of 105 songs. These include 100 songs that showcase the rich and dynamic sounds of the instrument, and all 100 of these songs can be used with the educational Lesson feature (page 60), a powerful tool that makes learning songs fun and easy. - Yamaha PSR-GX76 | Owner's Manual - Page 51
Selecting and Playing Songs 3 Start the selected song. Press the [START/STOP] button. As the song plays back, the measure num- ber and chords are shown in the display. • You can play along with the song using the currently selected voice, or even select a different voice for playing along. Simply - Yamaha PSR-GX76 | Owner's Manual - Page 52
function. 4 Turn off the A-B Repeat function. Press the [A-B REPEAT] button. Melody Voice Change The PSR-GX76 lets you play a melody on the keyboard along with each of the songs, either with the original melody voice or one of your own selection. The convenient Melody Voice Change feature takes this - Yamaha PSR-GX76 | Owner's Manual - Page 53
VOICE CHANGE" appears in the display, indicating that the selected panel voice has replaced the song's original melody voice. MELODY V Changing the Tempo The tempo of song playback can be adjusted over a Tempo function to change the tempo by "tapping" a new one in real time. (See page 36.) 53 - Yamaha PSR-GX76 | Owner's Manual - Page 54
Selecting and Playing Songs Adjusting the Song Volume The playback volume of the song can be adjusted. This volume control affects only the song volume. The volume range is 000 - 127. 1 Select the Song Volume function. Press the right Overall button, repeatedly if necessary, until " - Yamaha PSR-GX76 | Owner's Manual - Page 55
Song recording on the PSR-GX76 is similar to using a tape recorder; whatever you play on the keyboard is recorded in real time as you play it. Also, when you record subsequent parts to other tracks, you can hear the previously recorded parts as you record new ones. Recording a User Song Data that - Yamaha PSR-GX76 | Owner's Manual - Page 56
song for recording. Use the numeric keypad to select the desired song: 101 - 105. If no song is manually selected, the PSR-GX76 automatically selects the first available empty song number. 102 User 2 • User song numbers can be selected in the same way as with the voices (see page 24). You can use - Yamaha PSR-GX76 | Owner's Manual - Page 57
Voices, the lower Voice cannot be recorded. rEC User 2 Indicates the current measure If you want to song in the auto accompaniment section of the keyboard. The accompaniment starts automatically and you can in the display flashes. 7 Listen to your new recording. To play back the song from the beginning - Yamaha PSR-GX76 | Owner's Manual - Page 58
Song Recording Song Clear The Song Clear operation completely erases all recorded data on all tracks of a selected User song. Use this operation only when you're sure you want to erase a song and record a new one. To erase an individual track of a song while leaving the other tracks intact, use the - Yamaha PSR-GX76 | Owner's Manual - Page 59
The Track Clear operation completely erases all recorded data on a selected track of a selected User song, leaving the other tracks intact. Use this operation only when you're sure you want to erase a track and record a new one. To erase the data of an entire song, use the Song Clear operation (page - Yamaha PSR-GX76 | Owner's Manual - Page 60
fun and easy-to-use way to learn how to read music and play the keyboard. There are a total of 100 Lesson songs (Songs 001 to long as you play in rhythm. s Lesson 2 - Waiting In this lesson step, the PSR-GX76 waits for you to play the correct notes before continuing playback of the song. s Lesson 3 - Yamaha PSR-GX76 | Owner's Manual - Page 61
(Song Lesson off) To select Lesson 4, press both [L] and [R] buttons simultaneously. Lr4 BothHand • When the Talking function (page 66) is on, the PSR-GX76 "announces" the current Lesson step. • When a DJ song is selected, the left (L) and right (R) lessons are identical. 3 Start the Lesson. The - Yamaha PSR-GX76 | Owner's Manual - Page 62
) until Lesson 1 is indicated. r1 Timing • The melody note does not sound unless your playing is in time with the rhythm. 3 Play the appropriate melody one note repeatedly in time with the music. Regarding chords and the use of the left hand, the PSR-GX76 actually has two different types of - Yamaha PSR-GX76 | Owner's Manual - Page 63
Lesson 2 - Waiting In this lesson step, the PSR-GX76 waits for you to play the correct notes before continuing playback of the song. This lets you practice reading the music at your own pace. The notes to be played are shown in the display, one after another, as you play them correctly. 1 Select one - Yamaha PSR-GX76 | Owner's Manual - Page 64
Song Lesson 3 Play the appropriate part with the song. After the lead-in, the song starts automatically, and the appropriate notes appear in the display. In Lesson 3, listen carefully to the un-muted part, and play the muted part yourself. Lesson 4 - Both Hands Lesson 4 is a "Minus One" practice - Yamaha PSR-GX76 | Owner's Manual - Page 65
are assigned, depending on your performance: "OK," "Good," "Very Good," and "Excellent." When the Talking function (page 66) is on, the PSR-GX76 also "announces" your grade. on Excellen 1 Select the Grade function. Press the left Overall button, repeatedly if necessary, until "GRADE" appears in - Yamaha PSR-GX76 | Owner's Manual - Page 66
Talking This feature "talks" to you through the speakers, "announcing" the Grade comments as well as the titles of the Lesson steps and the names of certain functions. on TALKING 1 Select the Talking function. Press the left Overall button, repeatedly if necessary, until "TALKING" appears in the - Yamaha PSR-GX76 | Owner's Manual - Page 67
you play a "C" quarter note using the grand piano sound on the PSR-GX76 keyboard. Unlike an acoustic instrument that puts out a resonated note, the electronic instrument puts out information from the keyboard such as "with what voice," "with which key," "about how strong," "when was it pressed," and - Yamaha PSR-GX76 | Owner's Manual - Page 68
of the 16 channels. Message Name Note ON/OFF Program Change Control Change PSR-GX76 Operation/Panel Setting Messages which are generated when the keyboard is played. Each message includes a specific note number which corresponds to the key which is pressed, plus a velocity value based on how hard - Yamaha PSR-GX76 | Owner's Manual - Page 69
Cancel Function • The PSR-GX76 lets you disable or ignore incoming Bank LSB messages, which might otherwise cause problems when selecting PSR-GX76 voices from an external device. To cancel Bank LSB messages, simultaneously hold down the lowest key on the keyboard (C1) and turn the power on ([STANDBY - Yamaha PSR-GX76 | Owner's Manual - Page 70
generator. You can also control the PSRGX76 from an external device, such as playing back song data on a sequencer using the voices of the PSR-GX76, or playing the PSR-GX76 voices from a separate MIDI keyboard or controller. When you want to control playback of the PSR-GX76's styles or songs from - Yamaha PSR-GX76 | Owner's Manual - Page 71
. For example, if you are using the Yamaha MDF3 MIDI Data Filer: 1) Make the appropriate MIDI connections. PSR-GX76 MIDI OUT MIDI IN MDF3 2) Set up the MDF3 for recording MIDI data. (Refer to the MDF3 Owner's Manual.) 2 Select the MIDI operations. Press the right Overall button, repeatedly - Yamaha PSR-GX76 | Owner's Manual - Page 72
MIDI device. Send the data from the connected device. (Refer to the owner's manual of the device for details.) The PSR-GX76 automatically receives the data. The following display is shown while the data is being received. • This operation erases any and all of your original data in the PSR-GX76 - Yamaha PSR-GX76 | Owner's Manual - Page 73
MIDI Functions The display returns to the currently selected voice. 001 GrandPno • If, for some reason, some problem occurred in the on a sequencer that is intended for playback with the PSR-GX76. Essentially, this takes a "snapshot" of the PSR-GX76 settings and sends that data to the sequencer. By - Yamaha PSR-GX76 | Owner's Manual - Page 74
PSRGX76, you would want to set this to "off" - in order to avoid getting "double" notes, both from the keyboard and from the sequencer. Normally, when playing the PSR-GX76 by itself, this should be set to "on." 1 Select the local control on. While holding the lowest F key and turnning on the power - Yamaha PSR-GX76 | Owner's Manual - Page 75
occurs when using the PSR-GX76 with a sequencer. (This may also sound like a "dual" layered sound of two voices, even when Dual is turned off.) When using the accompaniment with a sequencer, set MIDI Echo (or the relevant control) to "off." (Refer to the owner's manual of your particular device - Yamaha PSR-GX76 | Owner's Manual - Page 76
Except for the data listed below, all PSR-GX76 panel settings are reset to their initial settings whenever the power is turned on. The data listed below are backed up - i.e. retained in memory - as long as an AC adaptor is connected or a set of batteries is installed. • User Song Data • Song Volume - Yamaha PSR-GX76 | Owner's Manual - Page 77
numbers for each voice. Use these program change numbers when playing the PSR-GX76 via MIDI from an external device. • Some voices may sound continuously or have a long decay after the notes have been released while the sustain pedal (footswitch) is held. q Panel Voice List Voice # 001 002 003 004 - Yamaha PSR-GX76 | Owner's Manual - Page 78
119 120 121 122 123 124 125 126 127 128 Bank Select MSB LSB MIDI Program Voice Name Change# 0 112 79 Ocarina SYNTH LEAD 0 112 80 Square 0 112 8 Celesta 0 112 14 Tubular Bells 0 112 47 Timpani 0 112 10 Music Box SPLIT 0 - - Strings/Grand Piano 0 - - Grand Piano/Violin 0 - - Yamaha PSR-GX76 | Owner's Manual - Page 79
231 232 Bank Select MSB LSB MIDI Program Voice Name Change# 0 0 0 0 75 Pan Flute 0 0 76 Blown Bottle 0 0 77 Shakuhachi 0 87 Lead 8 (bass+Lead ) SYNTH PAD 0 0 88 Pad 1 (new age) 0 0 89 Pad 2 (warm) 0 0 90 Pad 3 (polysynth 119 Reverse Cymbal SOUND EFFECTS 0 0 120 - Yamaha PSR-GX76 | Owner's Manual - Page 80
DJ Voice List No.1 DJ_Kit Note # Key # 036 - 047 048 - 059 F4 F # 4 G4 G # 4 A4 A # 4 B4 C5 C # 5 D5 D # 5 E5 F5 F # 5 G5 G # 5 A5 A # 5 B5 C6 MIDI Bank Select MSB LSB 0 123 0 123 0 123 0 123 0 123 0 123 0 123 0 123 0 123 0 123 0 123 0 123 0 123 0 123 0 123 0 123 - Yamaha PSR-GX76 | Owner's Manual - Page 81
Style List Serial No. 001 002 003 004 005 006 007 008 009 010 011 012 013 014 015 016 017 018 019 020 021 022 023 024 025 026 027 028 029 030 031 032 033 034 035 036 037 038 039 040 041 042 043 044 045 046 Style Name 8BEAT 8Beat Pop 1 8Beat Pop 2 8Beat Uptempo 8Beat Standard Folkrock Pop Rock - Yamaha PSR-GX76 | Owner's Manual - Page 82
: Keys marked "O" stop sounding the instant they are released. • Voices with the same Alternate Note Number (*1 ... 4) cannot be played simultaneously. (They are designed to be played alternately with each other.) Voice# 119 Bank MSB# 127 Bank LSB# 0 Program Change# 0 Keyboard MIDI Key - Yamaha PSR-GX76 | Owner's Manual - Page 83
# 0 Program Change# 0 Keyboard MIDI Key Alternate Note# Note Note# Note 55 G 2 43 G 1 Floor Tom H 56 G# 2 44 G# 1 1 Hi-Hat Pedal 57 A 2 45 A 1 Low Tom 58 A# 2 46 A# 1 1 Hi-Hat Open D 4 O Guiro Long 87 D# 5 75 D# 4 Claves 88 E 5 76 E 4 Wood Block H 89 F 5 77 F 4 Wood Block L 90 - Yamaha PSR-GX76 | Owner's Manual - Page 84
YAMAHA [ Portable Keyboard ] Model PSR-GX76 MIDI After Key's x Touch Ch's x 3 x x 0 - 127 0 - 127 o 9nH,v=1-127 o 9nH,v=0 or 8nH x x Pitch Bend x o Control Change Tune x x System : Clock o Real Time: Commands o Aux :All Sound OFF x :Reset All Cntrls x :Local ON/OFF x :All Notes - Yamaha PSR-GX76 | Owner's Manual - Page 85
MIDI Master Tuning • System exclusive messages for changing the Reverb Type, Chorus Type, and DSP Type. *2 Messages for these control change numbers cannot be transmitted from the PSR-GX76 saving (recording) User data (User songs and Registration Memory). • These messages control the clock setting - Yamaha PSR-GX76 | Owner's Manual - Page 86
MIDI Implementation Chart s Effect map * If the received value does not contain an effect parameter changes, you can select the Reverb, Chorus and DSP effect types which are not accessible from the PSR-GX76 panel itself. When one of the effects is selected by the external sequencer, " - " will be - Yamaha PSR-GX76 | Owner's Manual - Page 87
17 lbs., 10 oz.) Supplied Accessories • Music Stand • Owner's Manual • Song Book Optional Accessories • Headphones : HPE-150 • AC power adaptor : PA-3B • Footswitch : FC4, FC5 * Specifications and descriptions in this owner's manual are for information purposes only. Yamaha Corp. reserves the - Yamaha PSR-GX76 | Owner's Manual - Page 88
AC adaptor 8 accessory 76 internal clock (MIDI 70 Intro 36 L Lesson 60 loading bulk data 72 Local Control 74 M Main A/B 40 Metronome 20 MIDI 67 MIDI channels 68 MIDI Implementation Chart 84 MIDI terminals 68 Multi Fingering 42 music stand 26 Troubleshooting 75 Tuning 26 U User songs 56 - Yamaha PSR-GX76 | Owner's Manual - Page 89
for the periods indicated. This warranty is applicable to all models included in the following series of products: PSR SERIES OF PORTATONE ELECTRONIC KEYBOARDS If during the first 90 days that immediately follows the purchase date, your new Yamaha product covered by this warranty is found to have - Yamaha PSR-GX76 | Owner's Manual - Page 90
Co., Ltd. 11/F., Silvercord Tower 1, 30 Canton Road, Tsimshatsui, Kowloon, Hong Kong Tel: 2737-7688 INDONESIA PT. Yamaha Music Indonesia (Distributor) PT. Nusantik Gedung Yamaha Music Center, Jalan Jend. Gatot Subroto Kav. 4, Jakarta 12930, Indonesia Tel: 21-520-2577 KOREA Cosmos Corporation 1461 - Yamaha PSR-GX76 | Owner's Manual - Page 91
COVER 3 - Yamaha PSR-GX76 | Owner's Manual - Page 92
M.D.G., EMI Division, Yamaha Corporation © 2000 Yamaha Corporation V544030 0000??PPOO??????..??--0013AC00 Printed in Malaysia
-
 1
1 -
 2
2 -
 3
3 -
 4
4 -
 5
5 -
 6
6 -
 7
7 -
8
-
9
-
10
-
11
-
12
-
13
-
14
-
15
-
16
-
17
-
18
-
19
-
20
-
21
-
22
-
23
-
24
-
25
-
26
-
27
-
28
-
29
-
30
-
31
-
32
-
33
-
34
-
35
-
36
-
37
-
38
-
39
-
40
-
41
-
42
-
43
-
44
-
45
-
46
-
47
-
48
-
49
-
50
-
51
-
52
-
53
-
54
-
55
-
56
-
57
-
58
-
59
-
60
-
61
-
62
-
63
-
64
-
65
-
66
-
67
-
68
-
69
-
70
-
71
-
72
-
73
-
74
-
75
-
76
-
77
-
78
-
79
-
80
-
81
-
82
-
83
-
84
-
85
-
86
-
87
-
88
-
89
-
90
-
91
-
92
 |
 |