Yamaha RX-V473 Owners Manual
Yamaha RX-V473 Manual
 |
View all Yamaha RX-V473 manuals
Add to My Manuals
Save this manual to your list of manuals |
Yamaha RX-V473 manual content summary:
- Yamaha RX-V473 | Owners Manual - Page 1
AV Receiver Owner's Manual English Read the supplied booklet "Safety Brochure" before using the unit. - Yamaha RX-V473 | Owners Manual - Page 2
Connecting a TV 18 4 Connecting playback devices 23 Connecting video devices (such as BD/DVD players 23 Connecting audio devices (such as CD players 25 Connecting to the jacks on the front panel 26 5 Connecting the FM/AM antennas 26 6 Connecting to a network 27 7 Connecting recording devices - Yamaha RX-V473 | Owners Manual - Page 3
for playback devices 83 Resetting remote control codes 84 Updating the unit's firmware 85 APPENDIX 86 Frequently asked questions 86 Troubleshooting 87 Power and system 87 Audio 88 Video 89 FM/AM radio 90 USB and network 90 Remote control 91 Error indications on the front display 92 - Yamaha RX-V473 | Owners Manual - Page 4
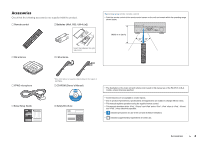
… Easy Setup Guide *One of the above is supplied depending on the region of purchase. … CD-ROM (Owner's Manual) … Safety Brochure • The illustrations of the main unit and remote control used in this manual are of the RX-V573 (U.S.A. model), unless otherwise specified. • Some features are not - Yamaha RX-V473 | Owners Manual - Page 5
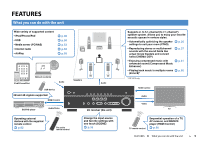
server (PC/NAS) • Internet radio • AirPlay . p.46 . p.50 . p.53 . p.56 . p.58 * * iPod/iPhone/iPad Network contents Audio USB device 3D and 4K signals supported HDMI Control Speakers Audio BD/DVD player Audio/Video AV receiver (the unit) Operating external devices with the supplied - Yamaha RX-V473 | Owners Manual - Page 6
sound with a single HDMI cable connection (Audio Return Channel: ARC) (p.18) When using an ARC -compatible TV, you only need one HDMI cable to enable video output to the TV, audio input from the TV, and the transmission of HDMI Control signals. HDMI Control TV audio Video from external device - Yamaha RX-V473 | Owners Manual - Page 7
DVD SCENE TV NET RADIO TONE CONTROL PROGRAM STRAIGHT VIDEO AUX USB AUDIO VIDEO iPod/iPhone/iPad 5V 2.1A DIRECT VOLUME B 1 z (power) key Turns on/off (standby) the unit. 2 Standby indicator Lights up when the unit is in standby mode under any of the following conditions. • HDMI Control - Yamaha RX-V473 | Owners Manual - Page 8
the unit is receiving an FM/AM radio station signal. 6 ZONE indicators (RX-V573 only) "SP A" lights up when the Zone A speaker output is enabled and "SP B" lights up when the Zone B speaker output is enabled (p.61). 7 SLEEP Lights up when the sleep timer is on. 8 MUTE Blinks when audio is muted - Yamaha RX-V473 | Owners Manual - Page 9
FM COMPONENT VIDEO PR PB Y MONITOR OUT NETWORK FRONT CENTER SPEAKERS SURROUND SURROUND BACK/BI AMP /ZONE B SINGLE 5 (RX-V573 U.S.A. model) OPTICAL AV 1 COAXIAL AV 2 COAXIAL AV 3 OPTICAL ( TV ) AV 4 AV 5 AV 6 AV OUT SUBWOOFER AUDIO 6 789 : A 1 HDMI OUT jack For connecting to an - Yamaha RX-V473 | Owners Manual - Page 10
Remote control 1 2 3 4 5 6 7 8 9 : A B C D CODE SET SOURCE RECEIVER HDMI 1 2 3 4 AV 1 2 3 4 5 6 AUDIO A V-AUX USB TUNER NET B ZONE FM AM PRESET TUNING INFO MEMORY MOVIE SLEEP BD DVD SUR. DECODE STRAIGHT MUSIC ENHANCER DIRECT SCENE TV NET RADIO SETUP OPTION ENTER - Yamaha RX-V473 | Owners Manual - Page 11
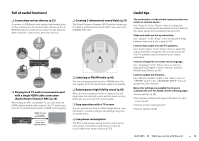
a TV to the unit. 4 Connecting playback devices (p.23) Connect video devices (such as BD/DVD players) and audio devices (such as CD players) to the unit. 5 Connecting the FM/AM antennas (p.26) Connect the supplied FM/AM antennas to the unit. 6 Connecting to a network (p.27) Connect the unit to - Yamaha RX-V473 | Owners Manual - Page 12
Canada models) Use speakers with an impedance of at least 6 Ω. Speaker type Front (L) Front (R) Center Surround (L) Surround (R) Surround back (L)* Surround back (R)* Surround back* Subwoofer * RX-V573 only Abbr. Function 1 Produce front right/left channel sounds (stereo sounds). 2 3 Produces - Yamaha RX-V473 | Owners Manual - Page 13
only) 1 2 9 3 4 10° to 30° 5 10° to 30° 6 7 30 cm (1 ft) or more 6.1-channel system (RX-V573 only) 1 2 9 3 4 10° to 30° 8 5 10° to 30° 5.1-channel system 1 2 9 3 4 10° to 30° 5 10° to 30° 4.1-channel system 1 9 4 10° to 30° 2 5 10° to 30° PREPARATIONS ➤ - Yamaha RX-V473 | Owners Manual - Page 14
(U.S.A. and Canada models only) Under its default settings, the unit is configured for 8-ohm speakers. When connecting 6-ohm speakers, set the speaker impedance to "6 Ω MIN". In this case, you can also use 4-ohm speakers as the front speakers. 1 Before connecting speakers, connect the power cable - Yamaha RX-V473 | Owners Manual - Page 15
BACK/BI AMP /ZONE B SINGLE SUBWOOFER 1 2 9 3 4 5 7.1-channel system (RX-V573 only) PB Y OR OUT The unit (rear) FRONT CENTER SPEAKERS SURROUND SURROUND BACK/BI AMP /ZONE B SINGLE SUBWOOFER 1 2 9 3 4 6 5 7 • When using only one surround back speaker, connect it to the SINGLE jack - Yamaha RX-V473 | Owners Manual - Page 16
■ Connecting the subwoofer Use an audio pin cable to connect the subwoofer. Audio pin cable Y MONITOR OUT AV6 AV OUT AUDIO SUBWOOFER Connecting front speakers that support bi-amp connections (RX-V573 only) When using front speakers that support bi-amp connections, connect them to the FRONT - Yamaha RX-V473 | Owners Manual - Page 17
• To connect a device that has a DVI jack, an HDMI/DVI-D cable is required. • The unit's HDMI jacks support the HDMI Control, Audio Return Channel (ARC), and 3D and 4K video transmission (through output) features. • Use high speed HDMI cables to enjoy 3D or 4K videos. ■ Video jacks ❑ COMPONENT VIDEO - Yamaha RX-V473 | Owners Manual - Page 18
) HDM ARC PR PB Y COMPONENT VIDEO VIDEO ANTEN AM HDMI HDMI input (ARC-compatible) HDMI ARC HDMI OPTICAL AV 1 COAXIAL AV 2 COAXIAL AV 3 OPTICAL ( TV ) AV 4 AV 5 AV 6 TV • By connecting a TV to the unit with an HDMI cable, you can navigate the iPod, USB storage device and network sources - Yamaha RX-V473 | Owners Manual - Page 19
to "AV 4" and the TV audio will be played back on the unit. If you cannot hear the TV's audio, check that "ARC" (p.73) in the "Setup" menu is set to "On". • If HDMI Control does not work properly, try turning off and on (or unplugging and then plugging in again) the devices. It may solve the problem - Yamaha RX-V473 | Owners Manual - Page 20
VIDEO VIDEO OPTICAL AV 1 COAXIAL AV 2 COAXIAL AV 3 OPTICAL ( TV ) AV 4 AV 5 OPTICAL AV 6 (TOVA) AV 4 OPTICAL O O AV 4 (OPTICAL) jack Audio output (digital optical) TV • By connecting a TV to the unit with an HDMI cable, you can navigate the iPod, USB storage device and network - Yamaha RX-V473 | Owners Manual - Page 21
than OPTICAL) for connecting the TV, connect the TV to one of the AV 1-6 and AUDIO jacks. To use the SCENE function (p.35), you also need to change the input assignment for SCENE(TV). • "AV 4" is set as TV audio input at the factory. If you have connected any external device to the AV 4 jacks or if - Yamaha RX-V473 | Owners Manual - Page 22
TV to one of the AV 1-6 and AUDIO jacks. To use the SCENE function (p.35), you also need to change the input assignment for SCENE(TV). ❑ COMPONENT VIDEO connection (with a component video cable) MONITOR OUT (COMPONENT VIDEO) jacks The unit (rear) COMPONENT VIDEO PR PR HDMI OUT ARC HDMI 1 (BD - Yamaha RX-V473 | Owners Manual - Page 23
OPTICAL AV 1 COAXIAL AV 2 COAXIAL AV 3 OPTICAL ( TV ) AV 4 AV 5 AV 6 AV OUT SUBWOOFER AUDIO Video device If you select the input source by pressing HDMI 1-4, the video/audio played back on the video device will be output from the unit. ■ Component video connection Connect a video device to - Yamaha RX-V473 | Owners Manual - Page 24
(AUDIO) AUDIO AV 1-2 (COMPONENT VIDEO) AV 5-6 (AUDIO) AUDIO ❑ Necessary setting For example, if you have connected a video device to AV 2 (COMPONENT VIDEO) and AV 5 (AUDIO) jacks of the unit, change the combination setting as follows. AV 2 (COMPONENT VIDEO) jacks The unit (rear) HDMI OUT ARC - Yamaha RX-V473 | Owners Manual - Page 25
After connecting external devices (such as a TV and playback devices) and power cable of the unit, turn on the unit. 2 Press AV 2 to select "AV 2" (video input jack to be used) as the input source. HDMI 1 2 3 4 AV 1 2 3 4 5 6 AUDIO A BD DVD TV NET RADIO SETUP OPTION AV 2 OPTION - Yamaha RX-V473 | Owners Manual - Page 26
, stop playback on the device and turn down the volume on the unit. BD DVD SCENE TV NET RADIO INPUT TONE CONTROL PROGRAM STRAIGHT VIDEO AUX USB AUDIO VIDEO iPod/iPhone/iPad 5V 2.1A The unit (front) V Portable audio player 5 Connecting the FM/AM antennas Connect the supplied FM/AM - Yamaha RX-V473 | Owners Manual - Page 27
. Router Network cable HDMI OUT ARC HDMI 1 (BD/DVD) HDMI 2 HDMI 3 HDMI 4 PR PB Y COMPONENT VIDEO VIDEO ANTENNA AM FM COMPONENT VIDEO PR PB Y MONITOR OUT NETWORK FRONT OPTICAL AV 1 COAXIAL AV 2 COAXIAL AV 3 OPTICAL ( TV ) AV 4 AV 5 AV 6 AV OUT SUBWOOFER AUDIO The unit - Yamaha RX-V473 | Owners Manual - Page 28
3 HDMI 4 ARC L VIDEO ANTENNA AM FM COMPONENT VIDEO PR R PB Y MONITOR OUT AV OUT L L R R AUDIO Video recording device COAXIAL AV 2 COAXIAL AV 3 OPTICAL ( TV ) AV 4 AV 5 AV 6 AV OUT SUBWOOFER AUDIO 8 Connecting the power cable Before connecting the power cable (General model - Yamaha RX-V473 | Owners Manual - Page 29
Language setting 10 CODE SET SOURCE RECEIVER HDMI 1 2 3 4 AV 1 2 3 4 5 6 AUDIO A V-AUX USB TUNER NET B ZONE FM AM PRESET TUNING INFO MEMORY MOVIE SLEEP BD DVD SUR. DECODE STRAIGHT MUSIC ENHANCER DIRECT SCENE TV NET RADIO SETUP OPTION RECEIVER z SETUP ENTER VOLUME - Yamaha RX-V473 | Owners Manual - Page 30
10 Automatic speaker setup CODE SET SOURCE RECEIVER HDMI 1 2 3 4 AV 1 2 3 4 5 6 AUDIO A V-AUX USB TUNER NET B ZONE FM AM PRESET TUNING INFO MEMORY MOVIE SLEEP BD DVD SUR. DECODE STRAIGHT MUSIC ENHANCER DIRECT SCENE TV NET RADIO SETUP OPTION RECEIVER z ENTER VOLUME - Yamaha RX-V473 | Owners Manual - Page 31
Automatic speaker setup CODE SET SOURCE RECEIVER HDMI 1 2 3 4 AV 1 2 3 4 5 6 AUDIO A V-AUX USB TUNER NET B ZONE FM AM PRESET TUNING INFO MEMORY MOVIE SLEEP BD DVD SUR. DECODE STRAIGHT MUSIC ENHANCER DIRECT SCENE TV NET RADIO SETUP OPTION SETUP ENTER VOLUME RETURN - Yamaha RX-V473 | Owners Manual - Page 32
displayed during the measurement, resolve the problem and perform YPAO again. Auto Setup Start Exit ERROR E-5:Noisy PROCEED 5% Error message TV screen E-5:NOISY VOL. SW L CR SL SR Front display ■ Procedure to handle errors 1 Check the content of error message and press ENTER. 2 Use the - Yamaha RX-V473 | Owners Manual - Page 33
unit with the optimal speaker settings. Auto Setup Start Exit Measurement Finished Result 3 / 2 / 0.1 ch 3.0 / 10.5 m -3.0 / +10.0 dB W-1:Out of Phase Warning message TV screen Problem speaker (blinks) W-1:PHASE VOL. SW L CR SL SR Front display ■ Procedure to handle warnings 1 Check the - Yamaha RX-V473 | Owners Manual - Page 34
CODE SET SOURCE RECEIVER HDMI 1 2 3 4 AV 1 2 3 4 5 6 AUDIO A V-AUX USB TUNER NET B ZONE FM AM PRESET TUNING INFO MEMORY MOVIE SLEEP BD DVD SUR. DECODE STRAIGHT MUSIC ENHANCER DIRECT SCENE TV NET RADIO SETUP OPTION ENTER VOLUME RETURN DISPLAY TOP MENU MODE POP-UP - Yamaha RX-V473 | Owners Manual - Page 35
CODE SET SOURCE RECEIVER HDMI 1 2 3 4 AV 1 2 3 4 5 6 AUDIO A V-AUX USB TUNER NET B ZONE FM AM PRESET TUNING INFO MEMORY MOVIE SLEEP BD DVD SUR. DECODE STRAIGHT MUSIC ENHANCER DIRECT SCENE TV NET RADIO SETUP OPTION ENTER VOLUME RETURN DISPLAY TOP MENU MODE POP-UP - Yamaha RX-V473 | Owners Manual - Page 36
CODE SET SOURCE RECEIVER HDMI 1 2 3 4 AV 1 2 3 4 5 6 AUDIO A V-AUX USB TUNER NET B ZONE FM AM PRESET TUNING INFO MEMORY MOVIE SLEEP BD DVD SUR. DECODE STRAIGHT MUSIC ENHANCER DIRECT SCENE TV NET RADIO SETUP OPTION MOVIE MUSIC SUR.DECODE STRAIGHT DIRECT ENHANCER - Yamaha RX-V473 | Owners Manual - Page 37
DSP) The unit is equipped with a variety of sound programs that utilize Yamaha's original DSP technology (CINEMA DSP). It allows you to easily create sound fields like actual movie theaters or concert halls in your room. Sound program category "CINEMA DSP" lights up Sci-Fi VOL. SW L CR SL SR - Yamaha RX-V473 | Owners Manual - Page 38
signals are input, they are down mixed to 2 channels and output from the front speakers (this program does not utilize CINEMA DSP). (RX-V573: 7ch Stereo, RX-V473: 5ch Stereo) Use this program to output sound from all speakers. When you play back multichannel sources, the unit mixes down the - Yamaha RX-V473 | Owners Manual - Page 39
CODE SET SOURCE RECEIVER HDMI 1 2 3 4 AV 1 2 3 4 5 6 AUDIO A V-AUX USB TUNER NET B ZONE FM AM PRESET TUNING INFO MEMORY MOVIE SLEEP BD DVD SUR. DECODE STRAIGHT MUSIC ENHANCER DIRECT SCENE TV NET RADIO SETUP OPTION STRAIGHT ENTER VOLUME RETURN DISPLAY TOP MENU - Yamaha RX-V473 | Owners Manual - Page 40
CODE SET SOURCE RECEIVER HDMI 1 2 3 4 AV 1 2 3 4 5 6 AUDIO A V-AUX USB TUNER NET B ZONE FM AM PRESET TUNING INFO MEMORY MOVIE SLEEP BD DVD SUR. DECODE STRAIGHT MUSIC ENHANCER DIRECT SCENE TV NET RADIO SETUP OPTION SUR.DECODE DIRECT ENTER VOLUME RETURN DISPLAY - Yamaha RX-V473 | Owners Manual - Page 41
CODE SET SOURCE RECEIVER HDMI 1 2 3 4 AV 1 2 3 4 5 6 AUDIO A V-AUX USB TUNER NET B ZONE FM AM PRESET TUNING INFO MEMORY MOVIE SLEEP BD DVD SUR. DECODE STRAIGHT MUSIC ENHANCER DIRECT SCENE TV NET RADIO SETUP OPTION ENHANCER ENTER VOLUME RETURN DISPLAY TOP MENU - Yamaha RX-V473 | Owners Manual - Page 42
CODE SET SOURCE RECEIVER HDMI 1 2 3 4 AV 1 2 3 4 5 6 AUDIO A V-AUX USB TUNER NET B ZONE FM AM PRESET TUNING INFO MEMORY MOVIE SLEEP BD DVD SUR. DECODE STRAIGHT MUSIC ENHANCER DIRECT SCENE TV NET RADIO SETUP OPTION TUNER FM AM TUNING ENTER VOLUME RETURN DISPLAY - Yamaha RX-V473 | Owners Manual - Page 43
CODE SET SOURCE RECEIVER HDMI 1 2 3 4 AV 1 2 3 4 5 6 AUDIO A V-AUX USB TUNER NET B ZONE FM AM PRESET TUNING INFO MEMORY MOVIE SLEEP BD DVD SUR. DECODE STRAIGHT MUSIC ENHANCER DIRECT SCENE TV NET RADIO SETUP OPTION TUNER MEMORY PRESET OPTION ENTER VOLUME RETURN - Yamaha RX-V473 | Owners Manual - Page 44
CODE SET SOURCE RECEIVER HDMI 1 2 3 4 AV 1 2 3 4 5 6 AUDIO A V-AUX USB TUNER NET B ZONE FM AM PRESET TUNING INFO MEMORY MOVIE SLEEP BD DVD SUR. DECODE STRAIGHT MUSIC ENHANCER DIRECT SCENE TV NET RADIO SETUP OPTION TUNER PRESET OPTION ENTER VOLUME RETURN DISPLAY - Yamaha RX-V473 | Owners Manual - Page 45
CODE SET SOURCE RECEIVER HDMI 1 2 3 4 AV 1 2 3 4 5 6 AUDIO A V-AUX USB TUNER NET B ZONE FM AM PRESET TUNING INFO MEMORY MOVIE SLEEP BD DVD SUR. DECODE STRAIGHT MUSIC ENHANCER DIRECT SCENE TV NET RADIO SETUP OPTION INFO OPTION ENTER VOLUME RETURN DISPLAY TOP MENU - Yamaha RX-V473 | Owners Manual - Page 46
iPod to the unit with the USB cable supplied with the iPod. 1 Connect the USB cable to the iPod. 2 Connect the USB cable to the USB jack. The unit (front) RADIO STRAIGHT VIDEO AUX USB AUDIO VIDEO iPod/iPhone/iPad 5V 2.1A USB Connected VOL. SW L CR SL SR • The iPod charges while it is - Yamaha RX-V473 | Owners Manual - Page 47
CODE SET SOURCE RECEIVER HDMI 1 2 3 4 AV 1 2 3 4 5 6 AUDIO A V-AUX USB TUNER NET B ZONE FM AM PRESET TUNING INFO MEMORY MOVIE SLEEP BD DVD SUR. DECODE STRAIGHT MUSIC ENHANCER DIRECT SCENE TV NET RADIO SETUP OPTION USB ENTER VOLUME RETURN DISPLAY TOP MENU MODE - Yamaha RX-V473 | Owners Manual - Page 48
CODE SET SOURCE RECEIVER HDMI 1 2 3 4 AV 1 2 3 4 5 6 AUDIO A V-AUX USB TUNER NET B ZONE FM AM PRESET TUNING INFO MEMORY MOVIE SLEEP BD DVD SUR. DECODE STRAIGHT MUSIC ENHANCER DIRECT SCENE TV NET RADIO SETUP remote control keys to control playback. External device - Yamaha RX-V473 | Owners Manual - Page 49
CODE SET SOURCE RECEIVER HDMI 1 2 3 4 AV 1 2 3 4 5 6 AUDIO A V-AUX USB TUNER NET B ZONE FM AM PRESET TUNING INFO MEMORY MOVIE SLEEP BD DVD SUR. DECODE STRAIGHT MUSIC ENHANCER DIRECT SCENE TV NET RADIO SETUP the front display the repeat function. One (One) Plays back - Yamaha RX-V473 | Owners Manual - Page 50
CODE SET SOURCE RECEIVER HDMI 1 2 3 4 AV 1 2 3 4 5 6 AUDIO A V-AUX USB TUNER NET B ZONE FM AM PRESET TUNING INFO MEMORY MOVIE SLEEP BD DVD SUR. DECODE STRAIGHT MUSIC ENHANCER DIRECT SCENE TV NET RADIO SETUP OPTION USB ENTER VOLUME RETURN DISPLAY TOP MENU MODE - Yamaha RX-V473 | Owners Manual - Page 51
CODE SET SOURCE RECEIVER HDMI 1 2 3 4 AV 1 2 3 4 5 6 AUDIO A V-AUX USB TUNER NET B ZONE FM AM PRESET TUNING INFO MEMORY MOVIE SLEEP BD DVD SUR. DECODE STRAIGHT MUSIC ENHANCER DIRECT SCENE TV NET RADIO SETUP Files not supported by the USB storage device contents. Use - Yamaha RX-V473 | Owners Manual - Page 52
CODE SET SOURCE RECEIVER HDMI 1 2 3 4 AV 1 2 3 4 5 6 AUDIO A V-AUX USB TUNER NET B ZONE FM AM PRESET TUNING INFO MEMORY MOVIE SLEEP BD DVD SUR. DECODE STRAIGHT MUSIC ENHANCER DIRECT SCENE TV NET RADIO SETUP OPTION OPTION ENTER VOLUME RETURN DISPLAY TOP MENU MODE - Yamaha RX-V473 | Owners Manual - Page 53
CODE SET SOURCE RECEIVER HDMI 1 2 3 4 AV 1 2 3 4 5 6 AUDIO A V-AUX USB TUNER NET B ZONE FM AM PRESET TUNING INFO MEMORY MOVIE SLEEP BD DVD SUR. DECODE STRAIGHT MUSIC ENHANCER DIRECT SCENE TV NET RADIO SETUP OPTION NET ENTER VOLUME RETURN DISPLAY TOP MENU MODE - Yamaha RX-V473 | Owners Manual - Page 54
CODE SET SOURCE RECEIVER HDMI 1 2 3 4 AV 1 2 3 4 5 6 AUDIO A V-AUX USB TUNER NET B ZONE FM AM PRESET TUNING INFO MEMORY MOVIE SLEEP BD DVD SUR. DECODE STRAIGHT MUSIC ENHANCER DIRECT SCENE TV NET RADIO SETUP press DISPLAY. • Files not supported by the unit cannot be - Yamaha RX-V473 | Owners Manual - Page 55
CODE SET SOURCE RECEIVER HDMI 1 2 3 4 AV 1 2 3 4 5 6 AUDIO A V-AUX USB TUNER NET B ZONE FM AM PRESET TUNING INFO MEMORY MOVIE SLEEP BD DVD SUR. DECODE STRAIGHT MUSIC ENHANCER DIRECT SCENE TV NET RADIO SETUP OPTION OPTION ENTER VOLUME RETURN DISPLAY TOP MENU MODE - Yamaha RX-V473 | Owners Manual - Page 56
CODE SET SOURCE RECEIVER HDMI 1 2 3 4 AV 1 2 3 4 5 6 AUDIO A V-AUX USB TUNER NET B ZONE FM AM PRESET TUNING INFO MEMORY MOVIE SLEEP BD DVD SUR. DECODE STRAIGHT MUSIC ENHANCER DIRECT SCENE TV NET RADIO SETUP OPTION NET ENTER VOLUME RETURN DISPLAY TOP MENU MODE - Yamaha RX-V473 | Owners Manual - Page 57
CODE SET SOURCE RECEIVER HDMI 1 2 3 4 AV 1 2 3 4 5 6 AUDIO A V-AUX USB TUNER NET B ZONE FM AM PRESET TUNING INFO MEMORY MOVIE SLEEP BD DVD SUR. DECODE STRAIGHT MUSIC ENHANCER DIRECT SCENE TV NET RADIO SETUP time. • Use the external device operation key (s) to stop - Yamaha RX-V473 | Owners Manual - Page 58
not appear, check whether the unit and PC/iPod are connected to the router properly. 2 On the iTunes/iPod, click (tap) the AirPlay icon and select the unit (network name of the unit) as the audio output device. iTunes (example) iPod (example) Network name of the unit 3 Select a song and start - Yamaha RX-V473 | Owners Manual - Page 59
CODE SET SOURCE RECEIVER HDMI 1 2 3 4 AV 1 2 3 4 5 6 AUDIO A V-AUX USB TUNER NET B ZONE FM AM PRESET TUNING INFO MEMORY MOVIE SLEEP BD DVD SUR. DECODE STRAIGHT MUSIC ENHANCER DIRECT SCENE TV NET RADIO SETUP immediately. ■ Playback screen AirPlay Now Playing Artist Name - Yamaha RX-V473 | Owners Manual - Page 60
in the "Setup" menu to "ZoneB" after connecting the power cable to an AC wall outlet. PB Y OR OUT The unit (rear) FRONT CENTER SPEAKERS SURROUND SURROUND BACK/BI AMP /ZONE B SINGLE SUBWOOFER 1 2 9 3 1 2 4 5 Zone B Zone A PLAYBACK ➤ Playing back music in multiple rooms (RX-V573 only - Yamaha RX-V473 | Owners Manual - Page 61
CODE SET SOURCE RECEIVER HDMI 1 2 3 4 AV 1 2 3 4 5 6 AUDIO A V-AUX USB TUNER NET B ZONE FM AM PRESET TUNING INFO MEMORY MOVIE SLEEP BD DVD SUR. DECODE STRAIGHT MUSIC ENHANCER DIRECT SCENE TV NET RADIO SETUP OPTION ENTER VOLUME RETURN DISPLAY TOP MENU MODE POP-UP - Yamaha RX-V473 | Owners Manual - Page 62
in the "Setup" menu. 64 Signal Info (Signal Info) Displays information about the video/audio signal. 64 Audio In (Audio In) Video Out (Video Out) Combines the video jack of the selected input source with an audio jack of others. 65 Selects a video to be output with radio sounds. 65 Auto - Yamaha RX-V473 | Owners Manual - Page 63
device (p.52), or media server (p.55). Enables/disables volume controls from iTunes/iPod via AirPlay value, sounds may not match those from other channels. Adjusting with the front panel controls ❑ Extended Surround (EXTD) (RX-V573 only) Selects how to one or two surround back speakers are connected - Yamaha RX-V473 | Owners Manual - Page 64
NET RADIO, AirPlay, TUNER: On (On) Others: Off (Off) ■ Volume Trim (Volume Trim) Fine-adjusts volume difference between input sources or subwoofer the "Setup" video/audio signal. Choices Format (FORMAT) Channel (CHAN) Sampling (SAMPL) Bitrate (B RATE) Input (V IN) Output (V OUT) Audio front - Yamaha RX-V473 | Owners Manual - Page 65
following cases. • Connecting a playback device that supports HDMI video output, but not HDMI audio output • Connecting a playback device that has component video jacks and analog stereo jacks (such as game consoles) Input sources HDMI 1-4, AV 1-2 ■ Setup procedure (To input audio through a digital - Yamaha RX-V473 | Owners Manual - Page 66
are available only when your TV is connected to the unit via HDMI. If not, carry out operations while viewing the front display. 1 Press SETUP. 2 Use the cursor keys to select a menu and press ENTER. Setup Speaker HDMI Sound ECO Function Network Language Configuration Distance Level Equalizer Test - Yamaha RX-V473 | Owners Manual - Page 67
Power Amp Assign Subwoofer Front Center Surround Surround Back Crossover Subwoofer Phase Extra Bass HDMI Control Audio Output Standby Through TV Audio Input Standby Sync ARC SCENE Function (RX-V573 only) Selects a speaker system. Selects whether or not a subwoofer is connected. Selects the size - Yamaha RX-V473 | Owners Manual - Page 68
) displayed on other network devices. Displays the network information on the unit. Updates the firmware via the network. Select an on-screen menu language. Page 73 73 74 74 74 74 74 75 75 75 75 76 76 77 77 77 78 78 78 78 79 79 79 CONFIGURATIONS ➤ Configuring various functions (Setup menu) En 68 - Yamaha RX-V473 | Owners Manual - Page 69
speaker settings manually. Setup Speaker HDMI Sound ECO Function Network Language Configuration subwoofer is connected. The subwoofer will produce LFE (low-frequency effect) channel audio and low-frequency components from other channels. Select this option when no subwoofer is connected. The front - Yamaha RX-V473 | Owners Manual - Page 70
works when you select a sound program. ❑ Surround Back (RX-V573 only) Selects whether or not surround back speakers are connected and their sizes. Settings Small x1 Small x2 (default) Large x1 Large x2 None Select this option when one small speaker is connected. The subwoofer or front speakers - Yamaha RX-V473 | Owners Manual - Page 71
sounds from the speakers reach the listening position at the same time. First, select the unit of distance from "Meter" or "Feet". Choices Front L, Front R, Center, Surround L, Surround R, Surround Back L (RX-V573 only), Surround Back R (RX-V573 only), Subwoofer manually. For details, see "Manual - Yamaha RX-V473 | Owners Manual - Page 72
Control. Configure the settings in "TV Audio Input", "Standby Sync", "ARC", and "SCENE". • To use HDMI control, you need to perform the HDMI Control link setup (p.96) after connecting HDMI Control-compatible devices. ❑ Audio Output Selects a device to output audio. • This setting is available only - Yamaha RX-V473 | Owners Manual - Page 73
TV: On NET, RADIO: Off • SCENE link playback may not work properly due to the compatibility between devices. We recommend using TV and playback devices from the same manufacturer so that HDMI Control works more effectively. Sound Configures the audio output settings. Setup Speaker HDMI Sound ECO - Yamaha RX-V473 | Owners Manual - Page 74
want to adjust the delay between video and audio output manually. Adjust the audio output timing in "Adjustment". Adjusts the delay between video and audio output automatically when a TV that supports an automatic lipsync function is connected to the unit via HDMI. If necessary, you can fine-adjust - Yamaha RX-V473 | Owners Manual - Page 75
the initial volume when the receiver is turned on. Settings Off audio output. -80.0 dB to +16.5 dB (0.5 dB increments) Sets the level to the specified volume level. ECO Configures the power supply settings. Setup Speaker HDMI Sound ECO Function Network models: 8 hours Other models: Off • - Yamaha RX-V473 | Owners Manual - Page 76
the functions that make the unit easier to use. Setup Speaker HDMI Sound ECO Function Network Language Input Rename Dimmer Memory Guard ■ Input Rename Changes the input source name displayed on the front display. Input sources HDMI 1-4, AV 1-6, AUDIO, USB, V-AUX ■ Procedure 1 Use the cursor keys - Yamaha RX-V473 | Owners Manual - Page 77
Guard o On Icon Back:RETURN Network Configures the network settings. Setup Speaker HDMI Sound ECO Function Network Language IP Address MAC Address Filter DMC Control Network Standby Network Name Information Network Update ■ IP Address Configures the network parameters (such as IP address - Yamaha RX-V473 | Owners Manual - Page 78
cursor keys (q/w) to select a character. Network Name YAMAHA xxxxxx Back:RETURN 3 To confirm the new name, press ENTER. 4 To exit from the menu, press SETUP. • A Digital Media Controller (DMC) is a device that can control other network devices through the network. When this function is enabled - Yamaha RX-V473 | Owners Manual - Page 79
to update the unit's firmware. For details, see "Updating the unit's firmware" (p.85). ❑ Firmware Version Displays the version of the firmware installed on the unit. ❑ System ID Displays the system ID number. Language Select an on-screen menu language. Setup Speaker HDMI Sound ECO Function Network - Yamaha RX-V473 | Owners Manual - Page 80
impedance setting. Selects the unit's remote control ID. (Asia and General models only) Changes the FM/AM tuning frequency setting. Switches the video signal type of HDMI output. Restores the default settings. Updates the firmware. Checks the version of firmware currently installed on the unit - Yamaha RX-V473 | Owners Manual - Page 81
(INIT) Updating the firmware (UPDATE) UPDATE USB New firmware that provides additional features or product improvements will be released as needed. Updates can be downloaded from our website. If the unit is connected to the Internet, you can download the firmware via the network. For details - Yamaha RX-V473 | Owners Manual - Page 82
CODE SET SOURCE RECEIVER HDMI 1 2 3 4 AV 1 2 3 4 5 6 AUDIO A V-AUX USB TUNER NET B ZONE FM AM PRESET TUNING INFO MEMORY MOVIE SLEEP BD DVD SUR. DECODE STRAIGHT MUSIC ENHANCER DIRECT SCENE TV NET RADIO SETUP OPTION ENTER VOLUME RETURN DISPLAY TOP MENU MODE POP-UP - Yamaha RX-V473 | Owners Manual - Page 83
CODE SET SOURCE RECEIVER HDMI 1 2 3 4 AV 1 2 3 4 5 6 AUDIO A V-AUX USB TUNER NET B ZONE FM AM PRESET TUNING INFO MEMORY MOVIE SLEEP BD DVD SUR. DECODE STRAIGHT MUSIC ENHANCER DIRECT SCENE TV NET RADIO SETUP OPTION ENTER VOLUME RETURN DISPLAY TOP MENU MODE POP-UP - Yamaha RX-V473 | Owners Manual - Page 84
CODE SET SOURCE RECEIVER HDMI 1 2 3 4 AV 1 2 3 4 5 6 AUDIO A V-AUX USB TUNER NET B ZONE FM AM PRESET TUNING INFO MEMORY MOVIE SLEEP BD DVD SUR. DECODE STRAIGHT MUSIC ENHANCER DIRECT SCENE TV NET RADIO SETUP OPTION ENTER VOLUME RETURN DISPLAY TOP MENU MODE POP-UP - Yamaha RX-V473 | Owners Manual - Page 85
CODE SET SOURCE RECEIVER HDMI 1 2 3 4 AV 1 2 3 4 5 6 AUDIO A V-AUX USB TUNER NET B ZONE FM AM PRESET TUNING INFO MEMORY MOVIE SLEEP BD DVD SUR. DECODE STRAIGHT MUSIC ENHANCER DIRECT SCENE TV NET RADIO SETUP OPTION SETUP ENTER VOLUME RETURN DISPLAY TOP MENU MODE - Yamaha RX-V473 | Owners Manual - Page 86
setup. This setup is required every time you add a new HDMI Control-compatible device to your system. For information on how HDMI Control works between your TV and playback devices, refer to the instruction manuals for each device. I want to display a device name or a manufacture name on the front - Yamaha RX-V473 | Owners Manual - Page 87
Troubleshooting Refer to the table below when the unit does not function properly. If the problem you are experiencing is not listed below or if the instructions below do not help, turn off the unit, disconnect the power cable, and contact the nearest authorized Yamaha dealer or service center. - Yamaha RX-V473 | Owners Manual - Page 88
is no problem with the connection, replace with another cable. The maximum volume is set. Use "Max Volume" in the "Setup" menu to adjust the maximum volume (p.75). A device connected to the output jacks of the unit is not turned on. (This may happen due to the nature of AV receivers.) Turn on - Yamaha RX-V473 | Owners Manual - Page 89
Problem Cause Remedy The TV does not support HDCP (High-bandwidth Digital Content Protection). Refer to the instruction manuals for the TV and check the TV's specifications. No sound from the playback device (connected to The unit is set not to output audio input through HDMI jacks from the - Yamaha RX-V473 | Owners Manual - Page 90
is for registering FM radio stations only. Register AM radio stations manually (p.43). USB and network Problem The unit does not detect the USB device. Folders and files in the USB device cannot be viewed. The network feature does not function. Cause The USB device is not connected to the USB - Yamaha RX-V473 | Owners Manual - Page 91
(p.80). Press SOURCE/RECEIVER to set the remote control to control external devices (the key lights up in green). Set the remote control code again (p.82). Even if the remote control code is registered properly, some products may not respond to the remote control. APPENDIX ➤ Troubleshooting En 91 - Yamaha RX-V473 | Owners Manual - Page 92
. The connected iPod is not supported by the unit. Use an iPod supported by the unit (p.46). An overcurrent is flowing through the USB device. Turn off the unit and reconnect your USB device. If the problem persists, try another USB device. APPENDIX ➤ Error indications on the front display En - Yamaha RX-V473 | Owners Manual - Page 93
with the existing multichannel audio systems that support DTS Digital Surround. This technology is used for audio on BD (Blu-ray discs). DTS-HD Master Audio DTS-HD Master Audio is an advanced lossless audio format developed to offer a high-definition home theater experience with the quality - Yamaha RX-V473 | Owners Manual - Page 94
methods. WMA (Windows Media Audio) One of the compressed digital audio formats developed by Microsoft Corporation. audio/video interface. For further information on HDMI, visit the HDMI website at "http://www.hdmi.org/". x.v.Color "x.v.Color" is a technology that the HDMI specification supports - Yamaha RX-V473 | Owners Manual - Page 95
Yamaha technologies CINEMA DSP (Digital Sound Field Processor) Since the Dolby Surround and DTS systems were originally designed for use in movie theaters, their effect is best experienced in a theater that has many speakers designed for acoustic effects. Since home conditions (such as room size, - Yamaha RX-V473 | Owners Manual - Page 96
VIDEO in VIDEO VIDEO VIDEO out VIDEO VIDEO Information on HDMI HDMI Control HDMI Control allows you to operate external devices via HDMI. If you connect a TV that supports HDMI Control to the unit with an HDMI cable, you can control the unit (such as power and volume) with TV remote control - Yamaha RX-V473 | Owners Manual - Page 97
starts Press SCENE (BD/DVD) Turns on and displays video from the playback device To use HDMI Control, you need to perform the following HDMI Control link setup after connecting the TV and playback devices. • This setup is required every time you add a new HDMI Control-compatible device to your - Yamaha RX-V473 | Owners Manual - Page 98
/24 Hz (4K signals) • When CPPM copy-protected DVD-Audio is played back, video/audio signals may not be output, depending on the type of the DVD player. • The unit is not compatible with HDCP-incompatible HDMI or DVI devices. For details, refer to the instruction manual for each device. • To decode - Yamaha RX-V473 | Owners Manual - Page 99
AV 3 OPTICAL ( TV ) AV 4 AV 5 AV 6 AV OUT SUBWOOFER AUDIO NETWORK FRONT CENTER SPEAKERS SURROUND SURROUND BACK/BI AMP /ZONE B SINGLE • The area around the video/audio output jacks is marked in white on the actual product to prevent improper connections. (RX-V573 U.S.A. model) APPENDIX - Yamaha RX-V473 | Owners Manual - Page 100
DTS, Inc. All Rights Reserved. This receiver supports network connections. (For RX-V573) Manufactured under license under U.S. Patent Nos: 5,956,674; 5,974,380; 6,226,616; 6,487,535; 7,212,872; 7,333,929; 7,392,195; 7,272,567 & other U.S. and worldwide patents issued & pending. DTS-HD, the Symbol - Yamaha RX-V473 | Owners Manual - Page 101
1 [RX-V473] - Speaker Out x 5 (FRONT L/R, CENTER, SURROUND L/R) - Subwoofer Out x 1 - AV OUT x 1 - Headphone x 1 • Video MONITOR OUT - Component x 1 - Composite x 1 AV OUT - Composite x 1 • HDMI Output HDMI OUT x 1 HDMI • HDMI Specification: Deep Color, "x.v.Color," Auto Lip Sync, ARC (Audio Return - Yamaha RX-V473 | Owners Manual - Page 102
/90/100/110/120/160/200 Hz) H.P.F. (Front, Center, Surround 12 dB/oct. H.P.F. (Surround Back [RX-V573 12 dB/oct. L.P.F. (Subwoofer 24 dB/oct. Video Section • Video Signal Type [U.S.A., Canada, Korea and General models NTSC [Other models PAL • Video Signal Level Composite 1 Vp-p/75 Ω Component - Yamaha RX-V473 | Owners Manual - Page 103
Off, Standby Through Off 0.1 W or less HDMI Control On, Standby Through On (No Signals 1.0 W (Typical) Network Standby On 2.0 W (Typical) • Dimensions (W x H x D 435 x 161 x 315 mm (17-1/8" x 6-3/8" x 12-3/8") • Weight [RX-V573 8.2 kg (18.1 lbs) [RX-V473 8.1 kg (17.9 lbs) * Specifications are - Yamaha RX-V473 | Owners Manual - Page 104
, Lipsync 74 ADVANCED SETUP 80 AirPlay 58 AM antenna 26 ARC 18 ARC (Setup menu, HDMI 73 ARC-compatible TV (Connection 18 Audio Decoder (Front display 34 Audio device connection 25 Audio In (Option menu 25, 65 AUDIO jack 17 Audio Output (Setup menu, HDMI 72 Audio Return Channel 18 Auto - Yamaha RX-V473 | Owners Manual - Page 105
menu, Speaker 71 Error indications on the front display ....... 92 Error message (YPAO 32 EX/ES (Extended Surround 63 EXTD (Option menu 63 Extended Surround (Option menu 63 External device operation keys 10 Extra Bass (Setup menu, Speaker 70 F Firmware update 85 Firmware version 81 FM - Yamaha RX-V473 | Owners Manual - Page 106
40 Neo: 6 Music (Surround decoder 40 NET RADIO (Input 56 Network (Setup menu 77 Network cable 27 Network information 79 Network Name (Setup menu, Network) ....78 Network Standby (Setup menu, Network 78 Network Update (Setup menu, Network 79 NTSC (Video signal type 81 O OPTICAL jack 17 - Yamaha RX-V473 | Owners Manual - Page 107
TV operations (Remote control 82 TV with HDMI input jacks (Connection) ... 21 TV without HDMI input jacks (Connection 22 U UPDATE (ADVANCED SETUP 81 Update of the unit's firmware 85 Updating the firmware 81 USB (Input 47, 50 USB jack 7 USB mass storage class 50 USB storage device 50 V V IN - Yamaha RX-V473 | Owners Manual - Page 108
ZoneB (Setup menu 69 ZoneB Trim (Option menu 61 APPENDIX ➤ Index En 108 - Yamaha RX-V473 | Owners Manual - Page 109
© 2012 Yamaha Corporation YE161B0/EN - Yamaha RX-V473 | Owners Manual - Page 110
, and several other people whose names I've misplaced. This code grew slowly over time without much design or planning, with features being (INCLUDING, BUT NOT LIMITED TO, PROCUREMENT OF SUBSTITUTE GOODS OR SERVICES; LOSS OF USE, DATA, OR PROFITS; OR BUSINESS INTERRUPTION) - Yamaha RX-V473 | Owners Manual - Page 111
is provided "AS IS", and you, its user, assume the entire risk as to its quality and IJG code, not just to the unmodified library. If you use our work, you ought to acknowledge us. Permission OR OTHERWISE, ARISING FROM, OUT OF OR IN CONNECTION WITH THE SOFTWARE OR THE USE OR OTHER DEALINGS - Yamaha RX-V473 | Owners Manual - Page 112
original software. 3. This notice may not be removed or altered from any source distribution. Do not disassemble, decompile, or reverse engineer the software included in Yamaha AV products. © 2012 Yamaha Corporation YE161A0/SLEN - Yamaha RX-V473 | Owners Manual - Page 113
ROM (Owner's Manual) *The supplied FM antenna varies depending on the region of purchase. … Safety Brochure … Easy Setup Guide • The illustrations of the main unit and remote control used in this guide are of the RX-V573 (U.S.A. model), unless otherwise specified. Cables required for connections - Yamaha RX-V473 | Owners Manual - Page 114
on other speaker systems, refer to "Owner's Manual". 5.1-channel system 1 2 9 3 4 10° to 30° 10° to 30° 5 2 En 7.1-channel system (RX-V573 only) 1 2 9 3 4 10° to 30° 6 5 10° to 30° 7 30 cm (1 ft) or more 1 Front speaker (L) 2 Front speaker (R) 3 Center speaker 4 Surround speaker - Yamaha RX-V473 | Owners Manual - Page 115
3 Connecting speakers/subwoofer • (U.S.A. and Canada models only) Under its default settings, the unit is configured for 8-ohm speakers. When connecting 6-ohm speakers, set the unit's speaker impedance to "6 Ω MIN". For details, see "Setting the speaker impedance" in "Owner's Manual". • (Except for - Yamaha RX-V473 | Owners Manual - Page 116
(//\) terminals. 4 Connect the subwoofer (9) to the SUBWOOFER jack. PB Y OR OUT The unit (rear) FRONT CENTER SPEAKERS SURROUND SUBWOOFER PB Y OR OUT The unit (rear) FRONT CENTER SPEAKERS SURROUND SUBWOOFER Audio pin cable For 7.1-channel system (RX-V573 only) Connect the surround back - Yamaha RX-V473 | Owners Manual - Page 117
INFO MEMORY PRESET FM AM TUNING INPUT BD DVD SCENE TV NET RADIO TONE CONTROL PROGRAM STRAIGHT VIDEO AUX USB AUDIO VIDEO iPod/iPhone/iPad 5V 2.1A The unit (front) DIRECT VOLUME Before connecting the power cable (General model only) Make sure you set the switch position of - Yamaha RX-V473 | Owners Manual - Page 118
position Ear height CODE SET SOURCE RECEIVER HDMI 1 2 3 4 AV 1 2 3 4 5 6 AUDIO A V-AUX USB TUNER NET B ZONE FM AM PRESET TUNING INFO MEMORY MOVIE SLEEP BD DVD SUR. DECODE STRAIGHT MUSIC ENHANCER DIRECT SCENE TV NET RADIO SETUP OPTION SETUP ENTER VOLUME RETURN - Yamaha RX-V473 | Owners Manual - Page 119
speakers are connected correctly. Auto Setup Start Exit Measurement Finished Result 3 / 2 / 0.1 ch 3.0 / 10.5 m -3.0 / +10.0 dB W-1:Out of Phase Warning message a Check for the blinking of the front display's indicator to identify the problem speaker. Problem speaker (blinks) W-1:PHASE VOL - Yamaha RX-V473 | Owners Manual - Page 120
surround sound produced by the unit. CODE SET SOURCE RECEIVER HDMI 1 2 3 4 AV 1 2 3 4 5 6 AUDIO A V-AUX USB TUNER NET B ZONE FM AM PRESET TUNING INFO MEMORY MOVIE SLEEP BD DVD SUR. DECODE STRAIGHT MUSIC ENHANCER DIRECT SCENE TV NET RADIO SETUP OPTION HDMI 1 STRAIGHT - Yamaha RX-V473 | Owners Manual - Page 121
List of remote control codes Liste des codes de commande Liste der Fernbedienungscodes Lista över fjärrstyrningskoder Elenco dei fjernbetjeningskoder Liste over fjernkontrollkoder Bazin Beko Belcor Bell & Howell Benq Beon Best Bestar Binatone Blue Sky Blue Star Boots BPL Bradford Brandt Brillian - Yamaha RX-V473 | Owners Manual - Page 122
Crown 0058, 0161, 0171, 0179, 0320, 0323, 0343, 0349, 0350, 0351 CS Electronics 0277, 0340, 0342 CTC Clatronic 0341 CTX 0205 Curtis Mathes 0007, 0008, 0010, 0019, 0021, 0026, 0049, 0050, 0178 CXC 0058, 0179 Cybertron 0340 Cytron 0152 Daewoo 0007, 0008, 0026, 0037, 0053, 0167, 0266 - Yamaha RX-V473 | Owners Manual - Page 123
, 0171, 0277, 0282, 0342 Monivision 0140 Montgomery Ward 0054 Motion Motorola MTC Multi System Multitech Murphy NAD Naonis NEC Neckermann NEI Net-TV Neufunk New Tech New World NewTech Nicamagic Nikkai Nikko Nobliko Nokia Norcent Nordic Nordmende Nordvision Novatronic Oceanic Okano Olevia ONCEAS - Yamaha RX-V473 | Owners Manual - Page 124
Orion 0043, 0146, 0283, 0320, 0323, 0328, 0343, 0349, 0350 Orline 0320 Osaki 0282, 0320, 0337, 0340, 0342 Oso 0340 Otto Versand 0282, 0320, 0336, 0342, 0344, 0348, 0349, 0350 Pael 0277, 0342 Palladium 0161, 0282, 0320, 0342, 0351 Palsonic 0282 Panama 0277, 0282, 0320, 0323, - Yamaha RX-V473 | Owners Manual - Page 125
0344, 0371, 0374, 0457, 0475, 0486 Sound & Vision 0340, 0341 Soundesign 0008, 0026, 0031 Watson 0320, 0349, 0350 Watt Radio 0277, 0341, 0342 Waycon 0349 Wincom 0101, 0106 Xrypton 0320 Yamaha 0008, 0026, 0050, 0053, , 1028, 1029, 1031 Audio Dynamics 1064 Audiosonic 1009 Audiovox - Yamaha RX-V473 | Owners Manual - Page 126
1024 Hitachi 1011, 1026, 1027, 1028, 1046, 1062 HNS 1110 Howard Computers 1016 HP 1016 HTS 1018 Hughes 1111, 1113, 1122 Hughes Network Systems 1110, 1116 Humax 1012, 1110, 1113 Hush 1016 Hypson 1008, 1009, 1024, 1029 iBUYPOWER 1016 Impego 1030 Imperial 1026 Inno Hit - Yamaha RX-V473 | Owners Manual - Page 127
Vector Research 1064 Video Concepts 1064 Videon 1024 Videosonic 1070 Viewsonic 1016 Voodoo 1016 Wards 1068, 1069, 1070, 1071 Weltblick XR-1000 Yamaha Yamishi Yokan Yoko 2367 BBK 2364 Bellagio 2363 Best Buy 2359 Blaupunkt 2131 Blue Parade 2157 Boghe 2382 Brainwave 2362 7 - Yamaha RX-V473 | Owners Manual - Page 128
2346, 2358, 2367, 2383 California Audio Labs 2151 Cambridge Audio 2354 CAT 2352, 2353 CAVS 2192 Global Solutions 2355 Global Sphere 2355 Go Video 2133, 2213 Goodmans 2165, 2280, 2291 2274, 2316, 2359, 2380 Hiteker 2130 Home Tech Industries 2364 Hyundai 2366 Ilo 2245 Initial - Yamaha RX-V473 | Owners Manual - Page 129
TSM 2364 Umax 2361 United 2367 Urban Concepts 2159 US Logic 2245 Venturer 2149 Viewmaster 2364 Vocopro 2206 VocoStar Wharfedale 2354, 2355 Woxter 2361, 2364 Xbox 2156, 2183 Xlogic 2355, 2362 XMS 2362 Xoro 2382 Yamada 2051, 2361, 2363 Yamaha 2056, 2064, 2065, 2080, 2081 - Yamaha RX-V473 | Owners Manual - Page 130
Aspire Astar Broksonic Go Video Hitachi Insignia Irradio JVC LG Liteon Panasonic Philips Pioneer Pye Samsung Sansui Sanyo Sony Sylvania Toshiba Yamaha 2222 2240 2146 3109 Mr Zapp 3101 Multichoice 3107 Multitech 3127 NEC 3064 NET Brazil 3085 Nokia 3097 Noos 3101 NSC 3077 Oak 3074 - Yamaha RX-V473 | Owners Manual - Page 131
Austar 4222 Axiel 4216 Axis 4008, 4009, 4024, 4050 BBK 4205 Best 4008, 4024 Blaupunkt 4015 Blue Sky 4217 Boca 4011, 4054, 4059 4203, 4206, 4207, 4221 Discoverer 4212 Discovery 4216 Diseqc 4216 Dish Network 4018, 4065, 4089, 4092, 4094, 4095, 4117 Dishpro 4018, 4117 Distrisat - Yamaha RX-V473 | Owners Manual - Page 132
, 4055 SkySat Skyvision SM Electronic Smart Sony SR Star Choice Starland Starring Start Trak Strong STS STVI Sumida Sunny Sound Sunsat Sunstar Supermax Tandberg Tandy Tantec TCM Techniland TechniSat Technology Technosat Technowelt Teco Telanor Telasat Telecom Telefunken Teleka Telemaster TELENET - Yamaha RX-V473 | Owners Manual - Page 133
Tvonics Twinner UEC Uher UltimateTV Uniden Unisat Unitor Universum US Digital 4104 4196 4053 4006, 4012, 4048, 4217 Yamaha 5082, 5095 CD Recorder Yamaha 5083 MD Yamaha 5080, 5081, 5086 Tape Yamaha 5084, 5087 Tuner Yamaha 5066, 5085, 5088, 5090, 5092 LD Yamaha 2080 Amplifier Yamaha
-
 1
1 -
 2
2 -
 3
3 -
 4
4 -
 5
5 -
 6
6 -
 7
7 -
8
-
9
-
10
-
11
-
12
-
13
-
14
-
15
-
16
-
17
-
18
-
19
-
20
-
21
-
22
-
23
-
24
-
25
-
26
-
27
-
28
-
29
-
30
-
31
-
32
-
33
-
34
-
35
-
36
-
37
-
38
-
39
-
40
-
41
-
42
-
43
-
44
-
45
-
46
-
47
-
48
-
49
-
50
-
51
-
52
-
53
-
54
-
55
-
56
-
57
-
58
-
59
-
60
-
61
-
62
-
63
-
64
-
65
-
66
-
67
-
68
-
69
-
70
-
71
-
72
-
73
-
74
-
75
-
76
-
77
-
78
-
79
-
80
-
81
-
82
-
83
-
84
-
85
-
86
-
87
-
88
-
89
-
90
-
91
-
92
-
93
-
94
-
95
-
96
-
97
-
98
-
99
-
100
-
101
-
102
-
103
-
104
-
105
-
106
-
107
-
108
-
109
-
110
-
111
-
112
-
113
-
114
-
115
-
116
-
117
-
118
-
119
-
120
-
121
-
122
-
123
-
124
-
125
-
126
-
127
-
128
-
129
-
130
-
131
-
132
-
133
 |
 |

AV Receiver
Owner’s Manual
English
Read the supplied booklet “Safety Brochure” before using the unit.