Yamaha RX-V473 Owners Manual - Page 30
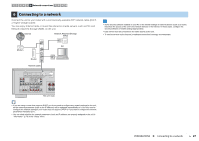
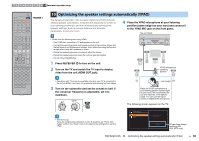
Optimizing the speaker settings automatically (YPAO), Press RECEIVER - test
 |
View all Yamaha RX-V473 manuals
Add to My Manuals
Save this manual to your list of manuals |
Page 30 highlights
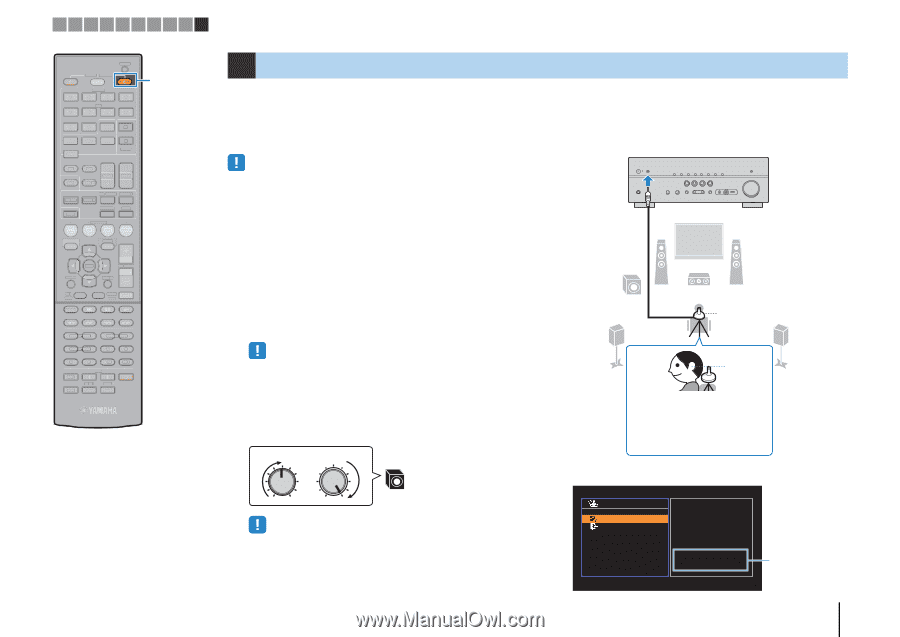
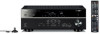
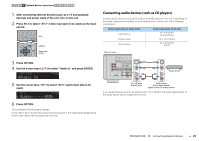
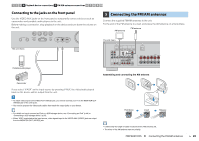
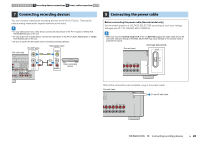
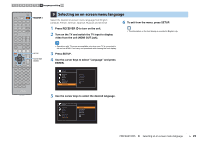
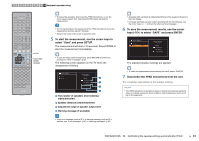
1 2 3 4 5 6 7 8 9 10 Automatic speaker setup CODE SET SOURCE RECEIVER HDMI 1 2 3 4 AV 1 2 3 4 5 6 AUDIO A V-AUX USB TUNER NET B ZONE FM AM PRESET TUNING INFO MEMORY MOVIE SLEEP BD DVD SUR. DECODE STRAIGHT MUSIC ENHANCER DIRECT SCENE TV NET RADIO SETUP OPTION RECEIVER z ENTER VOLUME RETURN DISPLAY TOP MENU MODE POP-UP MUTE MENU 1 2 3 4 5 6 7 8 9 INPUT MUTE 0 10 TV TV VOL TV CH ENT 10 Optimizing the speaker settings automatically (YPAO) The Yamaha Parametric room Acoustic Optimizer (YPAO) function detects speaker connections, measures the distances from them to your listening position(s), and then automatically optimizes the speaker settings, such as volume balance and acoustic parameters, to suit your room. 4 Place the YPAO microphone at your listening position (same height as your ears) and connect it to the YPAO MIC jack on the front panel. The unit (front) • Please note the following when using YPAO. - Use YPAO after connecting a TV and speakers to the unit. - During the measuring process, test tones are output at high volume. Ensure that the test tones do not frighten small children. Also, refrain from using this function at night when it may be a nuisance to others. - During the measuring process, you cannot adjust the volume. - During the measuring process, keep the room as quiet as possible. - Do not connect headphones. 1 Press RECEIVER z to turn on the unit. 2 Turn on the TV and switch the TV input to display video from the unit (HDMI OUT jack). 1 2 9 3 4 YPAO microphone Listening position 5 • Operations with TV screen are available only when your TV is connected to the unit via HDMI. If not, carry out operations while viewing the front display. 3 Turn on the subwoofer and set the volume to half. If the crossover frequency is adjustable, set it to maximum. VOLUME CROSSOVER/ HIGH CUT 9 Ear height Place the YPAO microphone at your listening position (same height as your ears). We recommend the use of a tripod as a microphone stand. You can use the tripod screws to stabilize the microphone. The following screen appears on the TV. MIN MAX MIN MAX • (RX-V573 only) If you are using bi-amp connection or Zone B speakers, set "Power Amp Assign" (p.69) in the "Setup" menu to the appropriate setting before starting YPAO. Auto Setup Start Exit Press SETUP key to Start Power Amp Assign Basic "Power Amp Assign" setting (p.69) (RX-V573 only) PREPARATIONS ➤ Optimizing the speaker settings automatically (YPAO) En 30
-
 1
1 -
2
-
3
-
4
-
5
-
6
-
7
-
8
-
9
-
10
-
11
-
12
-
13
-
14
-
15
-
16
-
17
-
18
-
19
-
20
-
21
-
22
-
23
-
24
-
 25
25 -
 26
26 -
 27
27 -
 28
28 -
 29
29 -
 30
30 -
 31
31 -
 32
32 -
 33
33 -
 34
34 -
 35
35 -
36
-
37
-
38
-
39
-
40
-
41
-
42
-
43
-
44
-
45
-
46
-
47
-
48
-
49
-
50
-
51
-
52
-
53
-
54
-
55
-
56
-
57
-
58
-
59
-
60
-
61
-
62
-
63
-
64
-
65
-
66
-
67
-
68
-
69
-
70
-
71
-
72
-
73
-
74
-
75
-
76
-
77
-
78
-
79
-
80
-
81
-
82
-
83
-
84
-
85
-
86
-
87
-
88
-
89
-
90
-
91
-
92
-
93
-
94
-
95
-
96
-
97
-
98
-
99
-
100
-
101
-
102
-
103
-
104
-
105
-
106
-
107
-
108
-
109
-
110
-
111
-
112
-
113
-
114
-
115
-
116
-
117
-
118
-
119
-
120
-
121
-
122
-
123
-
124
-
125
-
126
-
127
-
128
-
129
-
130
-
131
-
132
-
133
 |
 |