2008 BMW 5 Series Owner's Manual - Page 131
2008 BMW 5 Series Manual
Page 131 highlights
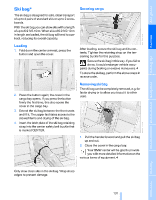
Partition net 3. Pull out the case downward, arrow 2; avoid tilting when doing so. With normal cargo bay Pull the partition net out of the case by the loop. Grasp the rod on both sides and insert it in the brackets, arrow 1. This is best carried out from the rear seat. When you no longer require the partition net, grasp the rod on both sides and remove it from the brackets, arrow 2. Then slowly allow the partition net to glide into the case. 5. Carefully pull out the partition net and insert it in the front brackets as described in With normal cargo bay. This is best carried out from the front seat. To restore the original state, proceed in the reverse order. Finally, lay the case in the two side brackets and then press forward until it engages. The red warning indicator disappears in the recess when the catch is engaged. Check whether the case is properly locked in place by pulling it with a sudden movement. 1. Fold down both rear backrests, refer to Expanding cargo bay. 2. Unlock the case on both sides with the buttons, arrow 1. Compartment in floor Automatic roll-up cover: the opened floor panel strikes against the roll-up cover in the end position. If necessary, unhook the roll-up cover at the rear before opening the floor panel. To open, reach into the recess and swing up the handle. The floor panel flap can be locked. The partitions in the compartment can be rearranged. 129 Online Edition for Part no. 01 41 0 014 240 - © 08/07 BMW AG Reference Mobility Communications Entertainment With an expanded cargo bay Navigation Driving tips Do not allow the partition net to snap back, otherwise there is a risk of injury and the partition net may be damaged.< 4. Push the case into the guides on the backs of the backrests. Controls At a glance
-
 1
1 -
2
-
3
-
4
-
5
-
6
-
7
-
8
-
9
-
10
-
11
-
12
-
13
-
14
-
15
-
16
-
17
-
18
-
19
-
20
-
21
-
22
-
23
-
24
-
25
-
26
-
27
-
28
-
29
-
30
-
31
-
32
-
33
-
34
-
35
-
36
-
37
-
38
-
39
-
40
-
41
-
42
-
43
-
44
-
45
-
46
-
47
-
48
-
49
-
50
-
51
-
52
-
53
-
54
-
55
-
56
-
57
-
58
-
59
-
60
-
61
-
62
-
63
-
64
-
65
-
66
-
67
-
68
-
69
-
70
-
71
-
72
-
73
-
74
-
75
-
76
-
77
-
78
-
79
-
80
-
81
-
82
-
83
-
84
-
85
-
86
-
87
-
88
-
89
-
90
-
91
-
92
-
93
-
94
-
95
-
96
-
97
-
98
-
99
-
100
-
101
-
102
-
103
-
104
-
105
-
106
-
107
-
108
-
109
-
110
-
111
-
112
-
113
-
114
-
115
-
116
-
117
-
118
-
119
-
120
-
121
-
122
-
123
-
124
-
125
-
 126
126 -
 127
127 -
 128
128 -
 129
129 -
 130
130 -
 131
131 -
 132
132 -
 133
133 -
 134
134 -
 135
135 -
 136
136 -
137
-
138
-
139
-
140
-
141
-
142
-
143
-
144
-
145
-
146
-
147
-
148
-
149
-
150
-
151
-
152
-
153
-
154
-
155
-
156
-
157
-
158
-
159
-
160
-
161
-
162
-
163
-
164
-
165
-
166
-
167
-
168
-
169
-
170
-
171
-
172
-
173
-
174
-
175
-
176
-
177
-
178
-
179
-
180
-
181
-
182
-
183
-
184
-
185
-
186
-
187
-
188
-
189
-
190
-
191
-
192
-
193
-
194
-
195
-
196
-
197
-
198
-
199
-
200
-
201
-
202
-
203
-
204
-
205
-
206
-
207
-
208
-
209
-
210
-
211
-
212
-
213
-
214
-
215
-
216
-
217
-
218
-
219
-
220
-
221
-
222
-
223
-
224
-
225
-
226
-
227
-
228
-
229
-
230
-
231
-
232
-
233
-
234
-
235
-
236
-
237
-
238
-
239
-
240
-
241
-
242
-
243
-
244
-
245
-
246
-
247
-
248
-
249
-
250
-
251
-
252
-
253
-
254
-
255
-
256
-
257
-
258
-
259
-
260
-
261
-
262
-
263
-
264
-
265
-
266
-
267
-
268
-
269
-
270
-
271
-
272
-
273
-
274
-
275
-
276
-
277
-
278
-
279
-
280
-
281
-
282
-
283
-
284
-
285
-
286
-
287
-
288
 |
 |
