1994 Honda Civic Owner's Manual - Page 145
1994 Honda Civic Manual
Page 145 highlights
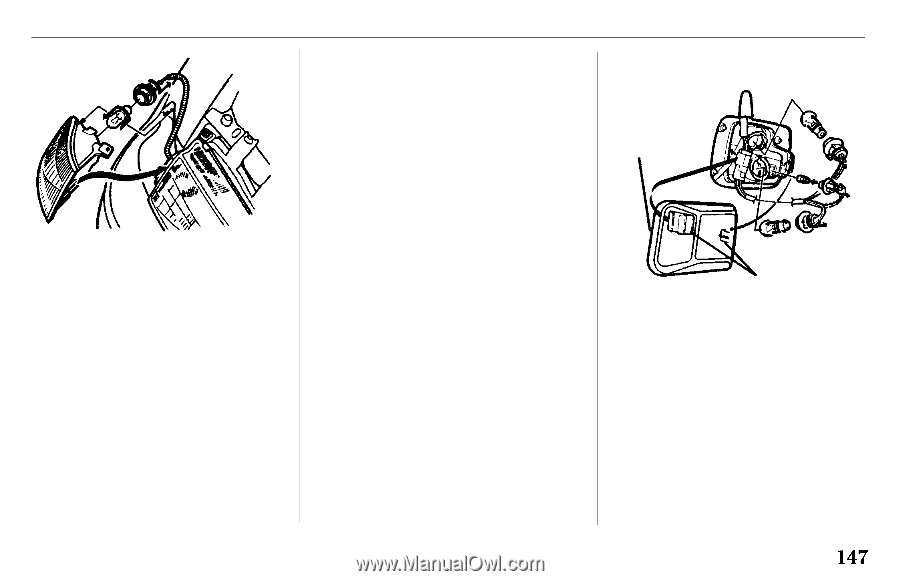
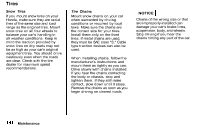
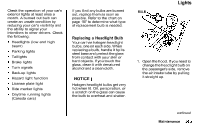
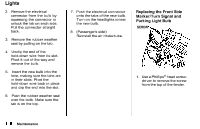
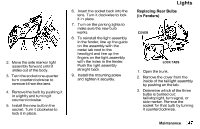
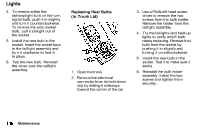
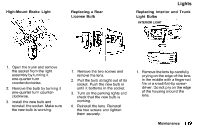
Lights 6. Insert the socket back into the lens. Turn it clockwise to lock it in place. 7. Turn on the parking lights to make sure the new bulb works. 8. To reinstall the light assembly in the fender, line up the guide on the assembly with the metal tab next to the headlight and line up the fingers on the light assembly with the holes in the fender. Push the light assembly straight back. 9. Install the mounting screw and tighten it securely. Replacing Rear Bulbs (in Fenders) COVER 2. Move the side marker light assembly forward until it slides out of the body. 3. Turn the socket one-quarter turn counterclockwise to remove it from the lens. 4. Remove the bulb by pushing it in slightly and turning it counterclockwise. 5. Install the new bulb in the socket. Turn it clockwise to lock it in place. LOCK TABS 1. Open the trunk. 2. Remove the cover from the inside of the taillight assembly by pushing on the tab. 3. Determine which of the three bulbs is burned out: tail/stoplight, turn signal, or side marker. Remove the socket for that bulb by turning it counterclockwise. Maintenance
-
 1
1 -
2
-
3
-
4
-
5
-
6
-
7
-
8
-
9
-
10
-
11
-
12
-
13
-
14
-
15
-
16
-
17
-
18
-
19
-
20
-
21
-
22
-
23
-
24
-
25
-
26
-
27
-
28
-
29
-
30
-
31
-
32
-
33
-
34
-
35
-
36
-
37
-
38
-
39
-
40
-
41
-
42
-
43
-
44
-
45
-
46
-
47
-
48
-
49
-
50
-
51
-
52
-
53
-
54
-
55
-
56
-
57
-
58
-
59
-
60
-
61
-
62
-
63
-
64
-
65
-
66
-
67
-
68
-
69
-
70
-
71
-
72
-
73
-
74
-
75
-
76
-
77
-
78
-
79
-
80
-
81
-
82
-
83
-
84
-
85
-
86
-
87
-
88
-
89
-
90
-
91
-
92
-
93
-
94
-
95
-
96
-
97
-
98
-
99
-
100
-
101
-
102
-
103
-
104
-
105
-
106
-
107
-
108
-
109
-
110
-
111
-
112
-
113
-
114
-
115
-
116
-
117
-
118
-
119
-
120
-
121
-
122
-
123
-
124
-
125
-
126
-
127
-
128
-
129
-
130
-
131
-
132
-
133
-
134
-
135
-
136
-
137
-
138
-
139
-
 140
140 -
 141
141 -
 142
142 -
 143
143 -
 144
144 -
 145
145 -
 146
146 -
 147
147 -
 148
148 -
 149
149 -
 150
150 -
151
-
152
-
153
-
154
-
155
-
156
-
157
-
158
-
159
-
160
-
161
-
162
-
163
-
164
-
165
-
166
-
167
-
168
-
169
-
170
-
171
-
172
-
173
-
174
-
175
-
176
-
177
-
178
-
179
-
180
-
181
-
182
-
183
-
184
-
185
-
186
-
187
-
188
-
189
-
190
-
191
-
192
-
193
-
194
-
195
-
196
-
197
-
198
-
199
-
200
-
201
-
202
-
203
-
204
-
205
-
206
-
207
-
208
-
209
-
210
 |
 |