2011 Kawasaki Mule 610 4x4 XC Owners Manual - Page 91
2011 Kawasaki Mule 610 4x4 XC Manual

Page 91 highlights
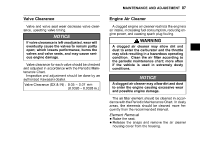
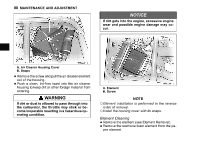
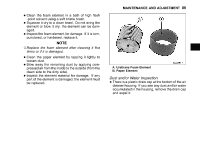
MAINTENANCE AND ADJUSTMENT 89 the foam element in a bath of high flash • Clean -point solvent using a soft bristle brush. it dry in a clean towel. Do not wring the • Squeeze element or blow it dry; the element can be dam- • aged. Inspect the foam element for damage. If it is torn, punctured, or hardened, replace it. NOTE żReplace the foam element after cleaning it five times or if it is damaged. j the paper element by tapping it lightly to • Clean loosen dust. away the remaining dust by applying com• Blow pressed air from the inside to the outside (from the • clean side to the dirty side). Inspect the element material for damage. If any part of the element is damaged, the element must be replaced. A. Urethane Foam Element B. Paper Element Dust and/or Water Inspection is a plastic drain cap at the bottom of the air • There cleaner housing. If you see any dust and/or water accumulated in the housing, remove the drain cap and expel it.
-
 1
1 -
2
-
3
-
4
-
5
-
6
-
7
-
8
-
9
-
10
-
11
-
12
-
13
-
14
-
15
-
16
-
17
-
18
-
19
-
20
-
21
-
22
-
23
-
24
-
25
-
26
-
27
-
28
-
29
-
30
-
31
-
32
-
33
-
34
-
35
-
36
-
37
-
38
-
39
-
40
-
41
-
42
-
43
-
44
-
45
-
46
-
47
-
48
-
49
-
50
-
51
-
52
-
53
-
54
-
55
-
56
-
57
-
58
-
59
-
60
-
61
-
62
-
63
-
64
-
65
-
66
-
67
-
68
-
69
-
70
-
71
-
72
-
73
-
74
-
75
-
76
-
77
-
78
-
79
-
80
-
81
-
82
-
83
-
84
-
85
-
 86
86 -
 87
87 -
 88
88 -
 89
89 -
 90
90 -
 91
91 -
 92
92 -
 93
93 -
 94
94 -
 95
95 -
 96
96 -
97
-
98
-
99
-
100
-
101
-
102
-
103
-
104
-
105
-
106
-
107
-
108
-
109
-
110
-
111
-
112
-
113
-
114
-
115
-
116
-
117
-
118
-
119
-
120
-
121
-
122
-
123
-
124
-
125
-
126
-
127
-
128
-
129
-
130
-
131
-
132
-
133
-
134
-
135
-
136
-
137
-
138
-
139
 |
 |
