2009 Mercedes E-Class Owner's Manual - Page 367
2009 Mercedes E-Class Manual
Page 367 highlights
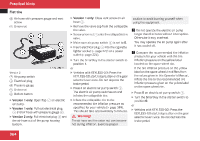
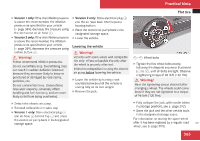
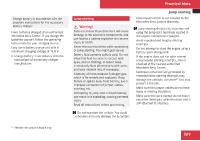
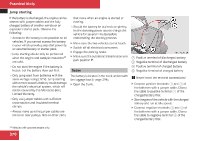
Practical hints Flat tire X Version 1 only: If the tire inflation pressure is above the recommended tire inflation pressure as specified for your vehicle (Y page 389), decrease tire pressure using the vent screw on air hose 4. X Version 2 only: If the tire inflation pressure is above the recommended tire inflation pressure as specified for your vehicle (Y page 389), decrease tire pressure using deflate button 6. X Version 2 only: Store electrical plug 3 and the air hose back into the pump housing bottom. X Place the electric air pump back in its designated storage space. X Lower the vehicle. Lowering the vehicle G Warning! Vehicles with spare wheel with collapsible tire only: Inflate collapsible tire only after the wheel is properly attached. Inflate the collapsible tire using the electric air pump before lowering the vehicle. X G Warning! Follow recommend inflation pressures. Do not overinflate tires. Overinflating tires can result in sudden deflation (blowout) because they are more likely to become punctured or damaged by road debris, potholes, etc. Do not underinflate tires. Underinflated tires wear unevenly, adversely affect handling and fuel economy, and are more likely to fail from being overheated. X 1 - 5 Wheel bolts X Tighten the five wheel bolts evenly, following the diagonal sequence illustrated (1 to 5), until all bolts are tight. Observe a tightening torque of 96 lb-ft (130 Nm). Lower the vehicle by turning crank counterclockwise until the vehicle is resting fully on its own weight. X Remove the jack. G Warning! Have the tightening torque checked after changing a wheel. The wheels could come loose if they are not tightened to a torque of 96 lb-ft (130 Nm). X Detach the electric air pump. X Reinstall collapsible tire valve cap. X Version 1 only: Store electrical plug 3 and air hose 4 behind flap 1 and place the electric air pump back in its designated storage space. Fully collapse the jack, with handle folded in (storage position), see (Y page 292). X Store the jack and the other vehicle tools in the designated storage space. For information on storing the spare wheel after it has been replaced by a regular road wheel, see (Y page 293). Z 365
-
 1
1 -
2
-
3
-
4
-
5
-
6
-
7
-
8
-
9
-
10
-
11
-
12
-
13
-
14
-
15
-
16
-
17
-
18
-
19
-
20
-
21
-
22
-
23
-
24
-
25
-
26
-
27
-
28
-
29
-
30
-
31
-
32
-
33
-
34
-
35
-
36
-
37
-
38
-
39
-
40
-
41
-
42
-
43
-
44
-
45
-
46
-
47
-
48
-
49
-
50
-
51
-
52
-
53
-
54
-
55
-
56
-
57
-
58
-
59
-
60
-
61
-
62
-
63
-
64
-
65
-
66
-
67
-
68
-
69
-
70
-
71
-
72
-
73
-
74
-
75
-
76
-
77
-
78
-
79
-
80
-
81
-
82
-
83
-
84
-
85
-
86
-
87
-
88
-
89
-
90
-
91
-
92
-
93
-
94
-
95
-
96
-
97
-
98
-
99
-
100
-
101
-
102
-
103
-
104
-
105
-
106
-
107
-
108
-
109
-
110
-
111
-
112
-
113
-
114
-
115
-
116
-
117
-
118
-
119
-
120
-
121
-
122
-
123
-
124
-
125
-
126
-
127
-
128
-
129
-
130
-
131
-
132
-
133
-
134
-
135
-
136
-
137
-
138
-
139
-
140
-
141
-
142
-
143
-
144
-
145
-
146
-
147
-
148
-
149
-
150
-
151
-
152
-
153
-
154
-
155
-
156
-
157
-
158
-
159
-
160
-
161
-
162
-
163
-
164
-
165
-
166
-
167
-
168
-
169
-
170
-
171
-
172
-
173
-
174
-
175
-
176
-
177
-
178
-
179
-
180
-
181
-
182
-
183
-
184
-
185
-
186
-
187
-
188
-
189
-
190
-
191
-
192
-
193
-
194
-
195
-
196
-
197
-
198
-
199
-
200
-
201
-
202
-
203
-
204
-
205
-
206
-
207
-
208
-
209
-
210
-
211
-
212
-
213
-
214
-
215
-
216
-
217
-
218
-
219
-
220
-
221
-
222
-
223
-
224
-
225
-
226
-
227
-
228
-
229
-
230
-
231
-
232
-
233
-
234
-
235
-
236
-
237
-
238
-
239
-
240
-
241
-
242
-
243
-
244
-
245
-
246
-
247
-
248
-
249
-
250
-
251
-
252
-
253
-
254
-
255
-
256
-
257
-
258
-
259
-
260
-
261
-
262
-
263
-
264
-
265
-
266
-
267
-
268
-
269
-
270
-
271
-
272
-
273
-
274
-
275
-
276
-
277
-
278
-
279
-
280
-
281
-
282
-
283
-
284
-
285
-
286
-
287
-
288
-
289
-
290
-
291
-
292
-
293
-
294
-
295
-
296
-
297
-
298
-
299
-
300
-
301
-
302
-
303
-
304
-
305
-
306
-
307
-
308
-
309
-
310
-
311
-
312
-
313
-
314
-
315
-
316
-
317
-
318
-
319
-
320
-
321
-
322
-
323
-
324
-
325
-
326
-
327
-
328
-
329
-
330
-
331
-
332
-
333
-
334
-
335
-
336
-
337
-
338
-
339
-
340
-
341
-
342
-
343
-
344
-
345
-
346
-
347
-
348
-
349
-
350
-
351
-
352
-
353
-
354
-
355
-
356
-
357
-
358
-
359
-
360
-
361
-
 362
362 -
 363
363 -
 364
364 -
 365
365 -
 366
366 -
 367
367 -
 368
368 -
 369
369 -
 370
370 -
 371
371 -
 372
372 -
373
-
374
-
375
-
376
-
377
-
378
-
379
-
380
-
381
-
382
-
383
-
384
-
385
-
386
-
387
-
388
-
389
-
390
-
391
-
392
-
393
-
394
-
395
-
396
-
397
-
398
-
399
-
400
-
401
-
402
-
403
-
404
-
405
-
406
-
407
-
408
 |
 |
