2009 Volvo XC90 Owner's Manual - Page 113
2009 Volvo XC90 Manual
Page 113 highlights
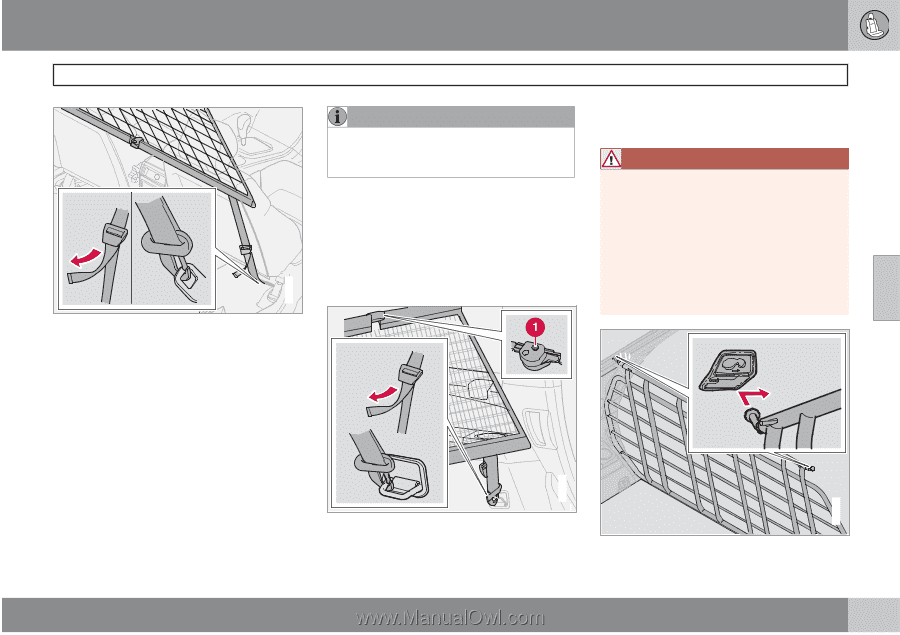
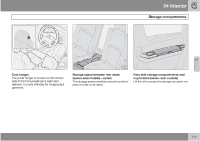
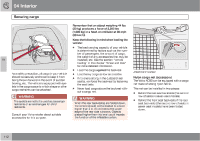
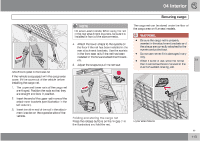
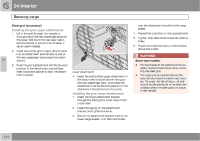
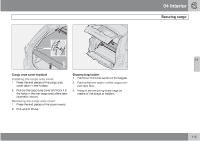
04 Interior Securing cargo NOTE On seven-seat models: When using the net in the rear attachment brackets, be sure it is installed in front of the side armrests. The cargo net can be stored under the floor of the cargo area on five-seat models. WARNING • 4. Attach the lower straps to the eyelets on the floor if the net has been installed in the rear attachment brackets. Use the eyelets in the front seat rails if the net has been installed in the forward attachment brackets. G027059 Be sure the cargo net is properly inserted in the attachment brackets and the straps are correctly attached to the eyelets and pulled taut. Do not use the net if it is damaged in any way. When it is not in use, store the net so that it cannot be thrown forward in the event of sudden braking, etc. 04 • • 5. Adjust the straps to pull the net taut. Attachment eyelet in front seat rail If the vehicle is equipped with the cargo area cover, lift the cover out of the vehicle before installing the cargo net. 1. The upper and lower rods of the cargo net are hinged. Position the rods so that they are straight and lock in position. 2. Insert the end of the upper rod in one of the attachment brackets (see illustration in the left column). 3. Insert the other end of the rod in the attachment bracket on the opposite side of the vehicle. G027060 Folding and storing the cargo net Press the release buttons on the hinges (1 in the illustration) and fold the net. Upper attachments G027056 113
-
 1
1 -
2
-
3
-
4
-
5
-
6
-
7
-
8
-
9
-
10
-
11
-
12
-
13
-
14
-
15
-
16
-
17
-
18
-
19
-
20
-
21
-
22
-
23
-
24
-
25
-
26
-
27
-
28
-
29
-
30
-
31
-
32
-
33
-
34
-
35
-
36
-
37
-
38
-
39
-
40
-
41
-
42
-
43
-
44
-
45
-
46
-
47
-
48
-
49
-
50
-
51
-
52
-
53
-
54
-
55
-
56
-
57
-
58
-
59
-
60
-
61
-
62
-
63
-
64
-
65
-
66
-
67
-
68
-
69
-
70
-
71
-
72
-
73
-
74
-
75
-
76
-
77
-
78
-
79
-
80
-
81
-
82
-
83
-
84
-
85
-
86
-
87
-
88
-
89
-
90
-
91
-
92
-
93
-
94
-
95
-
96
-
97
-
98
-
99
-
100
-
101
-
102
-
103
-
104
-
105
-
106
-
107
-
 108
108 -
 109
109 -
 110
110 -
 111
111 -
 112
112 -
 113
113 -
 114
114 -
 115
115 -
 116
116 -
 117
117 -
 118
118 -
119
-
120
-
121
-
122
-
123
-
124
-
125
-
126
-
127
-
128
-
129
-
130
-
131
-
132
-
133
-
134
-
135
-
136
-
137
-
138
-
139
-
140
-
141
-
142
-
143
-
144
-
145
-
146
-
147
-
148
-
149
-
150
-
151
-
152
-
153
-
154
-
155
-
156
-
157
-
158
-
159
-
160
-
161
-
162
-
163
-
164
-
165
-
166
-
167
-
168
-
169
-
170
-
171
-
172
-
173
-
174
-
175
-
176
-
177
-
178
-
179
-
180
-
181
-
182
-
183
-
184
-
185
-
186
-
187
-
188
-
189
-
190
-
191
-
192
-
193
-
194
-
195
-
196
-
197
-
198
-
199
-
200
-
201
-
202
-
203
-
204
-
205
-
206
-
207
-
208
-
209
-
210
-
211
-
212
-
213
-
214
-
215
-
216
-
217
-
218
-
219
-
220
-
221
-
222
-
223
-
224
-
225
-
226
-
227
-
228
-
229
-
230
-
231
-
232
-
233
-
234
-
235
-
236
-
237
-
238
-
239
-
240
-
241
-
242
-
243
-
244
-
245
-
246
-
247
-
248
-
249
-
250
-
251
-
252
-
253
-
254
-
255
-
256
-
257
-
258
-
259
-
260
-
261
-
262
-
263
-
264
-
265
-
266
-
267
-
268
-
269
-
270
-
271
-
272
-
273
-
274
-
275
-
276
-
277
-
278
-
279
-
280
-
281
-
282
 |
 |