2009 Volvo XC90 Owner's Manual - Page 114
2009 Volvo XC90 Manual
Page 114 highlights
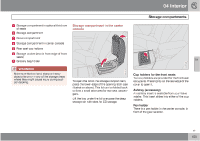
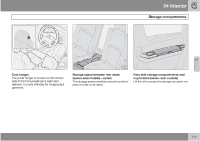
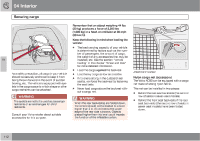
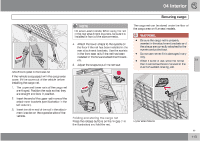
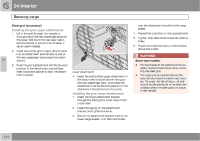
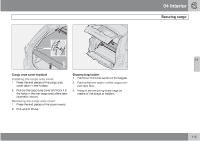
04 Interior Securing cargo Steel grid (accessory) Installing the grid, upper attachments 1. Lift in the grid through the tailgate or through one of the rear passenger doors (in this case, fold down the rear seat backrests/backrests in second row of seats in seven-seat models). 2. Insert one of the grid's upper attachments into an attachment bracket above one of the rear passenger doors (see illustration above). 3. Push the grid's attachment into the forward position in the attachment bracket (see inset illustration above) to lock the attachment in place. sion the attachment bracket in the cargo eyelet. 4. Repeat the operation on the opposite side. 5. Tighten both attachment brackets alternatively. 6. Place the protective caps on the threads above the knobs. WARNING G027057 04 Seven-seat models: • • Lower attachments The backrests of the optional third row seats must be folded down when installing the steel grid. The steel grid is installed behind the second row of seats in seven-seat models. To avoid the risk of injury, no one should be allowed to sit in the third row of seats when the steel grid is in place in the vehicle. 4. Insert the grid's other upper attachment in the attachment bracket above the opposite rear passenger door, and press the attachment into the forward position in the attachment bracket to lock it in place. Installing the grid, lower attachments 1. Insert the lower attachment bracket through the steel grid's lower mount from underneath. 2. Install the spring on the attachment bracket and tighten the knob. 3. Secure the attachment bracket hook in the lower cargo eyelet. Turn the knob to ten- 114
-
 1
1 -
2
-
3
-
4
-
5
-
6
-
7
-
8
-
9
-
10
-
11
-
12
-
13
-
14
-
15
-
16
-
17
-
18
-
19
-
20
-
21
-
22
-
23
-
24
-
25
-
26
-
27
-
28
-
29
-
30
-
31
-
32
-
33
-
34
-
35
-
36
-
37
-
38
-
39
-
40
-
41
-
42
-
43
-
44
-
45
-
46
-
47
-
48
-
49
-
50
-
51
-
52
-
53
-
54
-
55
-
56
-
57
-
58
-
59
-
60
-
61
-
62
-
63
-
64
-
65
-
66
-
67
-
68
-
69
-
70
-
71
-
72
-
73
-
74
-
75
-
76
-
77
-
78
-
79
-
80
-
81
-
82
-
83
-
84
-
85
-
86
-
87
-
88
-
89
-
90
-
91
-
92
-
93
-
94
-
95
-
96
-
97
-
98
-
99
-
100
-
101
-
102
-
103
-
104
-
105
-
106
-
107
-
108
-
 109
109 -
 110
110 -
 111
111 -
 112
112 -
 113
113 -
 114
114 -
 115
115 -
 116
116 -
 117
117 -
 118
118 -
 119
119 -
120
-
121
-
122
-
123
-
124
-
125
-
126
-
127
-
128
-
129
-
130
-
131
-
132
-
133
-
134
-
135
-
136
-
137
-
138
-
139
-
140
-
141
-
142
-
143
-
144
-
145
-
146
-
147
-
148
-
149
-
150
-
151
-
152
-
153
-
154
-
155
-
156
-
157
-
158
-
159
-
160
-
161
-
162
-
163
-
164
-
165
-
166
-
167
-
168
-
169
-
170
-
171
-
172
-
173
-
174
-
175
-
176
-
177
-
178
-
179
-
180
-
181
-
182
-
183
-
184
-
185
-
186
-
187
-
188
-
189
-
190
-
191
-
192
-
193
-
194
-
195
-
196
-
197
-
198
-
199
-
200
-
201
-
202
-
203
-
204
-
205
-
206
-
207
-
208
-
209
-
210
-
211
-
212
-
213
-
214
-
215
-
216
-
217
-
218
-
219
-
220
-
221
-
222
-
223
-
224
-
225
-
226
-
227
-
228
-
229
-
230
-
231
-
232
-
233
-
234
-
235
-
236
-
237
-
238
-
239
-
240
-
241
-
242
-
243
-
244
-
245
-
246
-
247
-
248
-
249
-
250
-
251
-
252
-
253
-
254
-
255
-
256
-
257
-
258
-
259
-
260
-
261
-
262
-
263
-
264
-
265
-
266
-
267
-
268
-
269
-
270
-
271
-
272
-
273
-
274
-
275
-
276
-
277
-
278
-
279
-
280
-
281
-
282
 |
 |
