2009 Volvo XC90 Owner's Manual - Page 187
2009 Volvo XC90 Manual

Page 187 highlights
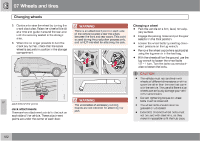
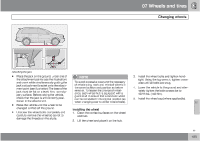
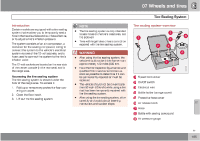
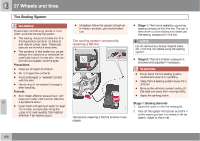
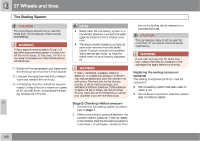
07 Wheels and tires Tire Sealing System 3. Ensure that the on/off switch is in position 0 (the 0 side of the switch should be pressed down). 4. Put on the gloves included in the tire sealing system. WARNING The bottle is equipped with a catch to keep it securely in place and help prevent sealing compound leakage. Once in place, the bottle cannot be unscrewed. This must be done by a trained and qualified Volvo service technician. WARNING • • • Never stand next to the tire being inflated when the compressor is in operation. If cracks, bubbles, etc. form on the tire, switch off the compressor immediately. If there is visible damage to the sidewall or the rim, the tire cannot be repaired. The vehicle should not be driven if this occurs. Contact a towing service or Volvo On Call Roadside Assistance if applicable. WARNING Contact with the sealing compound may cause skin irritation. If contact occurs, wash the affected area immediately with soap and water. 7. Remove the valve cap from the tire's inflation valve and screw the tire sealing system's hose connector onto the valve as tightly as possible by hand. 8. Connect the electrical wire to the nearest 12-volt socket in the vehicle. 9. Start the vehicle's engine. 10. Start the tire sealing system's compressor by pressing the on/off switch to position I. 5. Unscrew the orange cover over the bottle holder and unscrew the cap on the bottle of sealing compound. NOTE The air pressure gauge will temporarily show an increase in pressure to approximately 88 psi (6 bar) while the sealing compound is being pumped into the tire. The pressure should return to a normal level after approximately 30 seconds. NOTE Do not break the seal on the bottle. This occurs automatically when the bottle is screwed into the holder. 6. Screw the bottle into the bottle holder. 11. Within seven minutes, inflate the tire to between 22-44 psi (1.8-3.0 bar). Switch off the compressor briefly to get a clear reading from the pressure gauge. The compressor should not be used for more than 10 minutes at a time to avoid overheating. 07 187
-
 1
1 -
2
-
3
-
4
-
5
-
6
-
7
-
8
-
9
-
10
-
11
-
12
-
13
-
14
-
15
-
16
-
17
-
18
-
19
-
20
-
21
-
22
-
23
-
24
-
25
-
26
-
27
-
28
-
29
-
30
-
31
-
32
-
33
-
34
-
35
-
36
-
37
-
38
-
39
-
40
-
41
-
42
-
43
-
44
-
45
-
46
-
47
-
48
-
49
-
50
-
51
-
52
-
53
-
54
-
55
-
56
-
57
-
58
-
59
-
60
-
61
-
62
-
63
-
64
-
65
-
66
-
67
-
68
-
69
-
70
-
71
-
72
-
73
-
74
-
75
-
76
-
77
-
78
-
79
-
80
-
81
-
82
-
83
-
84
-
85
-
86
-
87
-
88
-
89
-
90
-
91
-
92
-
93
-
94
-
95
-
96
-
97
-
98
-
99
-
100
-
101
-
102
-
103
-
104
-
105
-
106
-
107
-
108
-
109
-
110
-
111
-
112
-
113
-
114
-
115
-
116
-
117
-
118
-
119
-
120
-
121
-
122
-
123
-
124
-
125
-
126
-
127
-
128
-
129
-
130
-
131
-
132
-
133
-
134
-
135
-
136
-
137
-
138
-
139
-
140
-
141
-
142
-
143
-
144
-
145
-
146
-
147
-
148
-
149
-
150
-
151
-
152
-
153
-
154
-
155
-
156
-
157
-
158
-
159
-
160
-
161
-
162
-
163
-
164
-
165
-
166
-
167
-
168
-
169
-
170
-
171
-
172
-
173
-
174
-
175
-
176
-
177
-
178
-
179
-
180
-
181
-
 182
182 -
 183
183 -
 184
184 -
 185
185 -
 186
186 -
 187
187 -
 188
188 -
 189
189 -
 190
190 -
 191
191 -
 192
192 -
193
-
194
-
195
-
196
-
197
-
198
-
199
-
200
-
201
-
202
-
203
-
204
-
205
-
206
-
207
-
208
-
209
-
210
-
211
-
212
-
213
-
214
-
215
-
216
-
217
-
218
-
219
-
220
-
221
-
222
-
223
-
224
-
225
-
226
-
227
-
228
-
229
-
230
-
231
-
232
-
233
-
234
-
235
-
236
-
237
-
238
-
239
-
240
-
241
-
242
-
243
-
244
-
245
-
246
-
247
-
248
-
249
-
250
-
251
-
252
-
253
-
254
-
255
-
256
-
257
-
258
-
259
-
260
-
261
-
262
-
263
-
264
-
265
-
266
-
267
-
268
-
269
-
270
-
271
-
272
-
273
-
274
-
275
-
276
-
277
-
278
-
279
-
280
-
281
-
282
 |
 |