2009 Volvo XC90 Owner's Manual - Page 254
2009 Volvo XC90 Manual
Page 254 highlights
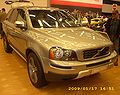
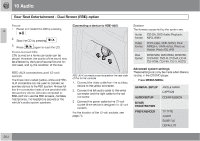
10 Audio Rear Seat Entertainment - Dual Screen (RSE)-option Pause 10 Connecting a device to RSE-AUX . System The formats supported by the system are: Audio format CD-DA, DVD Audio Playback, MP3, WMA DVD video, VCD, SVCD, Divx/ MPEG-4, WMA video, Photo cd Kodak, Photo CD JPG DVD-RAM, DVD-ROM, DVD-RW, DVD+RW, DVD-R, DVD+R, CD-R, CD-ROM, CD-RW, CD-3, HDCD 1. Pause and restart the CD by pressing 2. 3. Stop the CD by pressing Press . Video format Disc format again to eject the CD. Home-burned CDs CDs burned on a home computer can be played. However, the quality of the sound may be affected by the type of source file and format used, and by the condition of the disc. Advanced system settings RSE-AUX connectors and 12-volt socket The three color-coded (yellow-white-red) RSEAUX connectors can be used to connect an auxiliary device to the RSE system. Always follow the connection instructions provided with the auxiliary device. Devices connected to RSE-AUX can use the RSE screens, cordless headphones, the headphone sockets or the vehicle's audio system speakers. G015700 RSE-AUX connectors are located on the rear side of the tunnel console These settings can only be made when there is no disc in the CD/DVD player. Press MEDIA MENU. GENERAL SETUP ANGLE MARK CAPTION AUDIO SETUP DVX(R) REGISTRATION PREFERENCES TV TYPE AUDIO SUBTITLE DEFAULTS COMPRESSION 1. Connect the video cable from the auxiliary device to the yellow connector. 2. Connect the left audio cable to the white connector and the right cable to the red connector. 3. Connect the power cable to the 12-volt socket (if the device is designed for 12-volt current). For the location of the 12-volt sockets, see page 75. 254
-
 1
1 -
2
-
3
-
4
-
5
-
6
-
7
-
8
-
9
-
10
-
11
-
12
-
13
-
14
-
15
-
16
-
17
-
18
-
19
-
20
-
21
-
22
-
23
-
24
-
25
-
26
-
27
-
28
-
29
-
30
-
31
-
32
-
33
-
34
-
35
-
36
-
37
-
38
-
39
-
40
-
41
-
42
-
43
-
44
-
45
-
46
-
47
-
48
-
49
-
50
-
51
-
52
-
53
-
54
-
55
-
56
-
57
-
58
-
59
-
60
-
61
-
62
-
63
-
64
-
65
-
66
-
67
-
68
-
69
-
70
-
71
-
72
-
73
-
74
-
75
-
76
-
77
-
78
-
79
-
80
-
81
-
82
-
83
-
84
-
85
-
86
-
87
-
88
-
89
-
90
-
91
-
92
-
93
-
94
-
95
-
96
-
97
-
98
-
99
-
100
-
101
-
102
-
103
-
104
-
105
-
106
-
107
-
108
-
109
-
110
-
111
-
112
-
113
-
114
-
115
-
116
-
117
-
118
-
119
-
120
-
121
-
122
-
123
-
124
-
125
-
126
-
127
-
128
-
129
-
130
-
131
-
132
-
133
-
134
-
135
-
136
-
137
-
138
-
139
-
140
-
141
-
142
-
143
-
144
-
145
-
146
-
147
-
148
-
149
-
150
-
151
-
152
-
153
-
154
-
155
-
156
-
157
-
158
-
159
-
160
-
161
-
162
-
163
-
164
-
165
-
166
-
167
-
168
-
169
-
170
-
171
-
172
-
173
-
174
-
175
-
176
-
177
-
178
-
179
-
180
-
181
-
182
-
183
-
184
-
185
-
186
-
187
-
188
-
189
-
190
-
191
-
192
-
193
-
194
-
195
-
196
-
197
-
198
-
199
-
200
-
201
-
202
-
203
-
204
-
205
-
206
-
207
-
208
-
209
-
210
-
211
-
212
-
213
-
214
-
215
-
216
-
217
-
218
-
219
-
220
-
221
-
222
-
223
-
224
-
225
-
226
-
227
-
228
-
229
-
230
-
231
-
232
-
233
-
234
-
235
-
236
-
237
-
238
-
239
-
240
-
241
-
242
-
243
-
244
-
245
-
246
-
247
-
248
-
 249
249 -
 250
250 -
 251
251 -
 252
252 -
 253
253 -
 254
254 -
 255
255 -
 256
256 -
 257
257 -
 258
258 -
 259
259 -
260
-
261
-
262
-
263
-
264
-
265
-
266
-
267
-
268
-
269
-
270
-
271
-
272
-
273
-
274
-
275
-
276
-
277
-
278
-
279
-
280
-
281
-
282
 |
 |