3Com 3CRWPS10075-US User Guide - Page 16
LED Indicators, Diagnostic Push Button - firmware
 |
UPC - 662705484235
View all 3Com 3CRWPS10075-US manuals
Add to My Manuals
Save this manual to your list of manuals |
Page 16 highlights
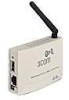
16 CHAPTER 1: INTRODUCTION LED Indicators There are two (2) LED indicators on the top panel - Status (Green, right) and Error (Red, left). The LED indicator modes are described in the following table. Table 3 LED Indicator Modes Status LED Off On On Blinking Error LED Off On Off Off Blinking Blinking Status Description No Power Hardware error Normal operation (idle) Normal operation - data is being transmitted or received on the USB Printer Port. During a Firmware Upgrade, both LEDs will blink. Diagnostic Push Button The Print Server is fitted with a Diagnostic Push Button. The button is recessed; a pin or paper clip can be used to press it. This button has 2 functions: ■ Restore the factory default settings ■ Print a test page containing all current settings. To restore the factory default settings: 1 Power down the the Print Server. 2 Press and hold the diagnostic button. While pressing the button, switch the Print Server ON. 3 If you continue pressing the button for 10 seconds, a diagnostic page will be printed, showing the new (default) settings. To generate a Diagnostic print out 1 Ensure that both the Print Server and the printer are ON. 2 Press the diagnostic button, and hold it in for 2 seconds. 3 The test page, containing the current settings, will be printed. PostScript printers are unable to print this page. If you have a PostScript printer, the test page will not be printed.
-
 1
1 -
2
-
3
-
4
-
5
-
6
-
7
-
8
-
9
-
10
-
 11
11 -
 12
12 -
 13
13 -
 14
14 -
 15
15 -
 16
16 -
 17
17 -
 18
18 -
 19
19 -
 20
20 -
 21
21 -
22
-
23
-
24
-
25
-
26
-
27
-
28
-
29
-
30
-
31
-
32
-
33
-
34
-
35
-
36
-
37
-
38
-
39
-
40
-
41
-
42
-
43
-
44
-
45
-
46
-
47
-
48
-
49
-
50
-
51
-
52
-
53
-
54
-
55
-
56
-
57
-
58
-
59
-
60
-
61
-
62
-
63
-
64
-
65
-
66
-
67
-
68
-
69
-
70
-
71
-
72
-
73
-
74
-
75
-
76
-
77
-
78
-
79
-
80
-
81
-
82
-
83
-
84
-
85
-
86
-
87
-
88
-
89
-
90
-
91
-
92
-
93
-
94
 |
 |
