Acer Veriton 3200 Veriton 3200 User Guide - Page 76
To install a DIMM, Align the DIMM with the socket.
 |
View all Acer Veriton 3200 manuals
Add to My Manuals
Save this manual to your list of manuals |
Page 76 highlights
66 4 Upgrading your computer 2. Gently pull the DIMM out of the socket (see step 2 in the figure). To install a DIMM Note: Observe the "Installation precautions" on page 47 when installing or removing a computer component. Also, make sure that you have removed the computer cover (see page 49). 1. Open the clips on the socket. 2. Align the DIMM with the socket. 3. Press the DIMM into the socket until the clips lock onto the DIMM.
-
 1
1 -
2
-
3
-
4
-
5
-
6
-
7
-
8
-
9
-
10
-
11
-
12
-
13
-
14
-
15
-
16
-
17
-
18
-
19
-
20
-
21
-
22
-
23
-
24
-
25
-
26
-
27
-
28
-
29
-
30
-
31
-
32
-
33
-
34
-
35
-
36
-
37
-
38
-
39
-
40
-
41
-
42
-
43
-
44
-
45
-
46
-
47
-
48
-
49
-
50
-
51
-
52
-
53
-
54
-
55
-
56
-
57
-
58
-
59
-
60
-
61
-
62
-
63
-
64
-
65
-
66
-
67
-
68
-
69
-
70
-
 71
71 -
 72
72 -
 73
73 -
 74
74 -
 75
75 -
 76
76 -
 77
77 -
 78
78 -
 79
79 -
 80
80 -
 81
81 -
82
-
83
-
84
-
85
-
86
-
87
-
88
-
89
-
90
-
91
-
92
-
93
-
94
-
95
-
96
 |
 |

4 Upgrading your computer
66
2.
Gently pull the DIMM out of the socket (see step 2 in the figure).
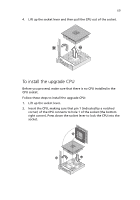
To install a DIMM
Note:
Observe the “Installation precautions” on page 47 when
installing or removing a computer component.
Also, make sure
that you have removed the computer cover (see
page 49).
1.
Open the clips on the socket.
2.
Align the DIMM with the socket.
3.
Press the DIMM into the socket until the clips lock onto the DIMM.