Acer Veriton 3200 Veriton 3200 User Guide - Page 79
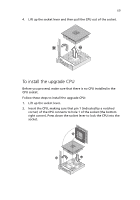
To install the upgrade CPU, corner of the CPU connects to hole 1 of the socket the bottom
 |
View all Acer Veriton 3200 manuals
Add to My Manuals
Save this manual to your list of manuals |
Page 79 highlights
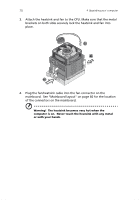
69 4. Lift up the socket lever and then pull the CPU out of the socket. To install the upgrade CPU Before you proceed, make sure that there is no CPU installed in the CPU socket. Follow these steps to install the upgrade CPU: 1. Lift up the socket lever. 2. Insert the CPU, making sure that pin 1 (indicated by a notched corner) of the CPU connects to hole 1 of the socket (the bottom right corner). Press down the socket lever to lock the CPU into the socket.
-
 1
1 -
2
-
3
-
4
-
5
-
6
-
7
-
8
-
9
-
10
-
11
-
12
-
13
-
14
-
15
-
16
-
17
-
18
-
19
-
20
-
21
-
22
-
23
-
24
-
25
-
26
-
27
-
28
-
29
-
30
-
31
-
32
-
33
-
34
-
35
-
36
-
37
-
38
-
39
-
40
-
41
-
42
-
43
-
44
-
45
-
46
-
47
-
48
-
49
-
50
-
51
-
52
-
53
-
54
-
55
-
56
-
57
-
58
-
59
-
60
-
61
-
62
-
63
-
64
-
65
-
66
-
67
-
68
-
69
-
70
-
71
-
72
-
73
-
 74
74 -
 75
75 -
 76
76 -
 77
77 -
 78
78 -
 79
79 -
 80
80 -
 81
81 -
 82
82 -
 83
83 -
 84
84 -
85
-
86
-
87
-
88
-
89
-
90
-
91
-
92
-
93
-
94
-
95
-
96
 |
 |

69
4.
Lift up the socket lever and then pull the CPU out of the socket.
To install the upgrade CPU
Before you proceed, make sure that there is no CPU installed in the
CPU socket.
Follow these steps to install the upgrade CPU:
1.
Lift up the socket lever.
2.
Insert the CPU, making sure that pin 1 (indicated by a notched
corner) of the CPU connects to hole 1 of the socket (the bottom
right corner). Press down the socket lever to lock the CPU into the
socket.