Acer Z120 User Guide - Page 6
Installing or removing the battery, Installing the battery
 |
View all Acer Z120 manuals
Add to My Manuals
Save this manual to your list of manuals |
Page 6 highlights
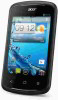
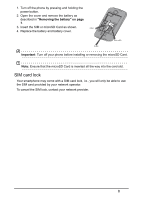
No. Item Description 4 LED indicator Indicates the phone's charging status. 5 Touchscreen 4.5-inch, 960 x 540 pixel capacitive touchscreen to display data, phone content and enter information. 6 Microphone Internal microphone. 7 Volume up/down buttons Increases or decreases the phone volume. 8 Camera A camera for taking high-resolution images. 9 Handsfree stereo speakers Emits stereo audio from your smartphone; suitable for handsfree use. 10 Micro USB connector Connects to a USB cable/charger. Installing or removing the battery Your smartphone uses a replaceable battery to provide power. It is packed separately from your smartphone and needs to be inserted and charged before you can use the smartphone. Installing the battery Insert your fingernail into the cutout between the battery cover and the phone. Unclip the cover and lift off the battery cover. SIM 1 SIM 2 Place the battery into the battery compartment, lining up the battery connectors with those at the top of the compartment. SIM 1 SIM 2 Align the tabs on the cover into the slots on the phone. Gently press the cover until it snaps in place. SIM 1 SIM 2 6
-
 1
1 -
 2
2 -
 3
3 -
 4
4 -
 5
5 -
 6
6 -
 7
7 -
 8
8 -
 9
9 -
 10
10 -
 11
11 -
 12
12 -
13
-
14
-
15
-
16
-
17
-
18
-
19
-
20
-
21
-
22
-
23
-
24
-
25
-
26
-
27
-
28
-
29
-
30
-
31
-
32
-
33
-
34
-
35
-
36
-
37
-
38
-
39
-
40
-
41
-
42
-
43
-
44
-
45
-
46
-
47
-
48
-
49
-
50
-
51
-
52
-
53
-
54
-
55
-
56
-
57
-
58
-
59
-
60
-
61
-
62
-
63
 |
 |
