Adaptec 1210SA User Guide - Page 74
Using the SATA Configuration Utility
 |
UPC - 760884154038
View all Adaptec 1210SA manuals
Add to My Manuals
Save this manual to your list of manuals |
Page 74 highlights
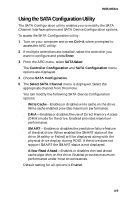
BIOS Utilities Using the SATA Configuration Utility The SATA Configuration utility enables you to modify the SATA Channel Interface options and SATA Device Configuration options. To access the SATA Configuration utility: 1 Turn on your computer and press Ctrl+A when prompted to access the ARC utility. 2 If multiple controllers are installed, select the controller you want to configure and press Enter. 3 From the ARC menu, select SATASelect. The Controller Configuration and SATA Configuration menu options are displayed. 4 Choose SATA Configuration. 5 The Select SATA Channel menu is displayed. Select the appropriate channel from this menu. You can modify the following SATA Device Configuration options: s Write Cache-Enables or disables write cache on the drive. Write cache enabled provides maximum performance. s DMA-Enables or disables the use of Direct Memory Access (DMA) mode for the drive. Enabled provides maximum performance. s SMART-Enables or disables the predictive failure feature of the disk drive. When enabled the SMART status of the drive (Healthy or Failed) will be displayed along with the physical drive display during POST. If the drive does not support SMART the SMART status is not displayed. s Allow Read Ahead-Enables or disables the read ahead cache algorithm on the drive. Enabled provides maximum performance under most circumstances. Default setting for all options is Enabled. A-9
-
 1
1 -
2
-
3
-
4
-
5
-
6
-
7
-
8
-
9
-
10
-
11
-
12
-
13
-
14
-
15
-
16
-
17
-
18
-
19
-
20
-
21
-
22
-
23
-
24
-
25
-
26
-
27
-
28
-
29
-
30
-
31
-
32
-
33
-
34
-
35
-
36
-
37
-
38
-
39
-
40
-
41
-
42
-
43
-
44
-
45
-
46
-
47
-
48
-
49
-
50
-
51
-
52
-
53
-
54
-
55
-
56
-
57
-
58
-
59
-
60
-
61
-
62
-
63
-
64
-
65
-
66
-
67
-
68
-
 69
69 -
 70
70 -
 71
71 -
 72
72 -
 73
73 -
 74
74 -
 75
75 -
 76
76 -
 77
77 -
 78
78 -
 79
79 -
80
-
81
-
82
-
83
-
84
-
85
-
86
-
87
-
88
 |
 |
