Alesis SR18 User Manual - Page 8
Connection Diagram, Top Panel Physical Layout, General Controls - footswitch
 |
View all Alesis SR18 manuals
Add to My Manuals
Save this manual to your list of manuals |
Page 8 highlights
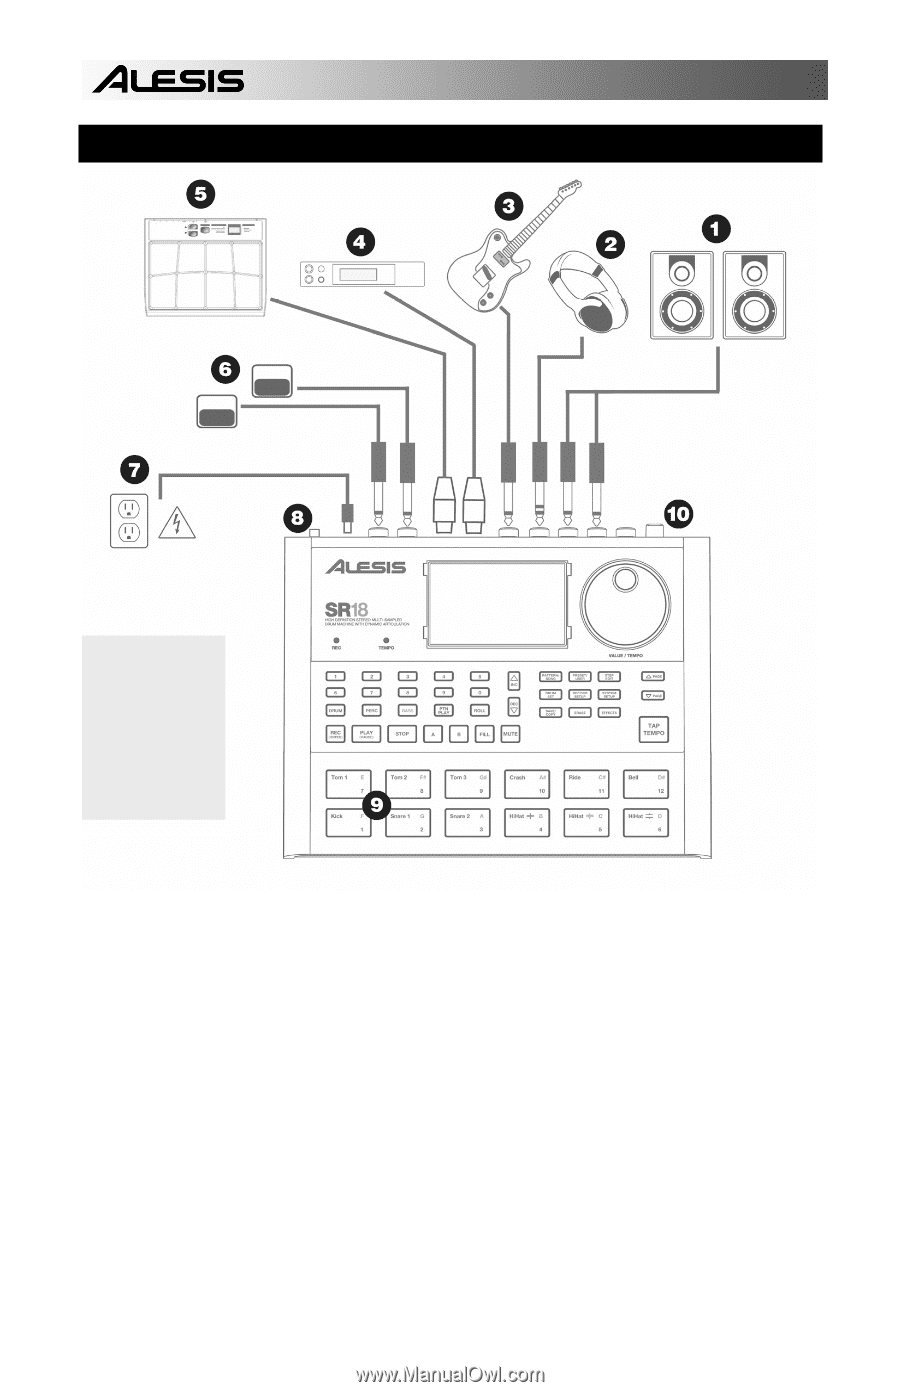
CONNECTION DIAGRAM As you hook up the SR18, the volume control on your power amp and the SR18 should be all the way down, and power to both units should be off. 1. Plug ¼" TS cables from the MAIN OUTPUTS to an amplifier, mixer, or speaker system. For mono sound, you can connect only one output. 2. Alternatively, you can connect a pair of ¼" TRS headphones to the PHONES OUTPUT to practice quietly. 3. Connect your instrument to the INSTRUMENT INPUT. 4. Connect a MIDI device, such as a sampler or sound module, to the MIDI OUT of the SR18. 5. Connect a MIDI device, such as a percussion controller, to the MIDI IN of the SR18. 6. If you have ¼" TS footswitches, connect them to the START / STOP and COUNT / A / B / FILL jacks. 7. Plug the included power adapter (12V DC 500mA) into the adapter jack and the adapter into a power source. Alternatively, you may choose to power the unit by inserting 6 AA batteries into the bottom compartment. 8. Press the POWER switch to turn on the unit. 9. Tap the pads to hear sounds. You can switch among the three different sound categories for the pads by pressing the corresponding button (DRUMS, PERC, BASS). 10. Adjust the volume control on the rear panel to a suitable listening level. Note that you may also connect the stereo Aux output to a speaker system or amplifier, using a ¼" TRS cable. The SR-18 can be setup to output sounds through the Main or Aux connections (Main by default). See "Creating and Editing Drum Sets / Page 12: Output" for more information. 8
-
 1
1 -
2
-
 3
3 -
 4
4 -
 5
5 -
 6
6 -
 7
7 -
 8
8 -
 9
9 -
 10
10 -
 11
11 -
 12
12 -
 13
13 -
14
-
15
-
16
-
17
-
18
-
19
-
20
-
21
-
22
-
23
-
24
-
25
-
26
-
27
-
28
-
29
-
30
-
31
-
32
-
33
-
34
-
35
-
36
-
37
-
38
-
39
-
40
-
41
-
42
-
43
-
44
-
45
-
46
-
47
-
48
-
49
-
50
-
51
-
52
-
53
-
54
-
55
-
56
-
57
-
58
-
59
-
60
 |
 |