Alesis Strike Pro Special Edition Strike Pro Special Edition - Module User Gui
Alesis Strike Pro Special Edition Manual
 |
View all Alesis Strike Pro Special Edition manuals
Add to My Manuals
Save this manual to your list of manuals |
Alesis Strike Pro Special Edition manual content summary:
- Alesis Strike Pro Special Edition | Strike Pro Special Edition - Module User Gui - Page 1
User Guide English ( 3 - 29 ) Appendix English ( 30 - 31 ) - Alesis Strike Pro Special Edition | Strike Pro Special Edition - Module User Gui - Page 2
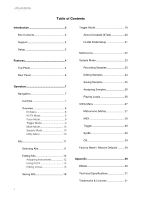
Mode 9 Mixer Mode 10 Sample Mode 10 Utility Menu 10 Kits 11 Selecting Kits 11 Editing Kits 12 Assigning Instruments 12 Using Kit FX 13 Editing Voices 15 Saving Kits 18 Trigger Mode 19 About Crosstalk (XTalk 20 Hi-Hat Pedal Setup 21 Metronome 22 Sample Mode 23 Recording Samples 23 - Alesis Strike Pro Special Edition | Strike Pro Special Edition - Module User Gui - Page 3
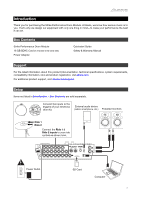
mind-to make your performance the best it can be. Box Contents Strike Performance Drum Module 16 GB SDHC Card (in module's SD card slot) Power Adapter Quickstart Guide Safety & Warranty Manual Support For the latest information about this product (documentation, technical specifications, system - Alesis Strike Pro Special Edition | Strike Pro Special Edition - Module User Gui - Page 4
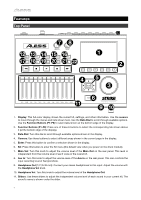
6 11 9 10 1. Display: This full-color display shows the current kit, settings, and other information. Use the cursors to move through the menus and lists shown in the display. 6. Kit: Press this button to enter the Kit menu (the default view when you power on the drum module). 7. Main Vol: Turn - Alesis Strike Pro Special Edition | Strike Pro Special Edition - Module User Gui - Page 5
active, hitting a trigger will automatically select it in the drum module. This is useful for quickly making changes to multiple sounds on your kit, like selecting new instruments, editing voice parameters, etc. Alternatively, your Strike module's menus allow you to select the current trigger using - Alesis Strike Pro Special Edition | Strike Pro Special Edition - Module User Gui - Page 6
drum module. 4. Trigger Inputs (1/4"/6.35 mm, TRS): Connect these inputs to the triggers of your Strike Pro Special Edition. The cable snake included with your Strike Pro Special Edition kick, snare, hi-hat, ride, the left and is required to save kits, samples, or global settings. The SDHC card must - Alesis Strike Pro Special Edition | Strike Pro Special Edition - Module User Gui - Page 7
contains information on how to use your Strike Performance Drum Module. Navigation Controls The Strike module's display shows information about its current mode enter its mode: Kit, Mixer, Sample, Utility, Save, Kit FX, Voice, or Triggers. When you power on the drum module, it'll always start in - Alesis Strike Pro Special Edition | Strike Pro Special Edition - Module User Gui - Page 8
specific operations in the drum module, see the Kits, Trigger Mode, Metronome, Sample Mode, and Utility Menu chapters. Kit Menu This is the main menu where you can select kits or select individual triggers to edit within the kit. To view the Kit menu, press Kit. To select a kit, do one of the - Alesis Strike Pro Special Edition | Strike Pro Special Edition - Module User Gui - Page 9
Kits > Editing Kits > Editing Voices). To enter Kit FX Mode, press Edit > Kit FX. See Kits > Editing Kits for more information about Kit FX Mode. Voice Mode Voice Mode shows the settings for each voice within the kit. A voice is the sound produced by each trigger of your Strike Pro Special Edition - Alesis Strike Pro Special Edition | Strike Pro Special Edition - Module User Gui - Page 10
Mode > Recording Samples to learn more. Sample Edit Mode lets you edit the sample you just recorded. See Sample Mode > Editing Samples for more information about this. Utility Menu The Utility menu contains settings that determine the module's overall operation, including global metronome functions - Alesis Strike Pro Special Edition | Strike Pro Special Edition - Module User Gui - Page 11
Kits The Strike module contains many preset kits. You can also create and save your own user kits onto an SD card. You can save as many user kits as your SD card can hold. If you edit a preset kit and then save it, the saved kit will be stored onto your SD card, while the original preset kit remains - Alesis Strike Pro Special Edition | Strike Pro Special Edition - Module User Gui - Page 12
After selecting a kit, select a trigger: If the Note Chase button is off, press it so it turns on, and then strike the desired zone of the trigger (drum or cymbal pad). 3. Press Voice and then press F4/Inst. 4. Press F1/Layer A or F2/Layer B to select the desired layer (your Strike module can layer - Alesis Strike Pro Special Edition | Strike Pro Special Edition - Module User Gui - Page 13
effect (F4/FX1 or F5/FX2). 3. Use the cursors to select the parameter you want to edit. Turn the data dial to change the parameter value or setting. To make adjustments to other kit effect settings, repeat Steps 2-3. To return to the previous screen, press F6/Back. These are the parameters in - Alesis Strike Pro Special Edition | Strike Pro Special Edition - Module User Gui - Page 14
Parameter Description Values/Settings EQ EQ lets you "boost" or "cut" low and high frequencies of the kit's sound to change its 's high frequency. 20 Hz - 18.5 kHz Comp Comp applies compression to the kit's sound (decreasing the dynamic range of the sound to make it more consistent). - Alesis Strike Pro Special Edition | Strike Pro Special Edition - Module User Gui - Page 15
Voices Voice Mode shows the kit's voice settings, which determine how each instrument sounds when you strike each trigger. (When creating user kits, this is where you'll spend most of your time.) To edit voice settings: 1. After selecting a kit, press Edit > Voice to enter Voice Mode. 2. Select - Alesis Strike Pro Special Edition | Strike Pro Special Edition - Module User Gui - Page 16
Layer B Loop This determines whether or not the sample on that layer will loop. When set to Loop, the sample will play repeatedly when you strike the trigger and stop playing when you strike it again (or set its Decay to 99 if you want it to play indefinitely). Off (---), Loop Vel Limit These - Alesis Strike Pro Special Edition | Strike Pro Special Edition - Module User Gui - Page 17
Voice Mode (they affect both layers): Parameter Description Values/Settings FX EQ/Comp This determines if equalization and compression will messages. Other Priority This determines the voice's priority in the Strike module's overall polyphony. If the maximum number of polyphony voices are - Alesis Strike Pro Special Edition | Strike Pro Special Edition - Module User Gui - Page 18
SD card, while the original preset kit remains unchanged on the module's internal memory. You must have your SD card inserted into the SD card slot in order to save changes to preset kits. To save a user kit: 1. After editing the kit, press Kit to enter the Kit Menu. 2. Press Save. 3. In the page - Alesis Strike Pro Special Edition | Strike Pro Special Edition - Module User Gui - Page 19
tab of Voice Mode instead (see Kits > Editing Kits > Editing Voices); Trigger Mode settings are already optimized to work with your Strike Pro Special Edition, so they generally won't require adjustment. These settings are global and retained in the module's internal memory; they are not saved - Alesis Strike Pro Special Edition | Strike Pro Special Edition - Module User Gui - Page 20
using your Strike Pro Special Edition. However, like a real acoustic drum kit, your kit can be positioned and played in many different ways depending on your preferences, some of which may cause crosstalk. If that happens, follow these tips to troubleshoot crosstalk: • Make sure your drum and cymbal - Alesis Strike Pro Special Edition | Strike Pro Special Edition - Module User Gui - Page 21
Pedal Setup While the trigger settings for the drums and cymbals of your Strike Pro Special Edition have already been optimized, you may need to make a small adjustment to further customize your hi-hat pedal performance. Hi-hat pedal designs can vary and the Strike module has an easy adjustment to - Alesis Strike Pro Special Edition | Strike Pro Special Edition - Module User Gui - Page 22
3 times at the desired rate. • Press and hold Metro > Tempo, and then turn the data dial to select a new tempo. To change the metronome settings, see Utility Menu > Metronome (Metro). You can change the metronome sound, time signature, and volume levels. You can also enable or disable the Metro - Alesis Strike Pro Special Edition | Strike Pro Special Edition - Module User Gui - Page 23
Strike module to record, edit, and save samples from another audio source. You can then assign those samples as instruments in a kit in (on the rear panel). • Internal: the module's internal audio signal (i.e., you playing the Strike Pro Special Edition). • Aux+Internal: the signal sent into the aux - Alesis Strike Pro Special Edition | Strike Pro Special Edition - Module User Gui - Page 24
of the End marker to a musical grid, based off the Strike module's tempo. To adjust the tempo (which affects the Grid setting), do one of the following: • Press Metro > Tempo three Mode to set a sample on a layer of a pad to loop. See Kits > Editing Kits > Editing Voices to learn about this. 24 - Alesis Strike Pro Special Edition | Strike Pro Special Edition - Module User Gui - Page 25
you can assign to a voice in a kit. Important: When you save a loop or instrument, it will be saved to your SD card only. You cannot save or overwrite loops or instruments in your Strike module's internal memory. To save the sample: 1. While in Sample Edit mode, press the Save button, and a window - Alesis Strike Pro Special Edition | Strike Pro Special Edition - Module User Gui - Page 26
found in the User tab. Playing Loops You can play your edited sample as a loop (e.g., as a backing track) in Sample Edit Mode. Tip: You can also use Voice Mode to set a sample on a layer of a pad to loop. See Kits > Editing Kits > Editing Voices to learn about this. To play a loop: 1. Press Sample - Alesis Strike Pro Special Edition | Strike Pro Special Edition - Module User Gui - Page 27
in Trigger Mode and in the Utility menu, press and hold the Stop and Enter buttons while powering on the Strike Module. Metronome (Metro) Setting Description Values/Settings Beats Per Bar This is the number of beats in each bar (the top number of a time signature). 00-99 Note Per Beat This - Alesis Strike Pro Special Edition | Strike Pro Special Edition - Module User Gui - Page 28
MIDI Setting Description Values/Settings Drum Chan This is the MIDI channel over which the module will Strike module's MIDI input or USB port. The numbers of program change messages correspond to the kits listed in the current folder. Alternatively, send MIDI CC #118 to increment by one kit - Alesis Strike Pro Special Edition | Strike Pro Special Edition - Module User Gui - Page 29
module's trigger inputs. This determines whether the hi-hat MIDI note will be sent with or without a MIDI CC message (CC#4). Values/Settings firmware. This is the version of the module's firmware. Factory Reset / Restore Defaults To reset to the default settings in Trigger Mode and in the Utility - Alesis Strike Pro Special Edition | Strike Pro Special Edition - Module User Gui - Page 30
Appendix Effects Effect Name Off Mono Flanger Stereo Flanger Xover Flanger Mono Chorus 1 Mono Chorus 2 Stereo Chorus XOver Chorus Mono Vibrato Vibrato Mono Doubler Doubler Mono Slapback Slapback Mono Delay Delay XOver Delay Ping Pong Parameters Rate Rate Rate Rate Rate Rate Rate Rate Rate Delay - Alesis Strike Pro Special Edition | Strike Pro Special Edition - Module User Gui - Page 31
Technical Specifications Kits & Sounds 136 kits - 1,900 instruments Unlimited user kits, depending on SD card size (see requirements 1.56 kg Specifications are subject to change without notice. Trademarks & Licenses Alesis is a trademark of inMusic Brands, Inc., registered in the U.S. and other - Alesis Strike Pro Special Edition | Strike Pro Special Edition - Module User Gui - Page 32
alesis.com Manual Version 1.0
-
 1
1 -
 2
2 -
 3
3 -
 4
4 -
 5
5 -
 6
6 -
 7
7 -
8
-
9
-
10
-
11
-
12
-
13
-
14
-
15
-
16
-
17
-
18
-
19
-
20
-
21
-
22
-
23
-
24
-
25
-
26
-
27
-
28
-
29
-
30
-
31
-
32
 |
 |

User Guide
English ( 3 – 29 )
Appendix
English ( 30 – 31 )