Alesis Strike Pro Special Edition Strike Pro Special Edition - Module User Gui - Page 15
Editing Voices, Note Chase
 |
View all Alesis Strike Pro Special Edition manuals
Add to My Manuals
Save this manual to your list of manuals |
Page 15 highlights
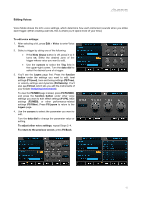
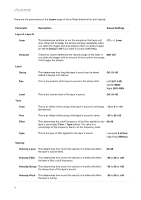
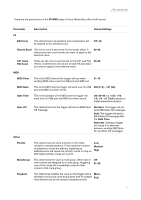
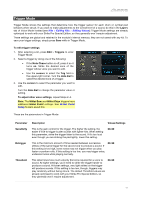
Editing Voices Voice Mode shows the kit's voice settings, which determine how each instrument sounds when you strike each trigger. (When creating user kits, this is where you'll spend most of your time.) To edit voice settings: 1. After selecting a kit, press Edit > Voice to enter Voice Mode. 2. Select a trigger by doing one of the following: • If the Note Chase button is off, press it so it turns on. Strike the desired zone of the trigger whose voice you want to edit. • Use the cursors to select the Trig field in the upper-right corner. Turn the data dial to select the desired zone of a trigger. 3. You'll see the Layers page first. Press the function button under the settings you want to edit: level settings (F1/Level), tone and tuning settings (F2/Tone), or velocity settings and dynamics (F3/Velocity). You'll also see F4/Inst, which lets you edit the instruments of your kit (see Assigning Instruments). To view the FX/MIDI page instead, press F5/FX/MIDI, and press the function button under other voice settings you want to edit: effect settings (F1/FX), MIDI settings (F2/MIDI), or other performance-related settings (F3/Other). Press F5/Layers to return to the Layers page. 4. Use the cursors to select the parameter you want to edit. Turn the data dial to change the parameter value or setting. To adjust other voice settings, repeat Steps 2-4. To return to the previous screen, press F6/Back. 15
-
 1
1 -
2
-
3
-
4
-
5
-
6
-
7
-
8
-
9
-
 10
10 -
 11
11 -
 12
12 -
 13
13 -
 14
14 -
 15
15 -
 16
16 -
 17
17 -
 18
18 -
 19
19 -
 20
20 -
21
-
22
-
23
-
24
-
25
-
26
-
27
-
28
-
29
-
30
-
31
-
32
 |
 |
