Alesis iO4 Quick Start Guide - Page 8
Windows Setup - driver
 |
View all Alesis iO4 manuals
Add to My Manuals
Save this manual to your list of manuals |
Page 8 highlights
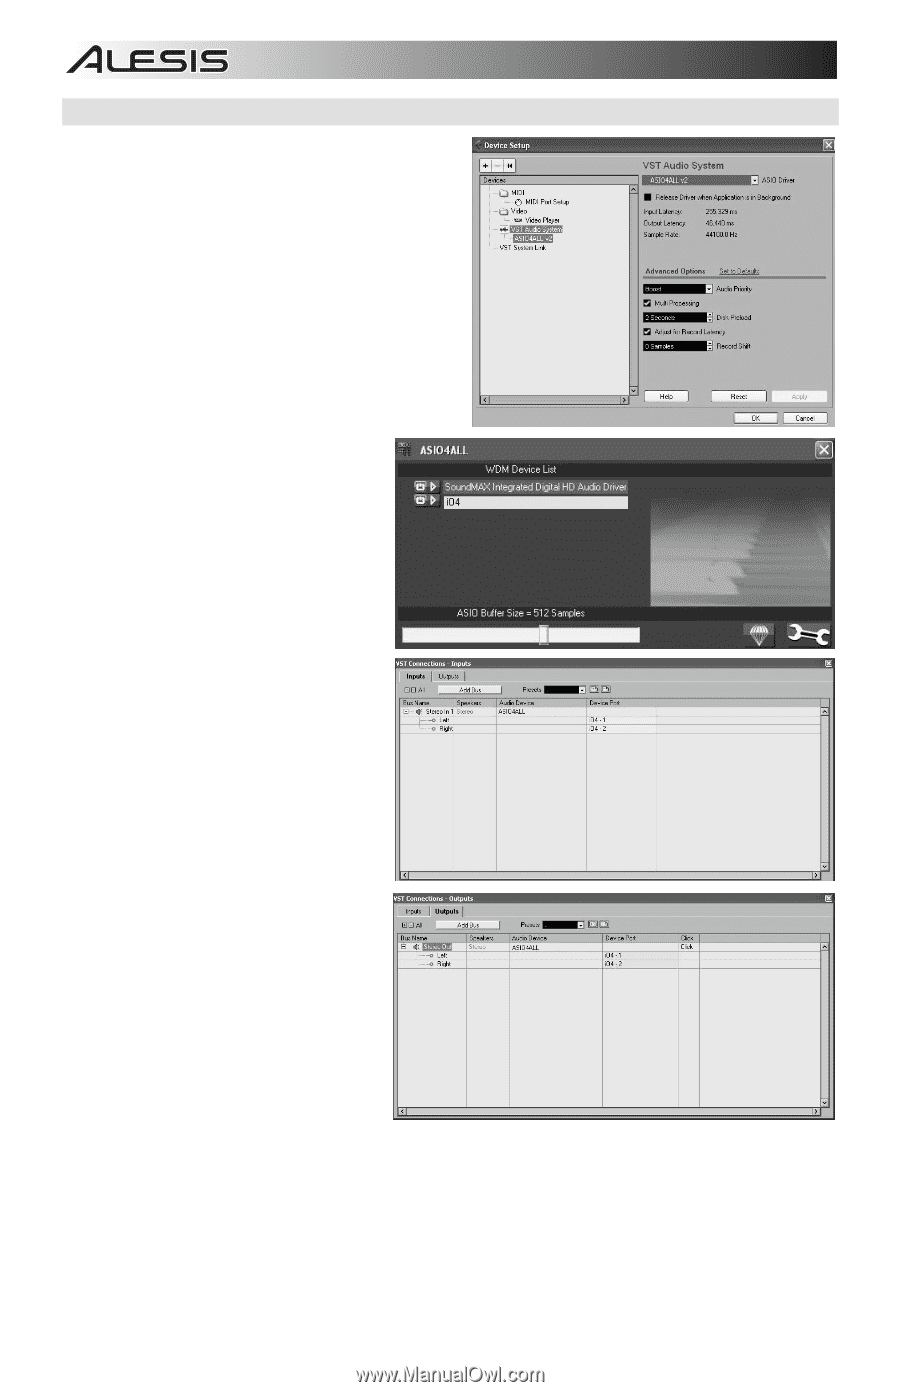
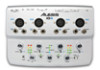
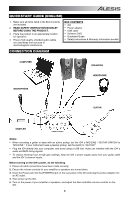
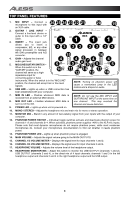
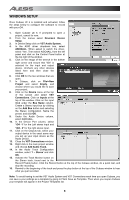
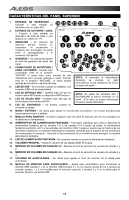
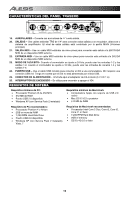
WINDOWS SETUP Once Cubase LE 5 is installed and activated, follow the steps below to configure the software to record with your iO4. 1. Open Cubase LE 5. If prompted to open a project, cancel for now. 2. From the menus select Devicesf Device Setup. 3. In Device Setup click on VST Audio System. 4. In the ASIO driver dropdown box, select ASIO4ALL. When asked to switch the driver, select 'Yes'. Then select ASIO4ALL from the left panel and click on the Control Panel button at the top right of the window. 5. Click on the image of the wrench in the bottom right corner and ensure that "iO4" is selected for the input and output device. Uncheck any other devices listed here and then close the window. 6. Click OK for the two windows that are open. 7. In Cubase, click on FilefNew Project and select Empty, and choose where you would like to save your project. 8. Click on the Device menu at the top of the screen and select VST Connections. Click on Inputs at the top of the window. Click on the input titled under the Bus Name column. Create a Stereo input bus by clicking on the Add Bus button and selecting the Stereo configuration. Name the preset, and click OK. 9. Under the Audio Device column, select ASIO4ALL. 10. In the Device Port column, select "iO4 -1" for the Left stereo input and "iO4 - 2" for the right stereo input. 11. Click on the Outputs tab, select your output device in the exact same way you set up your input device as the Audio Device. 12. Close the VST Connections window. 13. Right click in the main project window and choose Add Audio Track. 14. In the Audio Track Configuration window, select '1 - Stereo' and click OK. 15. Activate the Track Monitor button on the Stereo track, found next to the Record Enable button. Click the Record button at the top of the Cubase window, do a quick test, and stop the recording. 16. Rewind to the beginning of the track and press the play button at the top of the Cubase window to hear what you just recorded. Note: To avoid having to set the VST Audio System and VST Connections each time you open Cubase, you can save a your settings as a template by going to Filef Save as Template. Then when you reopen Cubase your template will appear in the Project Templates list. 8
-
 1
1 -
2
-
 3
3 -
 4
4 -
 5
5 -
 6
6 -
 7
7 -
 8
8 -
 9
9 -
 10
10 -
 11
11 -
 12
12 -
 13
13 -
14
-
15
-
16
-
17
-
18
-
19
-
20
-
21
-
22
-
23
-
24
-
25
-
26
-
27
-
28
-
29
-
30
-
31
-
32
-
33
-
34
-
35
-
36
-
37
-
38
-
39
-
40
 |
 |