Arlo Essential User Manual - Page 12
Check the LED, Find a good location for your camera, Wall mount your camera
 |
View all Arlo Essential manuals
Add to My Manuals
Save this manual to your list of manuals |
Page 12 highlights
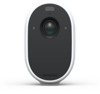
Arlo Essential Series Wire-Free Camera Check the LED The LED on the camera lights when the camera is powered on. The LED changes color and blinks depending on the camera's charge level and to indicate the status of activities such as pairing the camera and updating the camera firmware. • Slow blinking blue. The camera is in the process of pairing to a WiFi network. • Fast blinking blue. The camera paired with a WiFi network. • Blinking amber. The camera is out of range, a connection error occurred during pairing, or the camera battery charge is low (15% or less). • Alternating blue and amber. A firmware update is in process. Find a good location for your camera Select a location for your camera with a clear vantage point to fully optimize the wide field of view. For the best experience, choose a location with a strong WiFi signal. You can check the WiFi signal strength in the Arlo app. For information about WiFi connections, see WiFi connection options on page 16. Wall mount your camera Your camera comes with a mount and a screw kit. 1. Place the mount and secure it with screws. If you're mounting the camera on drywall, use the drywall anchors we provide. 2. Attach the camera to the mount. Note: The Essential XL Spotlight Camera has two mounting holes. One is located on the rear, and the other is on the bottom. You can use either for wall mounting. Get Started 12 User Manual
-
 1
1 -
2
-
3
-
4
-
5
-
6
-
 7
7 -
 8
8 -
 9
9 -
 10
10 -
 11
11 -
 12
12 -
 13
13 -
 14
14 -
 15
15 -
 16
16 -
 17
17 -
18
-
19
-
20
-
21
-
22
-
23
-
24
-
25
-
26
-
27
-
28
-
29
-
30
-
31
-
32
-
33
-
34
-
35
-
36
-
37
-
38
-
39
-
40
-
41
-
42
-
43
-
44
-
45
-
46
-
47
-
48
-
49
-
50
-
51
-
52
-
53
-
54
-
55
-
56
-
57
-
58
-
59
-
60
-
61
-
62
-
63
-
64
-
65
-
66
-
67
-
68
-
69
-
70
-
71
 |
 |
