Asko W600 Service Manual - Page 43
Heating Element And Thermistor, Changing The Hea, Changing The Heating Element, Ting Element
 |
View all Asko W600 manuals
Add to My Manuals
Save this manual to your list of manuals |
Page 43 highlights
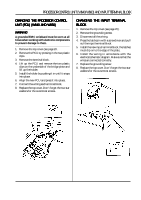
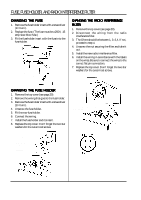
CHANGING THE HEATING ELEMENT 1. Remove the rear panel (see page 26). 2. Disconnect the wiring and unscrew the nut as far as possible. 3. Tap the screw so that the seal on the inside is separated from its flat washer. 4. Let the seal shrink and then pull out the element. 5. Install the element by pushing it in as far as possible. 6. Tighten the nut and connect the wiring. 7. Replace the rear panel. HEATING ELEMENT AND THERMISTOR CHANGING THE THERMISTOR 1. Remove the top cover (see page 20). 2. Remove the rear panel (see page 26). 3. Remove the thermistor by pulling it out to the left. 4. W600 and W620: Remove the thermistor header connector from the temperature selector. W640 and W660: Remove the thermistor header connector from the program control board. 5. Install the new thermistor by threading it through the hole between the cradle and holder. 6. W600 and W620: Connect the thermistor to the temperature selector. W640 and W660: Connect the thermistor to the program control board. 7. Replace the rear panel. 8. Replace the top cover. (Don't forget the two star washers for the outer screws.) Heating element P/N 8061706 Holder P/N 8061738 Thermistor P/N 8061663 43
-
 1
1 -
2
-
3
-
4
-
5
-
6
-
7
-
8
-
9
-
10
-
11
-
12
-
13
-
14
-
15
-
16
-
17
-
18
-
19
-
20
-
21
-
22
-
23
-
24
-
25
-
26
-
27
-
28
-
29
-
30
-
31
-
32
-
33
-
34
-
35
-
36
-
37
-
 38
38 -
 39
39 -
 40
40 -
 41
41 -
 42
42 -
 43
43 -
 44
44 -
 45
45 -
 46
46 -
 47
47 -
 48
48 -
49
-
50
-
51
-
52
-
53
-
54
-
55
-
56
-
57
-
58
-
59
-
60
-
61
-
62
-
63
-
64
-
65
-
66
-
67
 |
 |
