Asko W600 Service Manual - Page 44
Balancing Spring, Changing The Balancing Spring, Changing The Tension Ring
 |
View all Asko W600 manuals
Add to My Manuals
Save this manual to your list of manuals |
Page 44 highlights
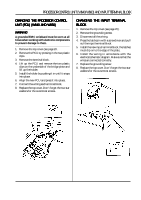
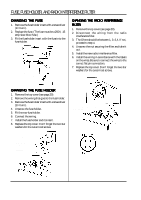
TENSION RING AND BALANCING SPRING CHANGING THE TENSION RING 1. Remove the front panel (see page 32.) 2. Remove the front cover plate (see page 36). 3. Install the special tool (part no. 8801152). Fasten the special tool's three stays in the drum end. 4. Slacken the tension ring and remove it. Do not pry the tension ring off. Undo one end and turn it round the holder to remove it. 5. Install the new tension ring by turning it to the right place and then securing the screw. 6. Tighten the screw fully. Use a rubber mallet to knock the tension ring into place on the upper edge. Also move it to the edge of the end plate with pliers. 7. Tighten the tension ring more. 8. Remove the special tool. 9. Replace the cover plate. CHANGING THE BALANCING SPRING 1. Remove the top cover (see page 20). 2. Use pliers to unhook the balancing spring from the holder. 3. Front spring: Unhook the spring from the front rail. Rear spring: Unhook the spring from the cross member. 4. Install a new spring by first hooking it to the member and then to the holder. 5. Replace the top cover. (Don't forget the two star washers for the outermost screws.) Balancing spring P/N 8061923 Special tool P/N 8801152 Tension ring P/N 8061699 Bolt P/N 8061116 Washer P/N 8901335 Nut 8901154 44
-
 1
1 -
2
-
3
-
4
-
5
-
6
-
7
-
8
-
9
-
10
-
11
-
12
-
13
-
14
-
15
-
16
-
17
-
18
-
19
-
20
-
21
-
22
-
23
-
24
-
25
-
26
-
27
-
28
-
29
-
30
-
31
-
32
-
33
-
34
-
35
-
36
-
37
-
38
-
 39
39 -
 40
40 -
 41
41 -
 42
42 -
 43
43 -
 44
44 -
 45
45 -
 46
46 -
 47
47 -
 48
48 -
 49
49 -
50
-
51
-
52
-
53
-
54
-
55
-
56
-
57
-
58
-
59
-
60
-
61
-
62
-
63
-
64
-
65
-
66
-
67
 |
 |
