Asus AP110 AP110 User Manual - Page 38
Install an IDE Drive
 |
View all Asus AP110 manuals
Add to My Manuals
Save this manual to your list of manuals |
Page 38 highlights
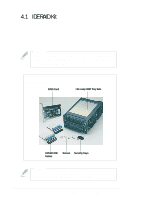
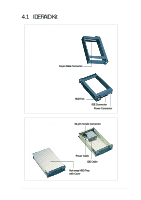
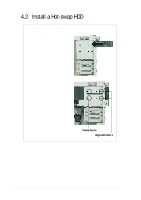
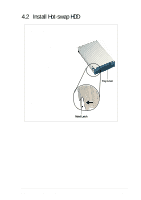
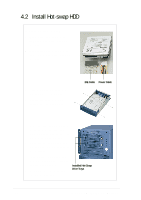
4.2 Install Hot-swap HDD Install an IDE Drive 1. Connect the IDE cable to the IDE connector at the back of the drive. 2. Connect the power cable to the power connector at the back of the drive. 3. Carefully place the drive into the tray until it fits in place. 4. Secure the drive with four screws (two on each side). IDE Cable Power Cable 5. Align the tray cover to the rails at the back of the tray, then slide the cover forward until the metal latch clicks in place. 6. Insert the hot-swap drive tray into the bay until it is flushed to the front panel. 7. Lock the hot-swap drive tray with the security key to prevent unauthorized access. Installed Hot-Swap 8. Do steps 1 to 7 to install the Drive Trays other hot-swap drive. 38 Chapter 4: Hardware Options
-
 1
1 -
2
-
3
-
4
-
5
-
6
-
7
-
8
-
9
-
10
-
11
-
12
-
13
-
14
-
15
-
16
-
17
-
18
-
19
-
20
-
21
-
22
-
23
-
24
-
25
-
26
-
27
-
28
-
29
-
30
-
31
-
32
-
 33
33 -
 34
34 -
 35
35 -
 36
36 -
 37
37 -
 38
38 -
 39
39 -
 40
40 -
 41
41 -
 42
42 -
 43
43 -
44
-
45
-
46
-
47
-
48
-
49
-
50
 |
 |
