Asus AP110 AP110 User Manual - Page 40
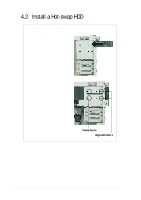
RAID Configuration, Removing a Hot-swap HDD Tray
 |
View all Asus AP110 manuals
Add to My Manuals
Save this manual to your list of manuals |
Page 40 highlights
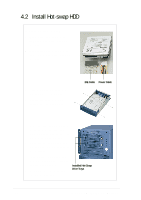
4.3 RAID Configuration Connect Power Cables Connect the power cables, with plugs labeled P5 and P6, to the power connectors at the back of the hot-swap drive frames. Power Cables 4.4 Removing a Hot-swap HDD Tray In the future, you might need to remove the drive tray and replace a hot-swap HDD. To remove a hot-swap drive tray: 1. Unlock the drive tray you desire to remove. 2. Lift up the tray handle. 3. Pull the tray out of the bay. 4. Refer to section 4.2 for instructions on installing a hotswap HDD. 40 Chapter 4: Hardware Options
-
 1
1 -
2
-
3
-
4
-
5
-
6
-
7
-
8
-
9
-
10
-
11
-
12
-
13
-
14
-
15
-
16
-
17
-
18
-
19
-
20
-
21
-
22
-
23
-
24
-
25
-
26
-
27
-
28
-
29
-
30
-
31
-
32
-
33
-
34
-
 35
35 -
 36
36 -
 37
37 -
 38
38 -
 39
39 -
 40
40 -
 41
41 -
 42
42 -
 43
43 -
 44
44 -
 45
45 -
46
-
47
-
48
-
49
-
50
 |
 |

40
Chapter 4:
Hardware Options
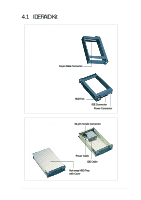
4.3
RAID Configuration
Connect Power Cables
Connect the power cables, with
plugs labeled P5 and P6, to the
power connectors at the back of the
hot-swap drive frames.
4.4
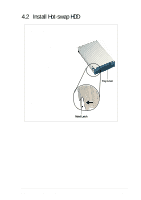
Removing a Hot-swap HDD Tray
In the future, you might need to
remove the drive tray and
replace a hot-swap HDD.
To remove a hot-swap drive
tray:
1.
Unlock the drive tray you
desire to remove.
2.
Lift up the tray handle.
3.
Pull the tray out of the bay.
4.
Refer to section 4.2 for
instructions on installing a hot-
swap HDD.
Power Cables