Asus AP110 AP110 User Manual - Page 39
RAID Configuration
 |
View all Asus AP110 manuals
Add to My Manuals
Save this manual to your list of manuals |
Page 39 highlights
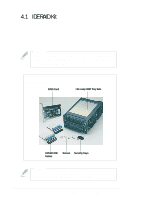
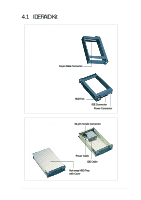
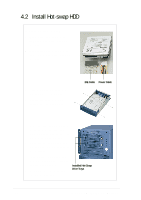
4.3 RAID Configuration This section presents only the physical hardware connections of the RAID card, hot-swap HDDs, and IDE and power cables. For detailed instructions on RAID configuration, refer to the user's manual that came with the IDE RAID kit. Install a RAID Card 1. Remove the cover opposite the PCI1 expansion slot. 2. Carefully insert the golden fingers of the RAID card into the slot until the card is properly seated. RAID Card Connect IDE Cables 1. Connect one end of an IDE cable to the IDE1 connector on the RAID card, and the other end to the back of a hot-swap drive frame. 2. Connect one end of the second IDE cable to the IDE2 connector on the RAID card, and the other end to the second hot-swap drive frame. IDE2 Connector IDE1 Connector IMPORTANT Use two separate IDE cables for IDE1 and IDE2 connections. AP110 Server User's Manual 39
-
 1
1 -
2
-
3
-
4
-
5
-
6
-
7
-
8
-
9
-
10
-
11
-
12
-
13
-
14
-
15
-
16
-
17
-
18
-
19
-
20
-
21
-
22
-
23
-
24
-
25
-
26
-
27
-
28
-
29
-
30
-
31
-
32
-
33
-
 34
34 -
 35
35 -
 36
36 -
 37
37 -
 38
38 -
 39
39 -
 40
40 -
 41
41 -
 42
42 -
 43
43 -
 44
44 -
45
-
46
-
47
-
48
-
49
-
50
 |
 |
