Asus P I-XP6NP5 User Manual - Page 17
ASUS P/I-XP6NP5 User's Manual, Voltage Regulator Output Selection, JP1, 2, 3, 4, 3Volt Power Source
 |
View all Asus P I-XP6NP5 manuals
Add to My Manuals
Save this manual to your list of manuals |
Page 17 highlights
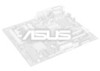
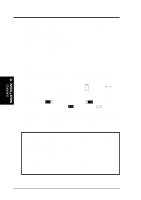
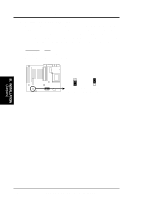
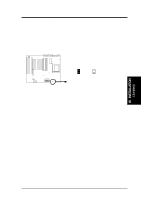
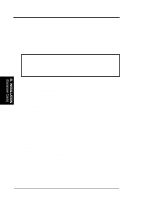
III. INSTALLATION (Jumpers) III. INSTALLATION 7. Voltage Regulator Output Selection (JP1, 2, 3, 4) Pentium Pro Processors may require different voltages. Current processors (marked "Pentium Pro") support VID and will automatically adjust the voltage regulator so that no jumper settings are needed (leave these jumpers open in this case). Older processors without VID support require manual voltage ID setting. Use [S] for Short and [O] or Open. Voltage JP1 (VID 3) JP2 (VID 2) JP3 (VID 1) JP4 (VID 0) 3.5 3.4 3.3 3.2 3.1 3.0 2.9 2.8 2.7 2.6 2.5 2.4 2.3 2.2 2.1 [S] [S] [S] [S] [S] [S] [S] [S] [O] [O] [O] [O] [O] [O] [O] [S] [S] [S] [S] [O] [O] [O] [O] [S] [S] [S] [S] [O] [O] [O] [S] [S] [O] [O] [S] [S] [O] [O] [S] [S] [O] [O] [S] [S] [O] [S] [O] [S] [O] [S] [O] [S] [O] [S] [O] [S] [O] [S] [O] [S] JP1 (VID 3) JP2 (VID 2) JP3 (VID 1) JP4 (VID 0) VID Support (Default) Voltage ID 3, 2, 1, 0 (VID Support or Manual) 8. 3.3Volt Power Source (JP6) If the ATX power supply is equipped with +3.3V, then choose ATX, some supply. If the ATX power supply is not equipped with +3.3V, then choose Onboard Regulator. Move all three jumpers together as illustrated. 3.3V Power Source JP6 JP6 JP6 Onboard Regulator [1-2] [1-2] [1-2] ATX Power Supply [2-3] [2-3] [2-3] (Default) JP6 1 2 3 Regulator +3.3V JP6 1 2 3 ATX +3.3V +3.3V Power Source (Regulator or ATX Supplied) ASUS P/I-XP6NP5 User's Manual 11
-
 1
1 -
2
-
3
-
4
-
5
-
6
-
7
-
8
-
9
-
10
-
11
-
 12
12 -
 13
13 -
 14
14 -
 15
15 -
 16
16 -
 17
17 -
 18
18 -
 19
19 -
 20
20 -
 21
21 -
 22
22 -
23
-
24
-
25
-
26
-
27
-
28
-
29
-
30
-
31
-
32
-
33
-
34
-
35
-
36
-
37
-
38
-
39
-
40
-
41
-
42
-
43
-
44
-
45
-
46
-
47
-
48
-
49
-
50
-
51
-
52
-
53
-
54
-
55
-
56
-
57
-
58
-
59
-
60
-
61
-
62
-
63
-
64
 |
 |