Asus P5GD2 Deluxe P5GD2 Premium user''s manual - Page 146
Auto-configuring a RAID array
 |
View all Asus P5GD2 Deluxe manuals
Add to My Manuals
Save this manual to your list of manuals |
Page 146 highlights
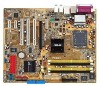
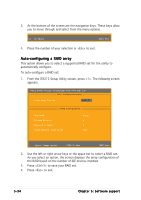
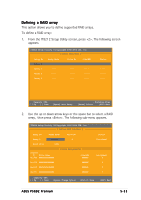
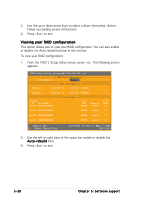
3. At the bottom of the screen are the navigation keys. These keys allow you to move through and select from the menu options. [1]..[5] Select [ESC] Exit 4. Press the number of your selection or to exit. Auto-configuring a RAID array This option allows you to select a supported RAID set for the utility to automatically configure. To auto-configure a RAID set: 1. From the IT8212 Setup Utility screen, press . The following screen appears. IT8212 Setup Utility (C)Copyright 2002-2004 ITE, Inc. [ Auto Configuration Menu ] Setup Array Type as: RAID 0 [ Array Configuration ] RAID Mode Un-used Drive(s Drive(s) in Array Array Capacity (size in MB Stripe 4 0 8056 [→,←,Space] Change Option [CTRL-Y] Save [ESC] Exit 2. Use the left or right arrow keys or the space bar to select a RAID set. As you select an option, the screen displays the array configuration of the RAID based on the number of IDE devices installed. 3. Press to save your RAID set. 4. Press to exit. 5-34 Chapter 5: Software support
-
 1
1 -
2
-
3
-
4
-
5
-
6
-
7
-
8
-
9
-
10
-
11
-
12
-
13
-
14
-
15
-
16
-
17
-
18
-
19
-
20
-
21
-
22
-
23
-
24
-
25
-
26
-
27
-
28
-
29
-
30
-
31
-
32
-
33
-
34
-
35
-
36
-
37
-
38
-
39
-
40
-
41
-
42
-
43
-
44
-
45
-
46
-
47
-
48
-
49
-
50
-
51
-
52
-
53
-
54
-
55
-
56
-
57
-
58
-
59
-
60
-
61
-
62
-
63
-
64
-
65
-
66
-
67
-
68
-
69
-
70
-
71
-
72
-
73
-
74
-
75
-
76
-
77
-
78
-
79
-
80
-
81
-
82
-
83
-
84
-
85
-
86
-
87
-
88
-
89
-
90
-
91
-
92
-
93
-
94
-
95
-
96
-
97
-
98
-
99
-
100
-
101
-
102
-
103
-
104
-
105
-
106
-
107
-
108
-
109
-
110
-
111
-
112
-
113
-
114
-
115
-
116
-
117
-
118
-
119
-
120
-
121
-
122
-
123
-
124
-
125
-
126
-
127
-
128
-
129
-
130
-
131
-
132
-
133
-
134
-
135
-
136
-
137
-
138
-
139
-
140
-
 141
141 -
 142
142 -
 143
143 -
 144
144 -
 145
145 -
 146
146 -
 147
147 -
 148
148 -
 149
149 -
 150
150 -
 151
151 -
152
 |
 |