Asus P5GDC Pro User Manual - Page 127
Creating a RAID Volume
 |
View all Asus P5GDC Pro manuals
Add to My Manuals
Save this manual to your list of manuals |
Page 127 highlights
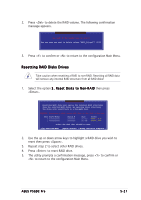
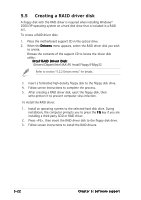
At the bottom of the screen are the navigation keys. These keys allow you to move through and select menu options. [ ]-Change [TAB]-Next [ESC] Previous Menu [Enter]-Select Creating a RAID Volume To create a RAID volume: 1. From the Intel Application Accelerator RAID Option ROM utility main menu, select 1 . C r e a t e R A I D V o l u m e then press . The following screen appears. Intel(R) Application Accelerator RAID Option ROM v4.0.0.6211 Copyright(C) 2003-04 Intel Corporation. All Rights Reserved. [ CREATE ARRAY MENU ] Name: RAID Level: Disks: Strip Size: Capacity: RAID_Volume1 RAID0(Stripe) Select Disk 128KB 149.0GB [ HELP ] Enter a string between 1 and 16 characters in length taht can be used to uniquely identify the RAID volume. This name is case sensitive and can not contain special characters. [ ]-Change [TAB]-Next [ESC] Previous Menu [Enter]-Select 2. Key-in a unique name for your RAID volume then press . 3. Use the up or down arrow keys to select your desired RAID Level then press . a. If you selected RAID 0 (Stripe), use the up or down arrow keys to select the stripe size for your RAID 0 array then press .The available values range from 8 KB to 128 KB. The default selection is 128 KB. The strip value should be chosen based on the planned drive usage. • 8 /16 KB - low disk usage • 64 KB - typical disk usage • 128 KB - performance disk usage ASUS P5GDC Pro 5-19
-
 1
1 -
2
-
3
-
4
-
5
-
6
-
7
-
8
-
9
-
10
-
11
-
12
-
13
-
14
-
15
-
16
-
17
-
18
-
19
-
20
-
21
-
22
-
23
-
24
-
25
-
26
-
27
-
28
-
29
-
30
-
31
-
32
-
33
-
34
-
35
-
36
-
37
-
38
-
39
-
40
-
41
-
42
-
43
-
44
-
45
-
46
-
47
-
48
-
49
-
50
-
51
-
52
-
53
-
54
-
55
-
56
-
57
-
58
-
59
-
60
-
61
-
62
-
63
-
64
-
65
-
66
-
67
-
68
-
69
-
70
-
71
-
72
-
73
-
74
-
75
-
76
-
77
-
78
-
79
-
80
-
81
-
82
-
83
-
84
-
85
-
86
-
87
-
88
-
89
-
90
-
91
-
92
-
93
-
94
-
95
-
96
-
97
-
98
-
99
-
100
-
101
-
102
-
103
-
104
-
105
-
106
-
107
-
108
-
109
-
110
-
111
-
112
-
113
-
114
-
115
-
116
-
117
-
118
-
119
-
120
-
121
-
 122
122 -
 123
123 -
 124
124 -
 125
125 -
 126
126 -
 127
127 -
 128
128 -
 129
129 -
 130
130
 |
 |