Asus P5GDC Pro User Manual - Page 128
Deleting a RAID Volume
 |
View all Asus P5GDC Pro manuals
Add to My Manuals
Save this manual to your list of manuals |
Page 128 highlights
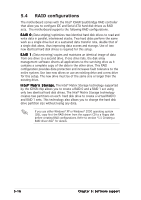
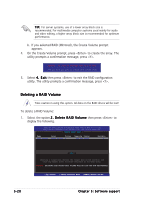
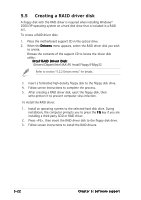
T I P : For server systems, use of a lower array block size is recommended. For multimedia computer systems used mainly for audio and video editing, a higher array block size is recommended for optimum performance. b. If you selected RAID (MIrrored), the Create Volume prompt appears. 4. On the Create Volume prompt, press to create the array. The utility prompts a confirmation message, press . WARNING: ALL DATA ON SELECTED DISK WILL BE LOST. Are you sure you want to create this volume (Y/N) 5. Select 4 . E x i t then press to exit the RAID configuration utility. The utility prompts a confirmation message, press . Deleting a RAID Volume Take caution in using this option. All data on the RAID drives will be lost! To delete a RAID Volume: 1. Select the option 2 . D e l e t e R A I D V o l u m e then press to display the following. Intel(R) Application Accelerator RAID Option ROM v4.0.0.6211 Copyright(C) 2003-04 Intel Corporation. All Rights Reserved. [ DELETE ARRAY MENU ] Name Level Drives RAID_Volume1 RAID0(Stripe) 2 Capacity Status 149.0GB Normal Bootable Yes [ HELP ] Deleting a volume will destroy the volume data on the drive(s) and cause any member disks to become available as non-RAID disks. WARNING: EXISTING DATA WITHIN THIS VOLUME WILL BE LOST AND NON-RECOVERABLE [ ]-Select []-Previous Menu []-Delete Volume 5-20 Chapter 5: Software support
-
 1
1 -
2
-
3
-
4
-
5
-
6
-
7
-
8
-
9
-
10
-
11
-
12
-
13
-
14
-
15
-
16
-
17
-
18
-
19
-
20
-
21
-
22
-
23
-
24
-
25
-
26
-
27
-
28
-
29
-
30
-
31
-
32
-
33
-
34
-
35
-
36
-
37
-
38
-
39
-
40
-
41
-
42
-
43
-
44
-
45
-
46
-
47
-
48
-
49
-
50
-
51
-
52
-
53
-
54
-
55
-
56
-
57
-
58
-
59
-
60
-
61
-
62
-
63
-
64
-
65
-
66
-
67
-
68
-
69
-
70
-
71
-
72
-
73
-
74
-
75
-
76
-
77
-
78
-
79
-
80
-
81
-
82
-
83
-
84
-
85
-
86
-
87
-
88
-
89
-
90
-
91
-
92
-
93
-
94
-
95
-
96
-
97
-
98
-
99
-
100
-
101
-
102
-
103
-
104
-
105
-
106
-
107
-
108
-
109
-
110
-
111
-
112
-
113
-
114
-
115
-
116
-
117
-
118
-
119
-
120
-
121
-
122
-
 123
123 -
 124
124 -
 125
125 -
 126
126 -
 127
127 -
 128
128 -
 129
129 -
 130
130
 |
 |