Asus ROG STRIX X399-E GAMING User Guide - Page 91
Creating a RAID driver disk, 4.2.1 Creating a RAID driver disk in Windows®
 |
View all Asus ROG STRIX X399-E GAMING manuals
Add to My Manuals
Save this manual to your list of manuals |
Page 91 highlights
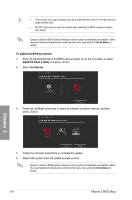
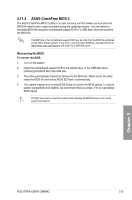
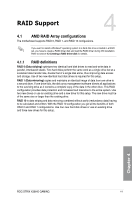
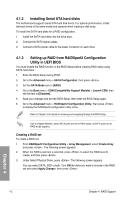
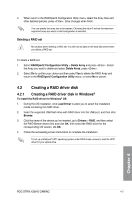
4. When return to the RAIDXpert2 Configuration Utility menu, select the Array Size and other detailed policies, press . Save changes when finish. You can specify the array size to be created. Choosing the value 0 will set the maximum supported array size when a valid configuration is selected. Deleting a RAID set Be cautious when deleting a RAID set. You will lose all data on the hard disk drives when you delete a RAID set. To delete a RAID set: 1. Select RAIDXpert2 Configuration Utility > Delete Array and press . Select the Array you want to delete and select Delete Array, press . 2. Select On to confirm your choice and then select Yes to delete the RAID Array and return to the RAIDXpert2 Configuration Utility menu, or select No to cancel. 4.2 Creating a RAID driver disk 4.2.1 Creating a RAID driver disk in Windows® To install the RAID driver for Windows® OS: 1. During the OS installation, click Load Driver to allow you to select the installation media containing the RAID driver. 2. Insert the supported USB flash drive with RAID driver into the USB port, and then click Browse. 3. Click the name of the device you've inserted, go to Drivers > RAID, and then select the RAID Bottom drivers first and click OK, then select the RAID driver for the corresponding OS version, clik OK. 4. Follow the succeeding screen instructions to complete the installation. To set up a Windows® UEFI operating system under RAID mode, ensure to load the UEFI driver for your optical drive. Chapter 4 ROG STRIX X399-E GAMING 4-3
-
 1
1 -
2
-
3
-
4
-
5
-
6
-
7
-
8
-
9
-
10
-
11
-
12
-
13
-
14
-
15
-
16
-
17
-
18
-
19
-
20
-
21
-
22
-
23
-
24
-
25
-
26
-
27
-
28
-
29
-
30
-
31
-
32
-
33
-
34
-
35
-
36
-
37
-
38
-
39
-
40
-
41
-
42
-
43
-
44
-
45
-
46
-
47
-
48
-
49
-
50
-
51
-
52
-
53
-
54
-
55
-
56
-
57
-
58
-
59
-
60
-
61
-
62
-
63
-
64
-
65
-
66
-
67
-
68
-
69
-
70
-
71
-
72
-
73
-
74
-
75
-
76
-
77
-
78
-
79
-
80
-
81
-
82
-
83
-
84
-
85
-
 86
86 -
 87
87 -
 88
88 -
 89
89 -
 90
90 -
 91
91 -
 92
92 -
 93
93 -
 94
94 -
 95
95 -
 96
96 -
97
-
98
-
99
-
100
 |
 |
