Asus RS740-E7-RS24-EG User Guide - Page 40
Hard disk drives HDDs, Installing 3.5-inch HDDs
 |
View all Asus RS740-E7-RS24-EG manuals
Add to My Manuals
Save this manual to your list of manuals |
Page 40 highlights
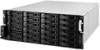
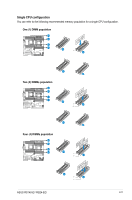
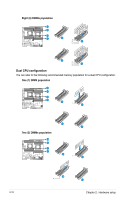
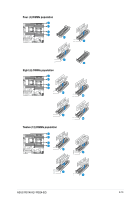
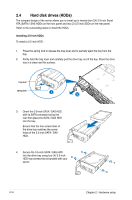
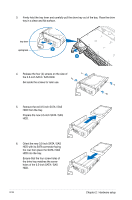
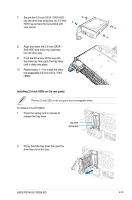
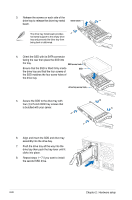
2.4 Hard disk drives (HDDs) The compact design of the server allows you to install up to twenty-four (24) 3.5-inch Serial ATA (SATA) / SAS HDDs on the front panel and two (2) 2.5-inch SSDs on the rear panel. Refer to the succeeding steps to install the HDDs. Installing 3.5-inch HDDs To install a 3.5-inch HDD: 1. Press the spring lock to release the tray lever and to partially eject the tray from the bay. 2. Firmly hold the tray lever and carefully pull the drive tray out of the bay. Place the drive tray in a clean and flat surface. tray lever spring lock 1 2 3. Orient the 3.5-inch SATA / SAS HDD with its SATA connector facing the rear then place the SATA / SAS HDD into the tray. Ensure that the four screw holes of the drive tray matches the screw holes of the 3.5-inch SATA / SAS HDD. 4. Secure the 3.5-inch SATA / SAS HDD into the drive tray using four (4) 3.5-inch HDD tray screws that is bundled with your server. 2-16 Chapter 2: Hardware setup
-
 1
1 -
2
-
3
-
4
-
5
-
6
-
7
-
8
-
9
-
10
-
11
-
12
-
13
-
14
-
15
-
16
-
17
-
18
-
19
-
20
-
21
-
22
-
23
-
24
-
25
-
26
-
27
-
28
-
29
-
30
-
31
-
32
-
33
-
34
-
 35
35 -
 36
36 -
 37
37 -
 38
38 -
 39
39 -
 40
40 -
 41
41 -
 42
42 -
 43
43 -
 44
44 -
 45
45 -
46
-
47
-
48
-
49
-
50
-
51
-
52
-
53
-
54
-
55
-
56
-
57
-
58
-
59
-
60
-
61
-
62
-
63
-
64
-
65
-
66
-
67
-
68
-
69
-
70
-
71
-
72
-
73
-
74
-
75
-
76
-
77
-
78
-
79
-
80
-
81
-
82
-
83
-
84
-
85
-
86
-
87
-
88
-
89
-
90
-
91
-
92
-
93
-
94
-
95
-
96
-
97
-
98
-
99
-
100
-
101
-
102
-
103
-
104
-
105
-
106
-
107
-
108
-
109
-
110
-
111
-
112
-
113
-
114
-
115
-
116
-
117
-
118
-
119
-
120
-
121
-
122
-
123
-
124
-
125
-
126
-
127
-
128
-
129
-
130
-
131
-
132
-
133
-
134
-
135
-
136
-
137
-
138
-
139
-
140
-
141
-
142
-
143
-
144
-
145
-
146
-
147
-
148
-
149
-
150
-
151
-
152
-
153
-
154
-
155
-
156
-
157
-
158
-
159
-
160
-
161
-
162
-
163
-
164
-
165
-
166
-
167
-
168
-
169
-
170
-
171
-
172
-
173
-
174
-
175
-
176
-
177
-
178
-
179
-
180
-
181
-
182
-
183
-
184
-
185
-
186
-
187
-
188
-
189
-
190
-
191
-
192
-
193
-
194
-
195
-
196
-
197
-
198
-
199
-
200
-
201
-
202
-
203
-
204
-
205
-
206
-
207
-
208
-
209
-
210
-
211
-
212
 |
 |
