Asus RS740-E7-RS24-EG User Guide - Page 53
Replacing the rear system fans, Disconnect the system fan cables
 |
View all Asus RS740-E7-RS24-EG manuals
Add to My Manuals
Save this manual to your list of manuals |
Page 53 highlights
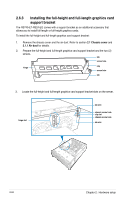
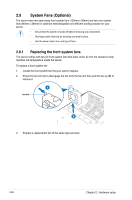
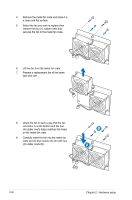
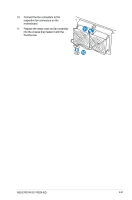
4. Orient the fan in such a way that the arrow indicator is pointing towards the rear of chassis (C) then insert the fan into the slot (D) ensuring that the fan connector is connected securely into the slot. The front system fan fits into the fan slot in one orientation only. If it does not fit, try reversing it. fan connector D fan slot C 2.9.2 Replacing the rear system fans The server also comes with two (2) easy-swap rear fans (80mm x 38mm) that expels out warm air from inside the chassis. Replacing the rear system fans To replace the rear system fans: 1. Release the thumbscrew to disengage the fan crate from the chassis. 2. Lift the metal fan crate just enough to detach it from the chassis. Ensure that you have enough space to hold and pull the fan cables. 3. Disconnect the system fan cables from the fan connectors. 2 1 3 ASUS RS740-E7-RS24-EG 2-29
-
 1
1 -
2
-
3
-
4
-
5
-
6
-
7
-
8
-
9
-
10
-
11
-
12
-
13
-
14
-
15
-
16
-
17
-
18
-
19
-
20
-
21
-
22
-
23
-
24
-
25
-
26
-
27
-
28
-
29
-
30
-
31
-
32
-
33
-
34
-
35
-
36
-
37
-
38
-
39
-
40
-
41
-
42
-
43
-
44
-
45
-
46
-
47
-
 48
48 -
 49
49 -
 50
50 -
 51
51 -
 52
52 -
 53
53 -
 54
54 -
 55
55 -
 56
56 -
 57
57 -
 58
58 -
59
-
60
-
61
-
62
-
63
-
64
-
65
-
66
-
67
-
68
-
69
-
70
-
71
-
72
-
73
-
74
-
75
-
76
-
77
-
78
-
79
-
80
-
81
-
82
-
83
-
84
-
85
-
86
-
87
-
88
-
89
-
90
-
91
-
92
-
93
-
94
-
95
-
96
-
97
-
98
-
99
-
100
-
101
-
102
-
103
-
104
-
105
-
106
-
107
-
108
-
109
-
110
-
111
-
112
-
113
-
114
-
115
-
116
-
117
-
118
-
119
-
120
-
121
-
122
-
123
-
124
-
125
-
126
-
127
-
128
-
129
-
130
-
131
-
132
-
133
-
134
-
135
-
136
-
137
-
138
-
139
-
140
-
141
-
142
-
143
-
144
-
145
-
146
-
147
-
148
-
149
-
150
-
151
-
152
-
153
-
154
-
155
-
156
-
157
-
158
-
159
-
160
-
161
-
162
-
163
-
164
-
165
-
166
-
167
-
168
-
169
-
170
-
171
-
172
-
173
-
174
-
175
-
176
-
177
-
178
-
179
-
180
-
181
-
182
-
183
-
184
-
185
-
186
-
187
-
188
-
189
-
190
-
191
-
192
-
193
-
194
-
195
-
196
-
197
-
198
-
199
-
200
-
201
-
202
-
203
-
204
-
205
-
206
-
207
-
208
-
209
-
210
-
211
-
212
 |
 |
