Asus RS740-E7-RS24-EG User Guide - Page 41
-inch SATA / SAS HDDs., Changing hot-swappable hard disk drives HDDs
 |
View all Asus RS740-E7-RS24-EG manuals
Add to My Manuals
Save this manual to your list of manuals |
Page 41 highlights
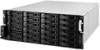
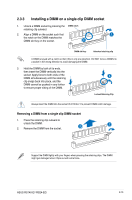
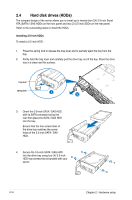
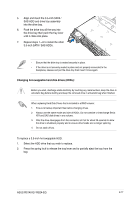
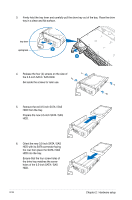
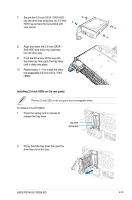
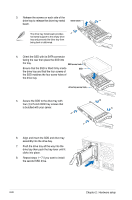
5. Align and insert the 3.5-inch SATA / SAS HDD and drive tray assembly into the drive bay. 6. Push the drive tray all the way into the drive bay then push the tray lever until it clicks into place. 7. Repeat steps 1-6 to install the other 3.5-inch SATA / SAS HDDs. • Ensure that the drive tray is seated securely in place. • If the drive is not securely seated in place and not properly connected to the backplane, release and pull the drive tray then insert it once again. Changing hot-swappable hard disk drives (HDDs): Before you start, discharge static electricity by touching any metal surface, keep the drive in anti-static bag before starting and keep the removed drive in anti-static bag when finished. When replacing Hard Disk Drives that is included in a RAID volume: 1. Ensure to backup important files before changing drives. 2 Always use the same model and size of HDDs. Do not combine or interchange Serial ATA and SAS disk drives in one volume . 3. After the drive disengages from the connector, let it sit for about 30 seconds to allow the drive to shutdown properly and to ensure drive heads are no longer spinning. 4. Do not stack drives. To replace a 3.5-inch hot-swappable HDD: 1. Select the HDD drive that you wish to replace. 2. Press the spring lock to release the tray lever and to partially eject the tray from the bay. ASUS RS740-E7-RS24-EG 2-17
-
 1
1 -
2
-
3
-
4
-
5
-
6
-
7
-
8
-
9
-
10
-
11
-
12
-
13
-
14
-
15
-
16
-
17
-
18
-
19
-
20
-
21
-
22
-
23
-
24
-
25
-
26
-
27
-
28
-
29
-
30
-
31
-
32
-
33
-
34
-
35
-
 36
36 -
 37
37 -
 38
38 -
 39
39 -
 40
40 -
 41
41 -
 42
42 -
 43
43 -
 44
44 -
 45
45 -
 46
46 -
47
-
48
-
49
-
50
-
51
-
52
-
53
-
54
-
55
-
56
-
57
-
58
-
59
-
60
-
61
-
62
-
63
-
64
-
65
-
66
-
67
-
68
-
69
-
70
-
71
-
72
-
73
-
74
-
75
-
76
-
77
-
78
-
79
-
80
-
81
-
82
-
83
-
84
-
85
-
86
-
87
-
88
-
89
-
90
-
91
-
92
-
93
-
94
-
95
-
96
-
97
-
98
-
99
-
100
-
101
-
102
-
103
-
104
-
105
-
106
-
107
-
108
-
109
-
110
-
111
-
112
-
113
-
114
-
115
-
116
-
117
-
118
-
119
-
120
-
121
-
122
-
123
-
124
-
125
-
126
-
127
-
128
-
129
-
130
-
131
-
132
-
133
-
134
-
135
-
136
-
137
-
138
-
139
-
140
-
141
-
142
-
143
-
144
-
145
-
146
-
147
-
148
-
149
-
150
-
151
-
152
-
153
-
154
-
155
-
156
-
157
-
158
-
159
-
160
-
161
-
162
-
163
-
164
-
165
-
166
-
167
-
168
-
169
-
170
-
171
-
172
-
173
-
174
-
175
-
176
-
177
-
178
-
179
-
180
-
181
-
182
-
183
-
184
-
185
-
186
-
187
-
188
-
189
-
190
-
191
-
192
-
193
-
194
-
195
-
196
-
197
-
198
-
199
-
200
-
201
-
202
-
203
-
204
-
205
-
206
-
207
-
208
-
209
-
210
-
211
-
212
 |
 |
