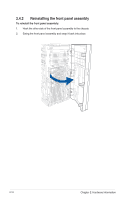
Asus TS300-E10-PS4 User Manual - Page 35
Installing the HDD module cage, Lock the cage latch properly.
 |
View all Asus TS300-E10-PS4 manuals
Add to My Manuals
Save this manual to your list of manuals |
Page 35 highlights
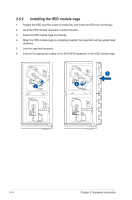
2.5.2 Installing the HDD module cage 1. Prepare the HDD tray then locate an empty bay and insert the HDD tray into the bay. 2. Level the HDD module cage latch counterclockwise. 3. Insert the HDD module cage into the bay. 4. When the HDD module cage is completely inserted, the cage latch will be pushed back clockwise. 5. Lock the cage latch properly. 6. Connect the appropriate cables to the SATA/SAS backplane on the HDD module cage. 2-14 Chapter 2: Hardware Information
-
 1
1 -
2
-
3
-
4
-
5
-
6
-
7
-
8
-
9
-
10
-
11
-
12
-
13
-
14
-
15
-
16
-
17
-
18
-
19
-
20
-
21
-
22
-
23
-
24
-
25
-
26
-
27
-
28
-
29
-
 30
30 -
 31
31 -
 32
32 -
 33
33 -
 34
34 -
 35
35 -
 36
36 -
 37
37 -
 38
38 -
 39
39 -
 40
40 -
41
-
42
-
43
-
44
-
45
-
46
-
47
-
48
-
49
-
50
-
51
-
52
-
53
-
54
-
55
-
56
-
57
-
58
-
59
-
60
-
61
-
62
-
63
-
64
-
65
-
66
-
67
-
68
-
69
-
70
-
71
-
72
-
73
-
74
-
75
-
76
-
77
-
78
-
79
-
80
-
81
-
82
-
83
-
84
-
85
-
86
-
87
-
88
-
89
-
90
-
91
-
92
-
93
-
94
-
95
-
96
-
97
-
98
-
99
-
100
-
101
-
102
-
103
-
104
-
105
-
106
-
107
-
108
-
109
-
110
-
111
-
112
-
113
-
114
-
115
-
116
-
117
-
118
-
119
-
120
-
121
-
122
-
123
-
124
-
125
-
126
-
127
-
128
-
129
-
130
-
131
-
132
-
133
-
134
-
135
-
136
-
137
-
138
-
139
-
140
-
141
-
142
-
143
-
144
-
145
-
146
-
147
-
148
-
149
-
150
-
151
-
152
-
153
-
154
-
155
-
156
-
157
-
158
-
159
-
160
-
161
-
162
-
163
 |
 |

Chapter 2: Hardware Information
2-14
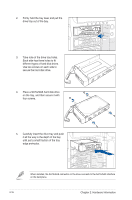
2.5.2
Installing the HDD module cage
1.
Prepare the HDD tray then locate an empty bay and insert the HDD tray into the bay.
2.
Level the HDD module cage latch counterclockwise.
3.
Insert the HDD module cage into the bay.
4.
When the HDD module cage is completely inserted, the cage latch will be pushed back
clockwise.
5.
Lock the cage latch properly.
6.
Connect the appropriate cables to the SATA/SAS backplane on the HDD module cage.