Asus TS300-E10-PS4 User Manual - Page 47
Prepare the M.2 card., place and that the screw hole on the, M.2 card matches the stand screw
 |
View all Asus TS300-E10-PS4 manuals
Add to My Manuals
Save this manual to your list of manuals |
Page 47 highlights
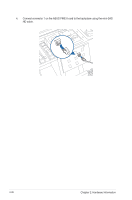
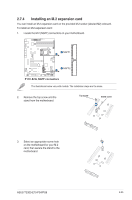
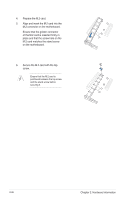
4. Prepare the M.2 card. 5. Align and insert the M.2 card into the M.2 connector on the motherboard. Ensure that the golden connector of the M.2 card is inserted firmly in place and that the screw hole on the M.2 card matches the stand screw on the motherboard. 6. Secure the M.2 card with the top screw. Ensure that the M.2 card is positioned between the top screw and the stand screw before securing it. 2-26 Chapter 2: Hardware Information
-
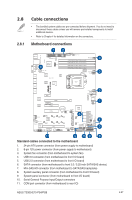
 1
1 -
2
-
3
-
4
-
5
-
6
-
7
-
8
-
9
-
10
-
11
-
12
-
13
-
14
-
15
-
16
-
17
-
18
-
19
-
20
-
21
-
22
-
23
-
24
-
25
-
26
-
27
-
28
-
29
-
30
-
31
-
32
-
33
-
34
-
35
-
36
-
37
-
38
-
39
-
40
-
41
-
 42
42 -
 43
43 -
 44
44 -
 45
45 -
 46
46 -
 47
47 -
 48
48 -
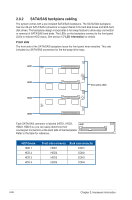 49
49 -
 50
50 -
 51
51 -
 52
52 -
53
-
54
-
55
-
56
-
57
-
58
-
59
-
60
-
61
-
62
-
63
-
64
-
65
-
66
-
67
-
68
-
69
-
70
-
71
-
72
-
73
-
74
-
75
-
76
-
77
-
78
-
79
-
80
-
81
-
82
-
83
-
84
-
85
-
86
-
87
-
88
-
89
-
90
-
91
-
92
-
93
-
94
-
95
-
96
-
97
-
98
-
99
-
100
-
101
-
102
-
103
-
104
-
105
-
106
-
107
-
108
-
109
-
110
-
111
-
112
-
113
-
114
-
115
-
116
-
117
-
118
-
119
-
120
-
121
-
122
-
123
-
124
-
125
-
126
-
127
-
128
-
129
-
130
-
131
-
132
-
133
-
134
-
135
-
136
-
137
-
138
-
139
-
140
-
141
-
142
-
143
-
144
-
145
-
146
-
147
-
148
-
149
-
150
-
151
-
152
-
153
-
154
-
155
-
156
-
157
-
158
-
159
-
160
-
161
-
162
-
163
 |
 |

Chapter 2: Hardware Information
2-26
Ensure that the M.2 card is
positioned between the top screw
and the stand screw before
securing it.
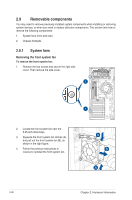
4.
Prepare the M.2 card.
5.
Align and insert the M.2 card into the
M.2 connector on the motherboard.
Ensure that the golden connector
of the M.2 card is inserted firmly in
place and that the screw hole on the
M.2 card matches the stand screw
on the motherboard.
6.
Secure the M.2 card with the top
screw.