Asus TX97-N TX97-N User Manual - Page 34
Managing and Updating Your Motherboard's BIOS
 |
View all Asus TX97-N manuals
Add to My Manuals
Save this manual to your list of manuals |
Page 34 highlights
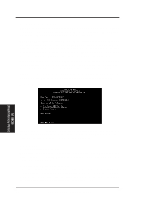
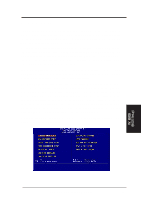
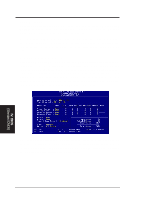
IV. BIOS SOFTWARE Managing and Updating Your Motherboard's BIOS Upon First Use of the Computer System 1. Create a bootable system floppy diskette by typing [FORMAT A:/S] from the DOS prompt without creating "AUTOEXEC.BAT" and "CONFIG.SYS" files. 2. Copy PFLASH2.EXE to your new diskette. 3. Run PFLASH2.EXE from your new diskette and select option 1 "Save Current BIOS to File." Enter the "Current BIOS Revision:" for the file name. Updating BIOS Procedures (only when necessary) 1. Download an updated ASUS BIOS file from the Internet (WWW or FTP) or a BBS (Bulletin Board Service) (see ASUS CONTACT INFORMATION on page 3 for details) and save to the disk you created earlier. 2. Boot from the disk you created earlier. 3. At the "A:\" prompt, type PFLASH2 and then press . 4. Enter 2 "Update BIOS Main Block From File" from the Main Menu or option 2 "Update BIOS Including Boot Block and ESCD" from the Advanced Features Menu if prompted by option 2 of the Main Menu. 5. The program displays a second screen prompting you for the name of the BIOS file. Type in the complete file name and extension of the new BIOS, and then press . The utility then updates the BIOS file from disk. WARNING! If you encounter problems while updating the new BIOS, DO NOT turn off your system since this might prevent your system from booting up. Just repeat the process, and if the problem still persists, update the original BIOS file you saved to disk above. If the Flash Memory Writer utility was not able to successfully update a complete BIOS file, your system may not be able to boot up. If this happens, your system will need service. 6. After successfully updating the new BIOS file, exit the Flash Memory Writer utility and then reboot. 7. Hold down to enter BIOS setup. You must select "Setup Default" to effect the new BIOS, after which you may set the other items from the Main Menu. IV. BIOS (Managing/Updating ) 34 ASUS TX97-N User's Manual
-
 1
1 -
2
-
3
-
4
-
5
-
6
-
7
-
8
-
9
-
10
-
11
-
12
-
13
-
14
-
15
-
16
-
17
-
18
-
19
-
20
-
21
-
22
-
23
-
24
-
25
-
26
-
27
-
28
-
 29
29 -
 30
30 -
 31
31 -
 32
32 -
 33
33 -
 34
34 -
 35
35 -
 36
36 -
 37
37 -
 38
38 -
 39
39 -
40
-
41
-
42
-
43
-
44
-
45
-
46
-
47
-
48
-
49
-
50
-
51
-
52
-
53
-
54
-
55
-
56
-
57
-
58
-
59
-
60
 |
 |
